Let’s talk about a very powerful library to build APIs: the Django Rest Framework, or just DRF!
With DRF it is possible to combine Python and Django in a flexible manner to develop web APIs in a very simple and fast way.
Some reasons to use DRF:
- Serialization of objects from ORM sources (databases) and non-ORM (classes).
- Extensive documentation and large community.
- It provides a navigable interface to debug its API.
- Various authentication strategies, including packages for OAuth1 and OAuth2.
- Used by large corporations such as: Heroku, EventBrite, Mozilla and Red Hat.
And it uses our dear Django as a base!
That’s why it’s interesting that you already have some knowledge of Django.
Introduction
The best way of learning a new tool is by putting your hand in the code and making a small project.
For this post I decided to join two things I really like: code and investments!
So in this post we will develop an API for consulting a type of investment: Exchange Traded Funds, or just ETFs.
Do not know what it is? So here it goes:
An exchange traded fund (ETF) is a type of security that tracks an index, sector, commodity, or other asset, but which can be purchased or sold on a stock exchange the same as a regular stock. An ETF can be structured to track anything from the price of an individual commodity to a large and diverse collection of securities. ETFs can even be structured to track specific investment strategies. (Retrieved from: Investopedia)
That said, let’s start at the beginning: let’s create the base structure and configure the DRF.
Project Configuration
First, let’s start with the name: let’s call it ETFFinder.
So let’s go to the first steps:
# Create the folder and access it
mkdir etffinder && cd etffinder

# Create virtual environment with latests installed Python version
virtualenv venv --python=/usr/bin/python3.8

# Activate virtual environment
source venv/bin/activate

# Install Django and DRF
pip install django djangorestframework
So far, we:
- Created the project folder;
- Created a virtual environment;
- Activated the virtual environment and install dependencies (Django and DRF)
To start a new project, let’s use Django’s startproject command:
django-admin startproject etffinder .
This will generate the base code needed to start a Django project.
Now, let’s create a new app to separate our API responsibilities.
Let’s call it api.
We use Django’s django-admin startapp command at the root of the project (where the manage.py file is located), like this:
python3 manage.py startapp api
Also, go ahead and create the initial database structure with:
python3 manage.py migrate
Now we have the following structure:
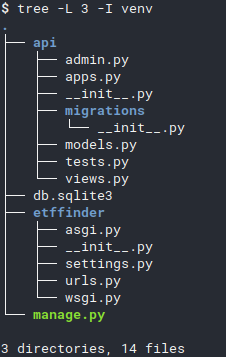
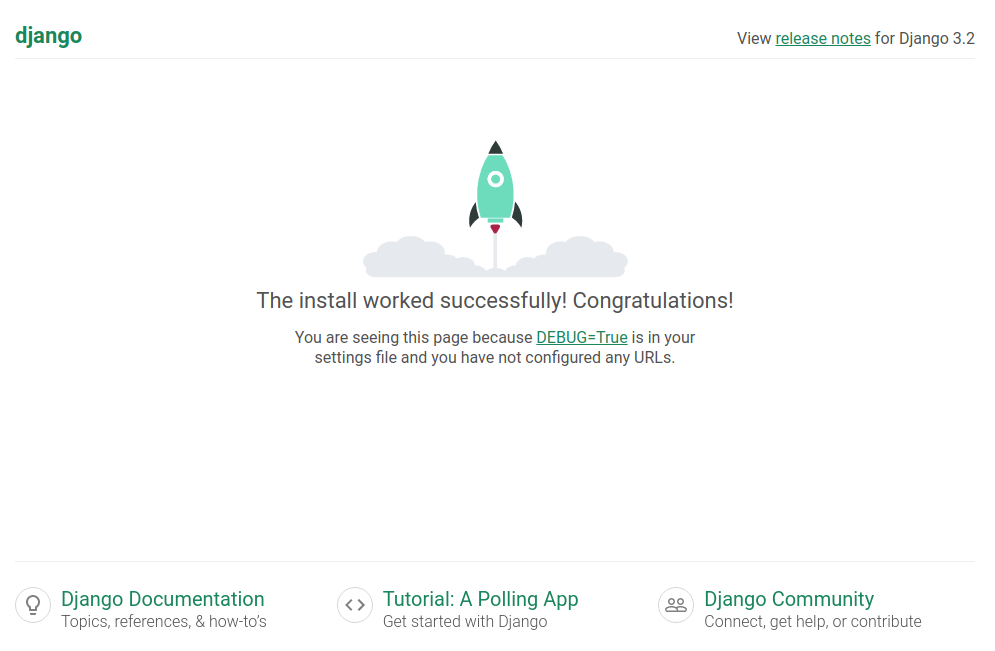
Run the local server to verify everything is correct:
python3 manage.py runserver
Access http://localhost:8000 in your browser ans you should see the following screen:
Now add a superuser with the createsuperuser command (a password will be asked):
python manage.py createsuperuser --email admin@etffinder.com --username admin
There’s only one thing left to finish our project’s initial settings: add everything to settings.py.
To do this, open the etffinder/settings.py file and add the api, etffinder and rest_framework apps (required for DRF to work) to the INSTALLED_APPS setting, like this:
INSTALLED_APPS = [
    'django.contrib.admin',
    'django.contrib.auth',
    'django.contrib.contenttypes',
    'django.contrib.sessions',
    'django.contrib.messages',
    'django.contrib.staticfiles',
    'rest_framework',
    'etffinder',
    'api'
]
Well done!
With that we have the initial structure to finally start our project!
Modeling
The process of developing applications using the Django Rest Framework generally follows the following path:
- Modeling;
- Serializers;
- ViewSets;
- Routers
Let’s start with Modeling.
Well, as we are going to make a system for searching and listing ETFs, our modeling must reflect fields that make sense.
To help with this task, I chose some parameters from this Large-Cap ETF’s Table, from ETFDB website:
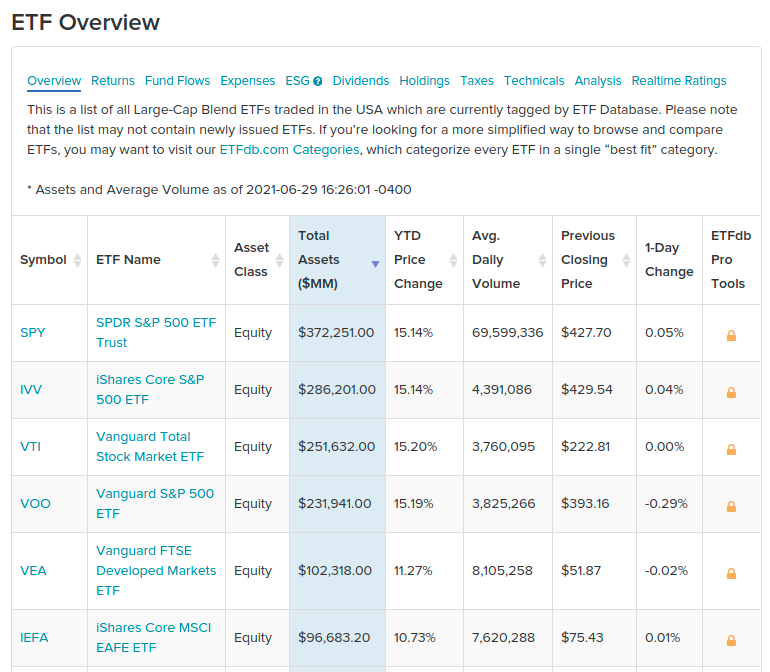
Let’s use the following attributes:
- Symbol: Fund identifier code.
- Name: ETF name
- Asset Class: ETF class.
- Total Assets: Total amount of money managed by the fund.
- YTD Price Change: Year-to-Date price change.
- Avg. Daily Volume: Average daily traded volume.
With this in hand, we can create the modeling of the ExchangeTradedFund entity.
For this, we’ll use the great Django’s own ORM (Object-Relational Mapping).
Our modeling can be implemented as follows (api/models.py):
from django.db import models
import uuid


class ExchangeTradedFund(models.Model):
  id = models.UUIDField(
    primary_key=True,
    default=uuid.uuid4,
    null=False,
    blank=True)

  symbol = models.CharField(
    max_length=8,
    null=False,
    blank=False)

  name = models.CharField(
    max_length=50,
    null=False,
    blank=False)

  asset_class = models.CharField(
    max_length=30,
    null=False,
    blank=False)

  total_assets = models.DecimalField(
    null=False,
    blank=False,
    max_digits=14,
    decimal_places=2)

  ytd_price_change = models.DecimalField(
    null=False,
    blank=False,
    max_digits=5,
    decimal_places=2)

  average_daily_volume = models.IntegerField(
    null=False,
    blank=False)
With this, we need to generate the Migrations file to update the database.
We accomplish this with Django’s makemigrations command. Run:
python3 manage.py makemigrations api
Now let’s apply the migration to the Database with the migrate command. Run:
python3 manage.py migrate
With the modeling ready, we can move to Serializer!
Serializer
DRF serializers are essential components of the framework.
They serve to translate complex entities such as querysets and class instances into simple representations that can be used in web traffic such as JSON and XML and we name this process Serialization.
Serializers also serve to do the opposite way: Deserialization. This is done by transforming simple representations (like JSON and XML) into complex representations, instantiating objects, for example.
Let’s create the file where our API’s serializers will be.
Create a file called serializers.py inside the api/ folder.
DRF provides several types of serializers that we can use, such as:
BaseSerializer: Base class for building genericSerializers.ModelSerializer: Helps the creation of model-based serializers.HyperlinkedModelSerializer: Similar toModelSerializer, however returns a link to represent the relationship between entities (ModelSerializerreturns, by default, the id of the related entity).
Let’s use the ModelSerializer to build the serializer of the entity ExchangeTradedFund.
For that, we need to declare which model that serializer will operate on and which fields it should be concerned with.
A serializer can be implemented as follows:
from rest_framework import serializers
from api.models import ExchangeTradedFund


class ExchangeTradedFundSerializer(serializers.ModelSerializer):
  class Meta:
    model = ExchangeTradedFund
    fields = [
      'id',
      'symbol',
      'name',
      'asset_class',
      'total_assets',
      'ytd_price_change',
      'average_daily_volume'
    ]
In this Serializer:
model = ExchangeTradedFunddefines which model this serializer must serialize.fieldschooses the fields to serialize.
Note: It is possible to define that all fields of the model entity should be serialized using fields = ['__all__'], however I prefer to show the fields explicitly.
With this, we conclude another step of our DRF guide!
Let’s go to the third step: creating Views.
ViewSets
A ViewSet defines which REST operations will be available and how your system will respond to API calls.
ViewSets inherit and add logic to Django’s default Views.
Their responsibilities are:
- Receive Requisition data (JSON or XML format)
- Validate the data according to the rules defined in the modeling and in the Serializer
- Deserialize the Request and instantiate objects
- Process Business related logic (this is where we implement the logic of our systems)
- Formulate a Response and respond to whoever called the API
I found a very interesting image on Reddit that shows the DRF class inheritance diagram, which helps us better understand the internal structure of the framework:
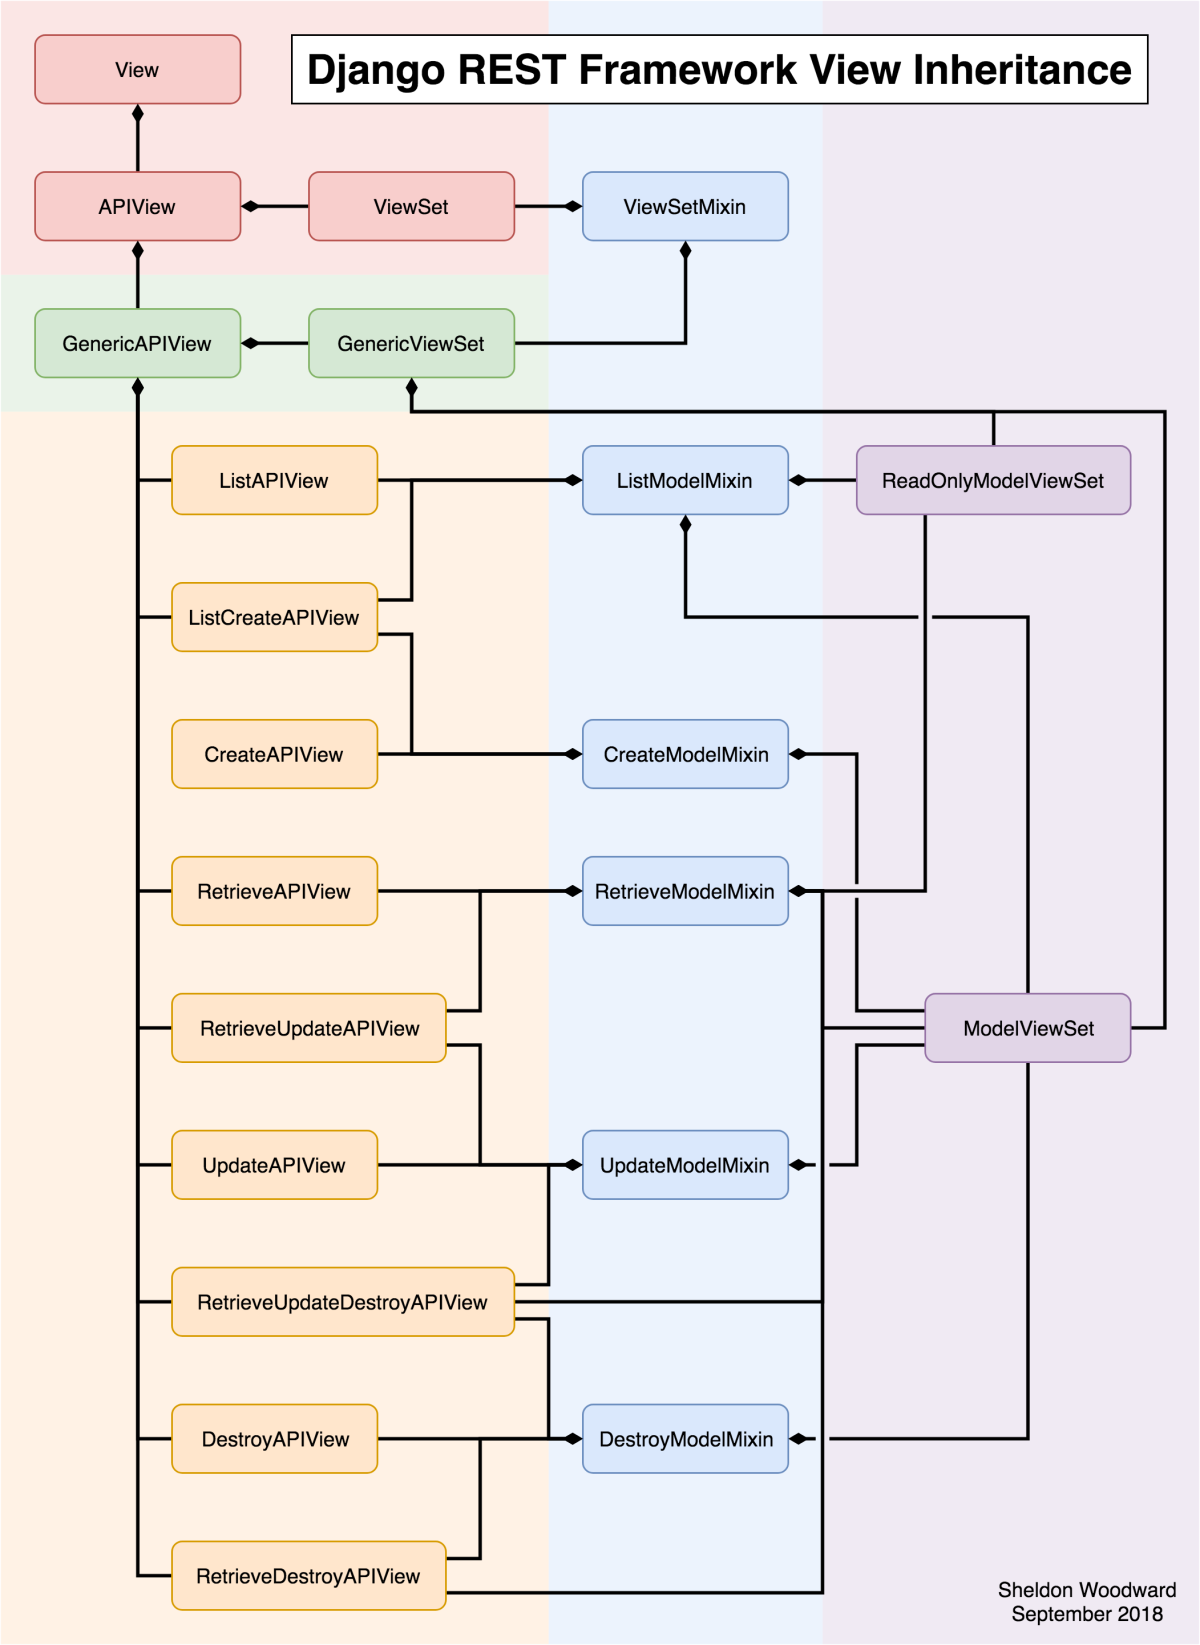
In the image:
- On the top, we have Django’s default
Viewclass. APIViewandViewSetare DRF classes that inherit fromViewand bring some specific settings to turn them into APIs, likeget()method to handleHTTP GETrequests andpost()to handleHTTP POSTrequests.- Just below, we have
GenericAPIView– which is the base class for generic views – andGenericViewSet– which is the base forViewSets(the right part in purple in the image). - In the middle, in blue, we have the
Mixins. They are the code blocks responsible for actually implementing the desired actions. - Then we have the
Viewsthat provide the features of our API, as if they were Lego blocks. They extend fromMixinsto build the desired functionality (whether listing, deleting, etc.)
For example: if you want to create an API that only provides listing of a certain Entity you could choose ListAPIView.
Now if you need to build an API that provides only create and list operations, you could use the ListCreateAPIView.
Now if you need to build an “all-in” API (ie: create, delete, update, and list), choose the ModelViewSet (notice that it extends all available Mixins).
To better understand:
Mixinslooks like the components of Subway sandwiches 🍅🍞🍗🥩Viewsare similar to Subway: you assemble your sandwich, component by component 🍞ViewSetsare like McDonalds: your sandwich is already assembled 🍔
DRF provides several types of Views and Viewsets that can be customized according to the system’s needs.
To make our life easier, let’s use the ModelViewSet!
In DRF, by convention, we implement Views/ViewSets in the views.py file inside the app in question.
This file is already created when using the django-admin startapp api command, so we don’t need to create it.
Now, see how difficult it is to create a ModelViewSet (don’t be amazed by the complexity):
from api.serializers import ExchangeTradedFundSerializer
from rest_framework import viewsets, permissions
from api.models import ExchangeTradedFund


class ExchangeTradedFundViewSet(viewsets.ModelViewSet):
  queryset = ExchangeTradedFund.objects.all()
  serializer_class = ExchangeTradedFundSerializer
  permission_classes = [permissions.IsAuthenticated]
That’s it!
You might be wondering?
Whoa, and where’s the rest?
All the code for handling Requests, serializing and deserializing objects and formulating HTTP Responses is within the classes that we inherited directly and indirectly.
In our class ExchangeTradedFundViewSet we just need to declare the following parameters:
queryset: Sets the base queryset to be used by the API. It is used in the action of listing, for example.serializer_class: Configures which Serializer should be used to consume data arriving at the API and produce data that will be sent in response.permission_classes: List containing the permissions needed to access the endpoint exposed by this ViewSet. In this case, it will only allow access to authenticated users.
With that we kill the third step: the ViewSet!
Now let’s go to the URLs configuration!
Routers
Routers help us generate URLs for our application.
As REST has well-defined patterns of structure of URLs, DRF automatically generates them for us, already in the correct pattern.
So, let’s use it!
To do that, first create the urls.py file in api/urls.py.
Now see how simple it is!
from rest_framework.routers import DefaultRouter
from api.views import ExchangeTradedFundViewSet


app_name = 'api'

router = DefaultRouter(trailing_slash=False)
router.register(r'funds', ExchangeTradedFundViewSet)

urlpatterns = router.urls
Let’s understand:
app_nameis needed to give context to generated URLs. This parameter specifies the namespace of the added URLConfs.DefaultRouteris the Router we chose for automatic URL generation. Thetrailing_slashparameter specifies that it is not necessary to use slashes/at the end of the URL.- The
registermethod takes two parameters: the first is the prefix that will be used in the URL (in our case:http://localhost:8000/funds) and the second is theViewthat will respond to the URLs with that prefix. - Lastly, we have Django’s
urlpatterns, which we use to expose this app’s URLs.
Now we need to add our api app-specific URLs to the project.
To do this, open the etffinder/urls.py file and add the following lines:
from django.contrib import admin
from django.urls import path, include

urlpatterns = [
  path('api/v1/', include('api.urls', namespace='api')),
  path('api-auth/', include('rest_framework.urls', namespace='rest_framework')),
  path('admin/', admin.site.urls),
]
Note: As a good practice, always use the prefix api/v1/ to maintain compatibility in case you need to evolve your api to V2 (api/v2/)!
Using just these lines of code, look at the bunch of endpoints that DRF automatically generated for our API:
| URL | HTTP Method | Action |
|---|---|---|
/api/v1 | GET | API’s root path |
/api/v1/backgrounds | GET | Listing of all elements |
/api/v1/backgrounds | POST | Creation of new element |
/api/v1/backgrounds/{lookup} | GET | Retrieve element by ID |
/api/v1/backgrounds/{lookup} | PUT | Element Update by ID |
/api/v1/backgrounds/{lookup} | PATCH | Partial update by ID (partial update) |
/api/v1/backgrounds/{lookup} | DELETE | Element deletion by ID |
Here, {lookup} is the parameter used by DRF to uniquely identify an element.
Let’s assume that a Fund has id=ef249e21-43cf-47e4-9aac-0ed26af2d0ce.
We can delete it by sending an HTTP DELETE request to the URL:
http://localhost:8000/api/v1/funds/ef249e21-43cf-47e4-9aac-0ed26af2d0ce
Or we can create a new Fund by sending a POST request to the URL http://localhost:8000/api/v1/funds and the field values in the request body, like this:
{
  "symbol": "SPY",
  "name": "SPDR S&P 500 ETF Trust",
  "asset_class": "Equity",
  "total_assets": "372251000000.00",
  "ytd_price_change": "15.14",
  "average_daily_volume": "69599336"
}
This way, our API would return a HTTP 201 Created code, meaning that an object was created and the response would be:
{
  "id": "a4139c66-cf29-41b4-b73e-c7d203587df9",
  "symbol": "SPY",
  "name": "SPDR S&P 500 ETF Trust",
  "asset_class": "Equity",
  "total_assets": "372251000000.00",
  "ytd_price_change": "15.14",
  "average_daily_volume": "69599336"
}
We can test our URL in different ways: through Python code, through a Frontend (Angular, React, Vue.js) or through Postman, for example.
And how can I see this all running?
So let’s go to the next section!
Browsable interface
One of the most impressive features of DRF is its Browsable Interface.
With it, we can test our API and check its values in a very simple and visual way.
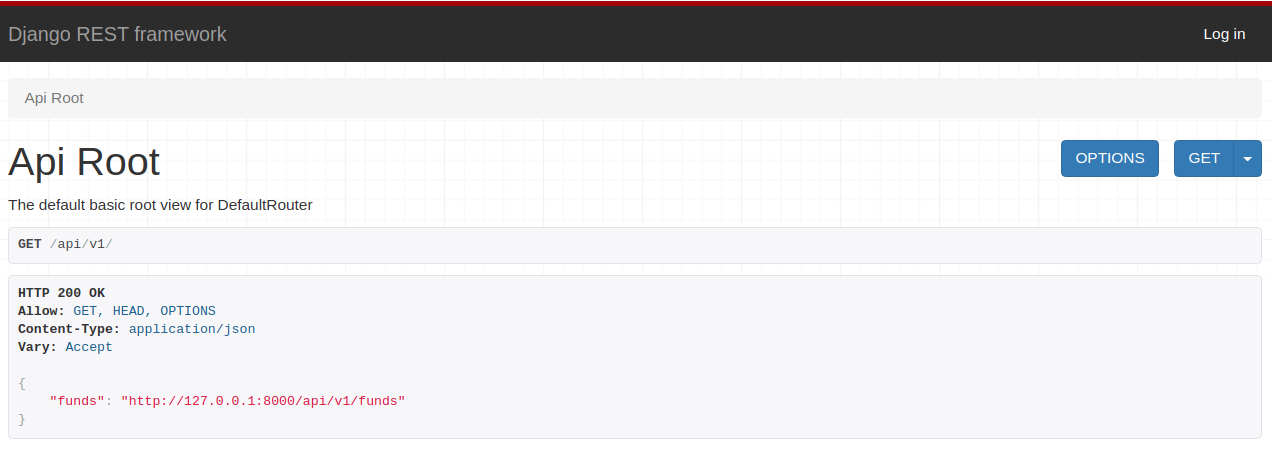
To access it, navigate in your browser to: http://localhost:8000/api/v1.
You should see the following:
Go there and click on http://127.0.0.1:8000/api/v1/funds!
The following message must have appeared:
{
  "detail": "Authentication credentials were not provided."
}
Remember the permission_classes setting we used to configure our ExchangeTradedFundViewSet?
It defined that only authenticated users (permissions.isAuthenticated) can interact with the API.
Click on the upper right corner, on “Log in” and use the credentials registered in the createsuperuser command, which we executed at the beginning of the post.
Now, look how this is useful! You should be seeing:
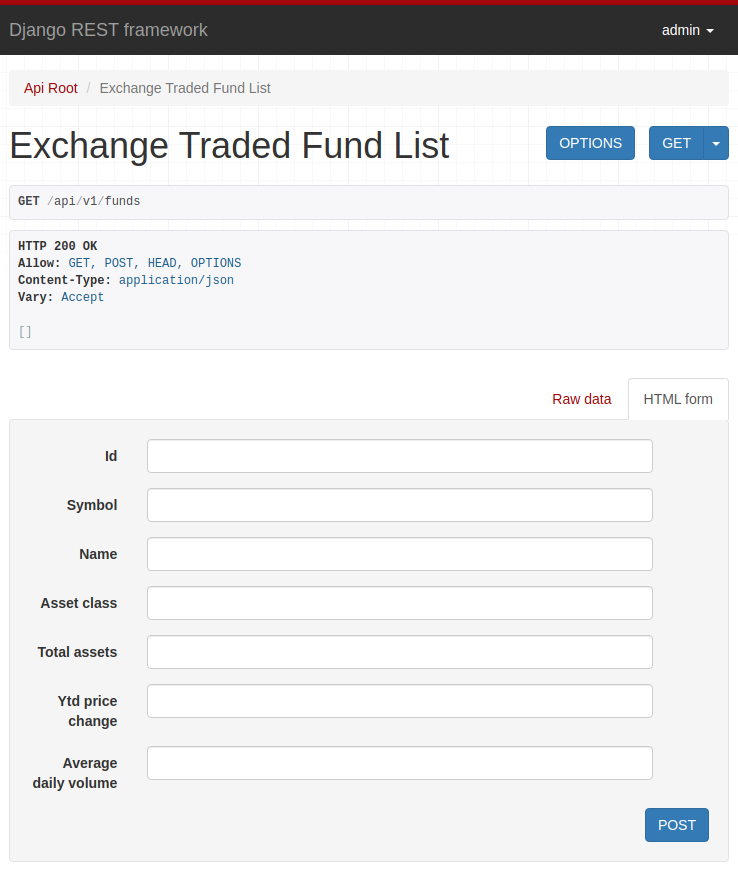
Play a little, add data and explore the interface.
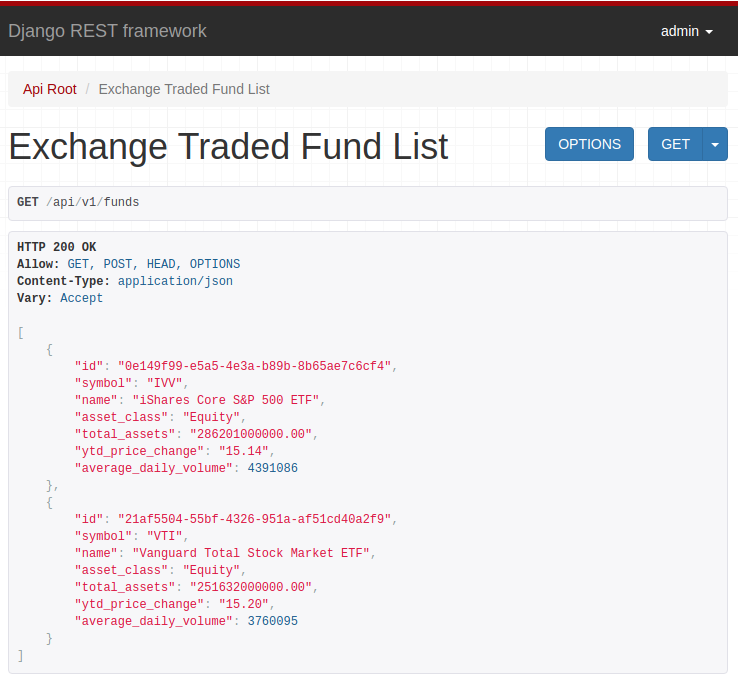
When adding data and updating the page, an HTTP GET API request is triggered, returning the data you just registered:
Specific Settings
It is possible to configure various aspects of DRF through some specific settings.
We do this by adding and configuring the REST_FRAMEWORK to the settings.py settings file.
For example, if we want to add pagination to our API, we can simply do this:
REST_FRAMEWORK = {
  'DEFAULT_PAGINATION_CLASS': 'rest_framework.pagination.PageNumberPagination',
  'PAGE_SIZE': 10
}
Now the result of a call, for example, to http://127.0.0.1:8000/api/v1/funds goes from:
[
    {
        "id": "0e149f99-e5a5-4e3a-b89b-8b65ae7c6cf4",
        "symbol": "IVV",
        "name": "iShares Core S&P 500 ETF",
        "asset_class": "Equity",
        "total_assets": "286201000000.00",
        "ytd_price_change": "15.14",
        "average_daily_volume": 4391086
    },
    {
        "id": "21af5504-55bf-4326-951a-af51cd40a2f9",
        "symbol": "VTI",
        "name": "Vanguard Total Stock Market ETF",
        "asset_class": "Equity",
        "total_assets": "251632000000.00",
        "ytd_price_change": "15.20",
        "average_daily_volume": 3760095
    }
]
To:
{
    "count": 2,
    "next": null,
    "previous": null,
    "results": [
        {
            "id": "0e149f99-e5a5-4e3a-b89b-8b65ae7c6cf4",
            "symbol": "IVV",
            "name": "iShares Core S&P 500 ETF",
            "asset_class": "Equity",
            "total_assets": "286201000000.00",
            "ytd_price_change": "15.14",
            "average_daily_volume": 4391086
        },
        {
            "id": "21af5504-55bf-4326-951a-af51cd40a2f9",
            "symbol": "VTI",
            "name": "Vanguard Total Stock Market ETF",
            "asset_class": "Equity",
            "total_assets": "251632000000.00",
            "ytd_price_change": "15.20",
            "average_daily_volume": 3760095
        }
    ]
}
Fields were added to help pagination:
count: The amount of returned results;next: The next page;previous: The previous page;results: The current result page.
There are several other very useful settings!
Here are some:
👉 DEFAULT_AUTHENTICATION_CLASSES is used to configure the API authentication method:
REST_FRAMEWORK = {
  ...
  DEFAULT_AUTHENTICATION_CLASSES: [
    'rest_framework.authentication.SessionAuthentication',
    'rest_framework.authentication.BasicAuthentication'
  ]
  ...
}
👉 DEFAULT_PERMISSION_CLASSES is used to set permissions needed to access the API (globally).
REST_FRAMEWORK = {
  ...
  DEFAULT_PERMISSION_CLASSES: ['rest_framework.permissions.AllowAny']
  ...
}
Note: It is also possible to define this configuration per View, using the attribute permissions_classes (which we use in our ExchangeTradedFundViewSet).
👉 DATE_INPUT_FORMATS is used to set date formats accepted by the API:
REST_FRAMEWORK = {
  ...
  'DATE_INPUT_FORMATS': ['%d/%m/%Y', '%Y-%m-%d', '%d-%m-%y', '%d-%m-%Y']
  ...
}
The above configuration will make the API allow the following date formats ’10/25/2006′, ‘2006-10-25′, ’25-10-2006’ for example.
See more settings accessing here the Documentation.