How to Trade Crypto in Your Sleep With Python

The defi revolution is in full swing if you know where to look. Serious efforts to build out and improve the underlying infrastructure for smart contracts as well as applications, art, and financial systems are popping up almost every week it seems. They use their own native tokens to power their networks, games, communities, transactions, NFTs and things that haven’t been thought up yet. As more decentralizated autonomous organizations (DAOs) track their assets, voting rights, and ownership stakes on-chain the market capitalization of tokens will only increase.

Avalanche is one new token of many that is an example of how new tokens can garner substantial support and funding if the community deems the project worthy.

There are as many potential uses for crypto tokens as there are for fiat money, except tokens in a sense “belong” to these projects and shared endeavours. If enough hype is built up, masses of people may speculate to the tune of hundreds of billions of dollars that the value of the tokens will increase. While many may consider their token purchases to be long-term investments in reputable projects with real utility, sometimes coming with rights or dividend payments, I believe a vast majority of people are looking to strike it rich quick. And some certainly have. The idea that you can get in early on the right coin and buy at a low price, and then sell it to someone not as savvy later on for way more money is a tempting one. Who doesn’t want to make money without doing any real work? I sure do.

Quickstart

If you want to skip all of the explanations and look at code you can run, you can download the JupyerLab Notebook that contains all of the code for creating and optimizing a strategy.

Now for some background.

Trading and Volatility

These tokens trade on hundreds of exchanges around the world from publicly-held and highly regulated Coinbase to fly-by-night shops registered in places like the Seychelles and Cayman. Traders buy and sell the tokens themselves as well as futures and leveraged tokens to bet on price movement up and down, lending tokens for other speculators to make leveraged bets, and sometimes actively coordinating pump and dump campaigns on disreputable discords. Prices swing wildly for everything from the most established and institutionally supported Bitcoin to my own MishCoin. This volatility is an opportunity to make money.

With enough patience anyone can try to grab some of these many billions of dollars flowing through the system by buying low and selling higher. You can do it on the timeframe of seconds or years, depending on your style. While many of the more mainstream coins have a definite upwards trend, all of them vacillate in price on some time scale. If you want to try your hand at this game what you need to do is define your strategy: decide what price movement conditions should trigger a buy or a sell.

Since it’s impossible to predict exactly how any coin will move in price in the future this is of course based on luck. It’s gambling. But you do have full control over your strategy and some people do quite well for themselves, making gobs of money betting on some of the stupidest things you can imagine. Some may spend months researching companies behind a new platform, digging into the qualifications of everyone on the team, the problems they’re trying to solve, the expected return, the competitive landscape, technical pitfalls and the track record of the founders. Others invest their life savings into an altcoin based on chatting to a pilled memelord at a party.

Automating Trading

Anyone can open an account at an exchange and start clicking Buy and Sell. If you have the time to watch the market carefully and look for opportunities this can potentially make some money, but it can demand a great deal of attention. And you have to sleep sometime. Of course we can write a program to perform this simple task for us, as long as we define the necessary parameters.

I decided to build myself a crypto trading bot using python and share what I learned. It was not so much a project for making real money (right now I’m up about $4 if I consider my time worth nothing) as a learning experience to tech myself more about automated trading and scientific python libraries and tools. Let’s get into it.

To create a bot to trade crypto for yourself you need to do the following steps:

  1. Get an API key for a crypto exchange you want to trade on
  2. Define, in code, the trading strategy you wish to use and its parameters
  3. Test your strategy on historical data to see if it would have hypothetically made money had your bot been actively trading during that time (called “backtesting”)
  4. Set your bot loose with some real money to trade

Let’s look at how to implement these steps.

Interfacing With an Exchange

To connect your bot to an exchange to read crypto prices, both historical and real-time, you will need an API key for the exchange you’ve selected.

Image

Fortunately you don’t need to use a specialized library for your exchange because there is a terrific project called CCXT (Crypto Currency eXchange Trading library) which provides an abstraction layer to most exchanges (111 at the the time of this writing) in multiple programming languages.

It means our bot can use a standard interface to buy and sell and fetch the price ticker data (this is called “OHLCV” in the jargon – open/high/low/close/volume data) in an exchange-agnostic way.

Now, the even better news it that we don’t really even have to use CCXT directly and can use a further abstraction layer to perform most of the grunt work of trading for us. There are a few such trading frameworks out there, I chose to build my bot using one called PyJuque but feel free to try others and let me know if you like them. What this framework does for you is provide the nuts and bolts of keeping track of open orders, buying and selling when certain triggers are met. It also provides backtesting and test-mode features so you can test out your strategy without using real money. You still need to connect to your exchange though in order to fetch the OHLCV data.

Configuring the Trading Engine

PyJuque contains a number of configuration parameters:

  • Exchange API key
  • Symbols to trade (e.g. BTC/USD, ETH/BTC, etc)
  • Timescale (I use 15 seconds with my exchange)
  • How much money to start with (in terms of the quote, so if you’re trading BTC/USD then this value will be in USD)
  • What fraction of the starting balance to commit in each trade
  • How far below the current price to place a buy order when a “buy” signal is triggered by your strategy
  • How much you want the price to go up before selling (aka “take profit” aka “when to sell”)
  • When to sell your position if the price drops (“stop loss”)
  • What strategy to use to determine when buy signals get triggered

Selecting a Strategy

Here we also have good news for the lazy programmers such as myself: there is a venerable library called ta-lib that contains implementations of 200 different technical analysis routines. It’s a C library so you will need to install it (macOS: brew install ta-lib). There is a python wrapper called pandas-ta.

Pandas TA

All you have to do is pick a strategy that you wish to use and input parameters for it. For my simple strategy I used the classic “bollinger bands” in conjunction with a relative strength index (RSI). You can pick and choose your strategies or implement your own as you see fit, but ta-lib gives us a very easy starting point. A future project could be to automate trying all 200 strategies available in ta-lib to see which work best.

Tuning Strategy Parameters

The final step before letting your bot loose is to configure the bot and strategy parameters. For the bollinger bands/RSI strategy we need to provide at least the slow and fast moving average windows. For the general bot parameters noted above we need to decide the optimal buy signal distance, stop loss price, and take profit percentage. What numbers do you plug in? What work best for the coin you want to trade?

scikit-optimize: sequential model-based optimization in Python — scikit- optimize 0.8.1 documentation

Again we can make our computer do all the work of figuring this out for us with the aid of an optimizer. An optimizer lets us find the optimum inputs for a given fitness function, testing different inputs in multiple dimensions in an intelligent fashion. For this we can use scikit-optimize.

To use the optimizer we need to provide two things:

  1. The domain of the inputs, which will be reasonable ranges of values for the aforementioned parameters.
  2. A function which returns a “loss” value between 0 and 1. The lower the value the more optimal the solution.
from skopt.space import Real, Integer
from skopt.utils import use_named_args
# here we define the input ranges for our strategy
fast_ma_len = Integer(name='fast_ma_len', low=1.0, high=12.0)
slow_ma_len = Integer(name='slow_ma_len', low=12.0, high=40.0)
# number between 0 and 100 - 1% means that when we get a buy signal, 
# we place buy order 1% below current price. if 0, we place a market 
# order immediately upon receiving signal
signal_distance = Real(name='signal_distance', low=0.0, high=1.5)
# take profit value between 0 and infinity, 3% means we place our sell 
# orders 3% above the prices that our buy orders filled at
take_profit = Real(name='take_profit', low=0.01, high=0.9)
# if our value dips by this much then sell so we don't lose everything
stop_loss_value = Real(name='stop_loss_value', low=0.01, high=4.0)
dimensions = [fast_ma_len, slow_ma_len, signal_distance, take_profit, stop_loss_value]
def calc_strat_loss(backtest_res) -> float:
    """Given backtest results, calculate loss.
    
    Loss is a measure of how badly we're doing.
    """
    score = 0
    
    for symbol, symbol_res in backtest_res.items():
        symbol_bt_res = symbol_res['results']
        profit_realised = symbol_bt_res['profit_realised']
        profit_after_fees = symbol_bt_res['profit_after_fees']
        winrate = symbol_bt_res['winrate']
        if profit_after_fees <= 0:
            # failed to make any money.
            # bad.
            return 1
        # how well we're doing (positive)
        # money made * how many of our trades made money
        score += profit_after_fees * winrate
        
    if score <= 0:
        # not doing so good
        return 1
    # return loss; lower number is better
    return math.pow(0.99, score)  # clamp 1-0 
@use_named_args(dimensions=dimensions)
def objective(**params):
    """This is our fitness function.
    
    It takes a set of parameters and returns the "loss" - an objective single scalar to minimize.
    """
    # take optimizer input and construct bot with config - see notebook
    bot_config = params_to_bot_config(params)
    backtest_res = backtest(bot_config)
    return calc_strat_loss(backtest_res)

Once you have your inputs and objective function you can run the optimizer in a number of ways. The more iterations it runs for, the better an answer you will get. Unfortunately in my limited experiments it appears to take longer to decide on what inputs to pick next with each iteration, so there may be something wrong with my implementation or diminishing returns with the optimizer.

Asking for new points to test gets slower as time goes on. I don’t understand why and it would be nice to fix this.

The package contains various strategies for selecting points to test, depending on how expensive your function should be. If the optimizer is doing a good job exploring the input space you should hopefully see loss trending downwards over time. This represents more profitable strategies being found as time goes on.

After you’ve run the optimizer for some time you can visualize the search space. A very useful visualization is to take a pair of parameters to see in two dimensions the best values, looking for ranges of values which are worth exploring more or obviously devoid of profitable inputs. You can use this information to adjust the ranges on the input domains.

The green/yellow islands represent local maxima and the red dot is the global maximum. The blue/purple islands are local minima.

You can also visualize all combinations of pairs of inputs and their resulting loss at different points:

Note that the integer inputs 
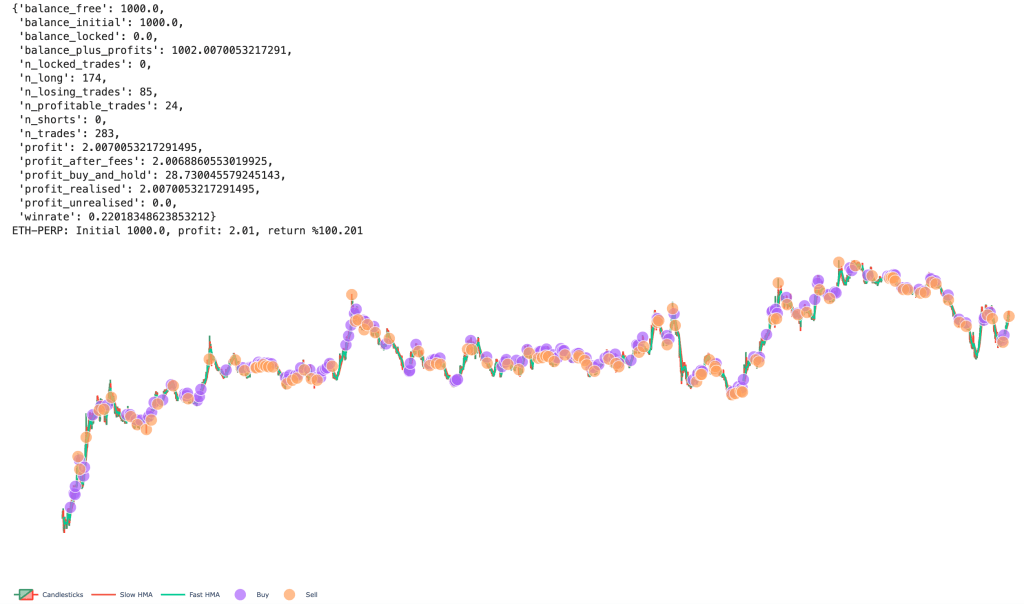
slow_ma_len and fast_ma_len have distinct steps in their inputs vs. the more “messy” real number inputs.

After running the optimizer for a few hundred or thousand iterations it spits out the best inputs. You can then visualize the buying and selling the bot performed during backtesting. This is a good time to sanity-check the strategy and see if it appears to be buying low and selling high.

Run the Bot

Armed with the parameters the optimizer gave us we can now run our bot. You can see a full script example here. Set SIMULATION = False to begin trading real coinz.

Trades placed by the bot.

All of the code to run a functioning bot and a JupyterLab Notebook to perform backtesting and optimization can be found in my GitHub repo.

I want to emphasize that this system does not comprise any meaningfully intelligent way to automatically trade crypto. It’s basically my attempt at a trader “hello world” type of application. A good first step but nothing more than the absolute basic minimum. There is vast room for improvement, things like creating one model for volatility data and another for price spikes, trying to overcome overfitting, hyperparameter optimization, and lots more. Also be aware you will need a service such as CoinTracker to keep track of your trades so you can report them on your taxes.

Multipart-Encoded and Python Requests

It’s easy to find on the web many examples of how to send multipart-encoded data like images/files using python requests. Even in request’s documentation there’s a section only for that. But I struggled a couple days ago about the Content-type header.

The recommended header for multipart-encoded files/images is multipart/form-data and requests already set it for us automatically, using the parameter “files”. Here’s an example taken from requests documentation:

>>> url = 'https://httpbin.org/post'
>>> files = {'file': open('report.xls', 'rb')}

>>> r = requests.post(url, files=files)
>>> r.text
{
  ...
  "files": {
    "file": "<censored...binary...data>"
  },
  ...
}

As you can see, you don’t even need to set the header. Moving on, we often need custom headers, like x-api-key or something else. So, we’d have:

>>> headers = {'x-auth-api-key': <SOME_TOKEN>, 'Content-type': 'multipart/form-data'}
>>> url = 'https://httpbin.org/post'
>>> files = {'file': open('report.xls', 'rb')}

>>> r = requests.post(url, files=files, headers=headers)
>>> r.text
{
  ...
  "files": {
    "file": "<censored...binary...data>"
  },
  ...
}

Right? Unfortunately, not. Most likely that you will receive an error like below:

ValueError: Invalid boundary in multipart form: b'' 

or

{'detail': 'Multipart form parse error - Invalid boundary in multipart: None'}

Or even from a simple Nodejs server, because it’s not a matter of language or framework. In the case of the NodeJs server, you will get an undefined in request.files because is not set.

So, what’s the catch?

The catch here is even when we need custom headers, we don’t need to set the 'Content-type': 'multipart/form-data', because otherwise requests won’t do its magic for us setting the boundary field.

For multipart entities the boundary directive is required, which consists of 1 to 70 characters from a set of characters known to be very robust through email gateways, and not ending with white space. It is used to encapsulate the boundaries of the multiple parts of the message. Often, the header boundary is prepended with two dashes and the final boundary has two dashes appended at the end. (source)

Here’s an example of a request containing multipart/form-data:

Example of a request containing multipart/form-data

So, there it is. When using requests to POST file and/or images, use the files param and “forget” the Content-type, because the library will handle it for you.

Nice, huh? 😄
Not when I was suffering. 😒

Building a REST API with Django REST Framework

Let’s talk about a very powerful library to build APIs: the Django Rest Framework, or just DRF!

DRF logo

With DRF it is possible to combine Python and Django in a flexible manner to develop web APIs in a very simple and fast way.

Some reasons to use DRF:

  • Serialization of objects from ORM sources (databases) and non-ORM (classes).
  • Extensive documentation and large community.
  • It provides a navigable interface to debug its API.
  • Various authentication strategies, including packages for OAuth1 and OAuth2.
  • Used by large corporations such as: Heroku, EventBrite, Mozilla and Red Hat.

And it uses our dear Django as a base!

That’s why it’s interesting that you already have some knowledge of Django.

Introduction

The best way of learning a new tool is by putting your hand in the code and making a small project.

For this post I decided to join two things I really like: code and investments!

So in this post we will develop an API for consulting a type of investment: Exchange Traded Funds, or just ETFs.

Do not know what it is? So here it goes:

An exchange traded fund (ETF) is a type of security that tracks an index, sector, commodity, or other asset, but which can be purchased or sold on a stock exchange the same as a regular stock. An ETF can be structured to track anything from the price of an individual commodity to a large and diverse collection of securities. ETFs can even be structured to track specific investment strategies. (Retrieved from: Investopedia)

That said, let’s start at the beginning: let’s create the base structure and configure the DRF.

Project Configuration

First, let’s start with the name: let’s call it ETFFinder.

So let’s go to the first steps:

# Create the folder and access it
mkdir etffinder && cd etffinder

# Create virtual environment with latests installed Python version
virtualenv venv --python=/usr/bin/python3.8

# Activate virtual environment
source venv/bin/activate

# Install Django and DRF
pip install django djangorestframework

So far, we:

  • Created the project folder;
  • Created a virtual environment;
  • Activated the virtual environment and install dependencies (Django and DRF)

To start a new project, let’s use Django’s startproject command:

django-admin startproject etffinder .

This will generate the base code needed to start a Django project.

Now, let’s create a new app to separate our API responsibilities.

Let’s call it api.

We use Django’s django-admin startapp command at the root of the project (where the manage.py file is located), like this:

python3 manage.py startapp api

Also, go ahead and create the initial database structure with:

python3 manage.py migrate

Now we have the following structure:

File structure
File structure

Run the local server to verify everything is correct:

python3 manage.py runserver

Access http://localhost:8000 in your browser ans you should see the following screen:

Default webpage
Django’s default webpage

Now add a superuser with the createsuperuser command (a password will be asked):

python manage.py createsuperuser --email admin@etffinder.com --username admin

There’s only one thing left to finish our project’s initial settings: add everything to settings.py.

To do this, open the etffinder/settings.py file and add the api, etffinder and rest_framework apps (required for DRF to work) to the INSTALLED_APPS setting, like this:

INSTALLED_APPS = [
    'django.contrib.admin',
    'django.contrib.auth',
    'django.contrib.contenttypes',
    'django.contrib.sessions',
    'django.contrib.messages',
    'django.contrib.staticfiles',
    'rest_framework',
    'etffinder',
    'api'
]

Well done!

With that we have the initial structure to finally start our project!

Modeling

The process of developing applications using the Django Rest Framework generally follows the following path:

  1. Modeling;
  2. Serializers;
  3. ViewSets;
  4. Routers

Let’s start with Modeling.

Well, as we are going to make a system for searching and listing ETFs, our modeling must reflect fields that make sense.

To help with this task, I chose some parameters from this Large-Cap ETF’s Table, from ETFDB website:

ETFDB table
ETFDB ETF table

Let’s use the following attributes:

  • Symbol: Fund identifier code.
  • Name: ETF name
  • Asset Class: ETF class.
  • Total Assets: Total amount of money managed by the fund.
  • YTD Price Change: Year-to-Date price change.
  • Avg. Daily Volume: Average daily traded volume.

With this in hand, we can create the modeling of the ExchangeTradedFund entity.

For this, we’ll use the great Django’s own ORM (Object-Relational Mapping).

Our modeling can be implemented as follows (api/models.py):

from django.db import models
import uuid


class ExchangeTradedFund(models.Model):
  id = models.UUIDField(
    primary_key=True,
    default=uuid.uuid4,
    null=False,
    blank=True)

  symbol = models.CharField(
    max_length=8,
    null=False,
    blank=False)

  name = models.CharField(
    max_length=50,
    null=False,
    blank=False)

  asset_class = models.CharField(
    max_length=30,
    null=False,
    blank=False)

  total_assets = models.DecimalField(
    null=False,
    blank=False,
    max_digits=14,
    decimal_places=2)

  ytd_price_change = models.DecimalField(
    null=False,
    blank=False,
    max_digits=5,
    decimal_places=2)

  average_daily_volume = models.IntegerField(
    null=False,
    blank=False)

With this, we need to generate the Migrations file to update the database.

We accomplish this with Django’s makemigrations command. Run:

python3 manage.py makemigrations api

Now let’s apply the migration to the Database with the migrate command. Run:

python3 manage.py migrate

With the modeling ready, we can move to Serializer!

Serializer

DRF serializers are essential components of the framework.

They serve to translate complex entities such as querysets and class instances into simple representations that can be used in web traffic such as JSON and XML and we name this process Serialization.

Serializers also serve to do the opposite way: Deserialization. This is done by transforming simple representations (like JSON and XML) into complex representations, instantiating objects, for example.

Let’s create the file where our API’s serializers will be.

Create a file called serializers.py inside the api/ folder.

DRF provides several types of serializers that we can use, such as:

  • BaseSerializer: Base class for building generic Serializers.
  • ModelSerializer: Helps the creation of model-based serializers.
  • HyperlinkedModelSerializer: Similar to ModelSerializer, however returns a link to represent the relationship between entities (ModelSerializer returns, by default, the id of the related entity).

Let’s use the ModelSerializer to build the serializer of the entity ExchangeTradedFund.

For that, we need to declare which model that serializer will operate on and which fields it should be concerned with.

A serializer can be implemented as follows:

from rest_framework import serializers
from api.models import ExchangeTradedFund


class ExchangeTradedFundSerializer(serializers.ModelSerializer):
  class Meta:
    model = ExchangeTradedFund
    fields = [
      'id',
      'symbol',
      'name',
      'asset_class',
      'total_assets',
      'ytd_price_change',
      'average_daily_volume'
    ]  

In this Serializer:

  • model = ExchangeTradedFund defines which model this serializer must serialize.
  • fields chooses the fields to serialize.

Note: It is possible to define that all fields of the model entity should be serialized using fields = ['__all__'], however I prefer to show the fields explicitly.

With this, we conclude another step of our DRF guide!

Let’s go to the third step: creating Views.

ViewSets

A ViewSet defines which REST operations will be available and how your system will respond to API calls.

ViewSets inherit and add logic to Django’s default Views.

Their responsibilities are:

  • Receive Requisition data (JSON or XML format)
  • Validate the data according to the rules defined in the modeling and in the Serializer
  • Deserialize the Request and instantiate objects
  • Process Business related logic (this is where we implement the logic of our systems)
  • Formulate a Response and respond to whoever called the API

I found a very interesting image on Reddit that shows the DRF class inheritance diagram, which helps us better understand the internal structure of the framework:

Django class inheritance diagram
DRF class inheritance diagram

In the image:

  • On the top, we have Django’s default View class.
  • APIView and ViewSet are DRF classes that inherit from View and bring some specific settings to turn them into APIs, like get() method to handle HTTP GET requests and post() to handle HTTP POST requests.
  • Just below, we have GenericAPIView – which is the base class for generic views – and GenericViewSet – which is the base for ViewSets (the right part in purple in the image).
  • In the middle, in blue, we have the Mixins. They are the code blocks responsible for actually implementing the desired actions.
  • Then we have the Views that provide the features of our API, as if they were Lego blocks. They extend from Mixins to build the desired functionality (whether listing, deleting, etc.)

For example: if you want to create an API that only provides listing of a certain Entity you could choose ListAPIView.

Now if you need to build an API that provides only create and list operations, you could use the ListCreateAPIView.

Now if you need to build an “all-in” API (ie: create, delete, update, and list), choose the ModelViewSet (notice that it extends all available Mixins).

To better understand:

  • Mixins looks like the components of Subway sandwiches 🍅🍞🍗🥩
  • Views are similar to Subway: you assemble your sandwich, component by component 🍞
  • ViewSets are like McDonalds: your sandwich is already assembled 🍔

DRF provides several types of Views and Viewsets that can be customized according to the system’s needs.

To make our life easier, let’s use the ModelViewSet!

In DRF, by convention, we implement Views/ViewSets in the views.py file inside the app in question.

This file is already created when using the django-admin startapp api command, so we don’t need to create it.

Now, see how difficult it is to create a ModelViewSet (don’t be amazed by the complexity):

from api.serializers import ExchangeTradedFundSerializer
from rest_framework import viewsets, permissions
from api.models import ExchangeTradedFund


class ExchangeTradedFundViewSet(viewsets.ModelViewSet):
  queryset = ExchangeTradedFund.objects.all()
  serializer_class = ExchangeTradedFundSerializer
  permission_classes = [permissions.IsAuthenticated]

That’s it!

You might be wondering?

Whoa, and where’s the rest?

All the code for handling Requests, serializing and deserializing objects and formulating HTTP Responses is within the classes that we inherited directly and indirectly.

In our class ExchangeTradedFundViewSet we just need to declare the following parameters:

  • queryset: Sets the base queryset to be used by the API. It is used in the action of listing, for example.
  • serializer_class: Configures which Serializer should be used to consume data arriving at the API and produce data that will be sent in response.
  • permission_classes: List containing the permissions needed to access the endpoint exposed by this ViewSet. In this case, it will only allow access to authenticated users.

With that we kill the third step: the ViewSet!

Now let’s go to the URLs configuration!

Routers

Routers help us generate URLs for our application.

As REST has well-defined patterns of structure of URLs, DRF automatically generates them for us, already in the correct pattern.

So, let’s use it!

To do that, first create the urls.py file in api/urls.py.

Now see how simple it is!

from rest_framework.routers import DefaultRouter
from api.views import ExchangeTradedFundViewSet


app_name = 'api'

router = DefaultRouter(trailing_slash=False)
router.register(r'funds', ExchangeTradedFundViewSet)

urlpatterns = router.urls

Let’s understand:

  • app_name is needed to give context to generated URLs. This parameter specifies the namespace of the added URLConfs.
  • DefaultRouter is the Router we chose for automatic URL generation. The trailing_slash parameter specifies that it is not necessary to use slashes / at the end of the URL.
  • The register method takes two parameters: the first is the prefix that will be used in the URL (in our case: http://localhost:8000/funds) and the second is the View that will respond to the URLs with that prefix.
  • Lastly, we have Django’s urlpatterns, which we use to expose this app’s URLs.

Now we need to add our api app-specific URLs to the project.

To do this, open the etffinder/urls.py file and add the following lines:

from django.contrib import admin
from django.urls import path, include

urlpatterns = [
  path('api/v1/', include('api.urls', namespace='api')),
  path('api-auth/', include('rest_framework.urls', namespace='rest_framework')),
  path('admin/', admin.site.urls),
]

Note: As a good practice, always use the prefix api/v1/ to maintain compatibility in case you need to evolve your api to V2 (api/v2/)!

Using just these lines of code, look at the bunch of endpoints that DRF automatically generated for our API:

URLHTTP MethodAction
/api/v1GETAPI’s root path
/api/v1/backgroundsGETListing of all elements
/api/v1/backgroundsPOSTCreation of new element
/api/v1/backgrounds/{lookup}GETRetrieve element by ID
/api/v1/backgrounds/{lookup}PUTElement Update by ID
/api/v1/backgrounds/{lookup}PATCHPartial update by ID (partial update)
/api/v1/backgrounds/{lookup}DELETEElement deletion by ID
Automatically generated routes.

Here, {lookup} is the parameter used by DRF to uniquely identify an element.

Let’s assume that a Fund has id=ef249e21-43cf-47e4-9aac-0ed26af2d0ce.

We can delete it by sending an HTTP DELETE request to the URL:

http://localhost:8000/api/v1/funds/ef249e21-43cf-47e4-9aac-0ed26af2d0ce

Or we can create a new Fund by sending a POST request to the URL http://localhost:8000/api/v1/funds and the field values ​​in the request body, like this:

{
  "symbol": "SPY",
  "name": "SPDR S&P 500 ETF Trust",
  "asset_class": "Equity",
  "total_assets": "372251000000.00",
  "ytd_price_change": "15.14",
  "average_daily_volume": "69599336"
}

This way, our API would return a HTTP 201 Created code, meaning that an object was created and the response would be:

{
  "id": "a4139c66-cf29-41b4-b73e-c7d203587df9",
  "symbol": "SPY",
  "name": "SPDR S&P 500 ETF Trust",
  "asset_class": "Equity",
  "total_assets": "372251000000.00",
  "ytd_price_change": "15.14",
  "average_daily_volume": "69599336"
}

We can test our URL in different ways: through Python code, through a Frontend (Angular, React, Vue.js) or through Postman, for example.

And how can I see this all running?

So let’s go to the next section!

Browsable interface

One of the most impressive features of DRF is its Browsable Interface.

With it, we can test our API and check its values in a very simple and visual way.

To access it, navigate in your browser to: http://localhost:8000/api/v1.

You should see the following:

DRF Browsable Interface
DRF Browsable Interface – API Root

Go there and click on http://127.0.0.1:8000/api/v1/funds!

The following message must have appeared:

{
  "detail": "Authentication credentials were not provided."
}

Remember the permission_classes setting we used to configure our ExchangeTradedFundViewSet?

It defined that only authenticated users (permissions.isAuthenticated) can interact with the API.

Click on the upper right corner, on “Log in” and use the credentials registered in the createsuperuser command, which we executed at the beginning of the post.

Now, look how this is useful! You should be seeing:

DRF Browsable Interface - ETF Form
DRF Browsable Interface – ETF Form

Play a little, add data and explore the interface.

When adding data and updating the page, an HTTP GET API request is triggered, returning the data you just registered:

DRF Browsable Interface - ETF List
DRF Browsable Interface – ETF List

Specific Settings

It is possible to configure various aspects of DRF through some specific settings.

We do this by adding and configuring the REST_FRAMEWORK to the settings.py settings file.

For example, if we want to add pagination to our API, we can simply do this:

REST_FRAMEWORK = {
  'DEFAULT_PAGINATION_CLASS': 'rest_framework.pagination.PageNumberPagination',
  'PAGE_SIZE': 10
}

Now the result of a call, for example, to http://127.0.0.1:8000/api/v1/funds goes from:

[
    {
        "id": "0e149f99-e5a5-4e3a-b89b-8b65ae7c6cf4",
        "symbol": "IVV",
        "name": "iShares Core S&P 500 ETF",
        "asset_class": "Equity",
        "total_assets": "286201000000.00",
        "ytd_price_change": "15.14",
        "average_daily_volume": 4391086
    },
    {
        "id": "21af5504-55bf-4326-951a-af51cd40a2f9",
        "symbol": "VTI",
        "name": "Vanguard Total Stock Market ETF",
        "asset_class": "Equity",
        "total_assets": "251632000000.00",
        "ytd_price_change": "15.20",
        "average_daily_volume": 3760095
    }
]

To:

{
    "count": 2,
    "next": null,
    "previous": null,
    "results": [
        {
            "id": "0e149f99-e5a5-4e3a-b89b-8b65ae7c6cf4",
            "symbol": "IVV",
            "name": "iShares Core S&P 500 ETF",
            "asset_class": "Equity",
            "total_assets": "286201000000.00",
            "ytd_price_change": "15.14",
            "average_daily_volume": 4391086
        },
        {
            "id": "21af5504-55bf-4326-951a-af51cd40a2f9",
            "symbol": "VTI",
            "name": "Vanguard Total Stock Market ETF",
            "asset_class": "Equity",
            "total_assets": "251632000000.00",
            "ytd_price_change": "15.20",
            "average_daily_volume": 3760095
        }
    ]
}

Fields were added to help pagination:

  • count: The amount of returned results;
  • next: The next page;
  • previous: The previous page;
  • results: The current result page.

There are several other very useful settings!

Here are some:

👉 DEFAULT_AUTHENTICATION_CLASSES is used to configure the API authentication method:

REST_FRAMEWORK = {
  ...
  DEFAULT_AUTHENTICATION_CLASSES: [
    'rest_framework.authentication.SessionAuthentication',
    'rest_framework.authentication.BasicAuthentication'
  ]
  ...
}

👉 DEFAULT_PERMISSION_CLASSES is used to set permissions needed to access the API (globally).

REST_FRAMEWORK = {
  ...
  DEFAULT_PERMISSION_CLASSES: ['rest_framework.permissions.AllowAny']
  ...
}

Note: It is also possible to define this configuration per View, using the attribute permissions_classes (which we use in our ExchangeTradedFundViewSet).

👉 DATE_INPUT_FORMATS is used to set date formats accepted by the API:

REST_FRAMEWORK = {
  ...
  'DATE_INPUT_FORMATS': ['%d/%m/%Y', '%Y-%m-%d', '%d-%m-%y', '%d-%m-%Y']
  ...
}

The above configuration will make the API allow the following date formats ’10/25/2006′, ‘2006-10-25′, ’25-10-2006’ for example.

See more settings accessing here the Documentation.