Mastering JavaScript Tree-Shaking

One fantastic feature of JavaScript (compared to say, Python) is that it is possible to bundle your code for packaging; removing everything that is not needed to run your code. We call this “tree-shaking” because the stuff you aren’t using falls out leaving the strongly-attached bits. This reduces the size of your output, whether it’s a NPM module, code to run in a browser, or a NodeJS application.

By way of illustration, suppose we have a script that imports a function from a library. Here it calls apple1() from lib.ts:

If we bundle script.ts using esbuild:

esbuild --bundle script.ts > script-bundle.js

Then we get the resulting output:

The main point here being that only apple1 is included in the bundled script. Since we didn’t use apple2 it gets shaken out like an overripe piece of fruit.

Motivation

There are many reasons this is a valuable feature, the main one is performance. Less code means less time spent parsing JavaScript when your code is executed. It means your web app loads faster, your docker image is smaller, your serverless function cold start time is reduced, your NPM module takes up less disk space.

A robust application architecture can be a serverless architecture where your application is composed of discrete functions. These functions can function like an API if you put an API gateway or GraphQL server that invokes the functions for different routes and queries, or can be triggered by messages in queues or files being uploaded to a bucket or as regularly scheduled events. In this setup each function is self-contained, only containing whatever code is needed for its specific functionality and no unrelated code. This is in contrast to a monolith or microservice where the entire application must be loaded up in order to handle a request. No matter how large your project gets, each function remains about the same size.

I build applications using Serverless Stack, which has a terrific developer experience focused on building serverless applications on AWS with TypeScript and CDK in a local development environment. Under the hood it uses esbuild. Let’s peek under the hood.

Mechanics

Conceptually tree-shaking is pretty straightforward; just throw away whatever code our application doesn’t use. However there are a great number of caveats and tricks needed to debug and finesse your bundling.

Tree-shaking is a feature provided by all modern JavaScript bundlers. These include tools like Webpack, Turbopack, esbuild, and rollup. If you ask them to produce a bundle they will do their best to remove unused code. But how do they know what is unused?

The fine details may vary from bundler to bundler and between targets but I’ll give an overview of salient properties and options to be aware of. I’ll use the example of using esbuild to produce node bundles for AWS Lambda but these concepts apply generally to anyone who wants to reduce their bundle size.

Measuring

Before trying to reduce your bundle size you need to look at what’s being bundled, how much space everything takes up, and why. There are a number of tools at our disposal which help visualize and trace the tree-shaking process.

Bundle Buddy

This is one of the best tools for analyzing bundles visually and it has very rich information. You will need to ask your bundler to produce a meta-analysis of the bundling process and run Bundle Buddy on it (it’s all local browser based). It supports webpack, create-react-app, rollup, rome, parcel, and esbuild. For esbuild you specify the --metafile=meta.json option.

When you upload your metafile to Bundle Buddy you will be presented with a great deal of information. Let’s go through what some of it indicates.

Bundle Buddy in action

Let’s start with the duplicate modules.

This section lets you know that you have multiple versions of the same package in your bundle. This can be due to your dependencies or your project depending on different versions of a package which cannot be resolved to use the same version for some reason.

Here you can see I have versions 3.266.0 and 3.272 of the AWS SDK and two versions of fast-xml-parser. and The best way to hunt down why different versions may be included is to simply ask your package manager. For example you can ask pnpm:

$ pnpm why fast-xml-parser

dependencies:
@aws-sdk/client-cloudformation 3.266.0
├─┬ @aws-sdk/client-sts 3.266.0
│ └── fast-xml-parser 4.0.11
└── fast-xml-parser 4.0.11
@aws-sdk/client-cloudwatch-logs 3.266.0
└─┬ @aws-sdk/client-sts 3.266.0
  └── fast-xml-parser 4.0.11
...
@prisma/migrate 4.12.0
└─┬ mongoose 6.8.1
  └─┬ mongodb 4.12.1
    └─┬ @aws-sdk/credential-providers 3.282.0
      ├─┬ @aws-sdk/client-cognito-identity 3.282.0
      │ └─┬ @aws-sdk/client-sts 3.282.0
      │   └── fast-xml-parser 4.1.2
      ├─┬ @aws-sdk/client-sts 3.282.0
      │ └── fast-xml-parser 4.1.2
      └─┬ @aws-sdk/credential-provider-cognito-identity 3.282.0
        └─┬ @aws-sdk/client-cognito-identity 3.282.0
          └─┬ @aws-sdk/client-sts 3.282.0
            └── fast-xml-parser 4.1.2

So if I want to shrink my bundle I need to figure out how to get it so that both @aws-sdk/client-* and @prisma/migrate can agree on a common version to share so that only one copy of fast-xml-parser needs to end up in my bundle. Since this function shouldn’t even be importing @prisma/migrate (and certainly not mongodb) I can use that as a starting point for tracking down an unneeded import which will discuss shortly. Alternatively you can open a PR for one of the dependencies to use a looser version spec (e.g. ^4.0.0) for fast-xml-parser or @aws-sdk/client-sts.

With duplicate modules out of the way, the main meat of the report is the bundled modules. This will usually be broken up into your code and stuff from node_modules:

When viewing in Bundle Buddy you can click on any box to zoom in for a closer look. We can see that of the 1.63MB that comprises our bundle, 39K is for my actual function code:

This is interesting but not where we need to focus our efforts.

Clearly the prisma client and runtime are taking up sizable parcels of real-estate. There’s not much you can do about this besides file a ticket on GitHub (as I did here with much of this same information).

But looking at our node_modules we can see at a glance what is taking up the most space:

This is where you can survey what dependencies are not being tree-shaken out. You may have some intuitions about what belongs here, doesn’t belong here, or seems too large. For example in the case of my bundle the two biggest dependencies are on the left there, @redis-client (166KB) and gremlin 97KB). I do use redis as a caching layer for our Neptune graph database, of which gremlin is a client library that one uses to query the database. Because I know my application and this function I know that this function never needs to talk to the graph database so it doesn’t need gremlin. This is another starting point for me to trace why gremlin is being required. We’ll look at that later on when we get into tracing. Also noteworthy is that even though I only use one redis command, the code for handling all redis commands get bundled, adding a cost of 109KB to my bundle.

Finally the last section in the Bundle Buddy readout is a map of what files import other files. You can click in for what looks like a very interesting and useful graph but it seems to be a bit broken. No matter, we can see this same information presented more clearly by esbuild.

esbuild –analyze

Your bundler can also operate in a verbose mode where it tells you WHY certain modules are being included in your bundle. Once you’ve determined what is taking up the most space in your bundle or identified large modules that don’t belong, it may be obvious to you what the problem is and where and how to fix it. Oftentimes it may not be so clear why something is being included. In my example above of including gremlin, I needed to see what was requiring it.

We can ask our friend esbuild:

esbuild --bundle --analyze --analyze=verbose script.ts --outfile=tmp.js 2>&1 | less

The important bit here being the --analyze=verbose flag. This will print out all traces of all imports so the output gets rather large, hence piping it to less. It’s sorted by size so you can start at the top and see why your biggest imports are being included. A couple down from the top I can see what’s pulling in gremlin:

   ├ node_modules/.pnpm/gremlin@3.6.1/node_modules/gremlin/lib/process/graph-traversal.js ─── 13.1kb ─── 0.7%
   │  └ node_modules/.pnpm/gremlin@3.6.1/node_modules/gremlin/index.js
   │     └ backend/src/repo/gremlin.ts
   │        └ backend/src/repo/repository/skillGraph.ts
   │           └ backend/src/repo/repository/skill.ts
   │              └ backend/src/repo/repository/vacancy.ts
   │                 └ backend/src/repo/repository/candidate.ts
   │                    └ backend/src/api/graphql/candidate/list.ts

This is extremely useful information for tracking down exactly what in your code is telling the bundler to pull in this module. After a quick glance I realized my problem. The file repository/skill.ts contains a SkillRepository class which contains methods for loading a vacancy’s skills which is used by the vacancy repository which is eventually used by my function. Nothing in my function calls the SkillRepository methods which need gremlin, but it does include the SkillRepository class. What I foolishly assumed was that the methods on the class I don’t call will get tree-shaken out. This means that if you import a class, you will be bringing in all possible dependencies any method of that class brings in. Good to know!

@next/bundle-analyzer

This is a colorful but limited tool for showing you what’s being included in your NextJS build. You add it to your next.config.js file and when you do a build it will pop open tabs showing you what’s being bundled in your backend, frontend, and middleware chunks.

The amount of bullshit @apollo/client pulls in is extremely aggravating to me.

Modularize Imports

It was helpful for learning that using top-level Material-UI imports such as import { Button, Dialog } from "@mui/material" will pull in ALL of @mui/material into your bundle. Perhaps this is because NextJS still is stuck on CommonJS, although that is pure speculation on my part.

While you can fix this by assiduously doing import { Button } from "@mui/material/Button" everywhere this is hard to enforce and tedious. There is a NextJS config option to rewrite such imports:

  modularizeImports: {
    "@mui/material": {
      transform: "@mui/material/{{member}}",
    },
    "@mui/icons-material": {
      transform: "@mui/icons-material/{{member}}",
    },
  },

Webpack Analyzer

Has a spiffy graph of imports and works with Webpack.

Tips and Tricks

CommonJS vs. ESM

One factor that can affect bundling is using CommonJS vs. EcmaScript Modules (ESM). If you’re not familiar with the difference, the TypeScript documentation has a nice summary and the NodeJS package docs are quite informative and comprehensive. But basically CommonJS is the “old, busted” way of defining modules in JavaScript and makes use of things like require() and module.exports, whereas ESM is the “cool, somewhat less busted” way to define modules and their contents using import and export keywords.

Tree-shaking with CommonJS is possible but it is more wooley due to the more procedural format of defining exports from a module whereas ESM exports are more declarative. The esbuild tool is specifically built around ESM, in the docs it says:

This way esbuild will only bundle the parts of your packages that you actually use, which can sometimes be a substantial size savings. Note that esbuild’s tree shaking implementation relies on the use of ECMAScript module import and export statements. It does not work with CommonJS modules. Many packages on npm include both formats and esbuild tries to pick the format that works with tree shaking by default. You can customize which format esbuild picks using the main fields and/or conditions options depending on the package.

So if you’re using esbuild, it won’t even bother trying unless you’re using ESM-style imports and exports in your code and your dependencies. If you’re still typing require then you are a bad person and this is a fitting punishment for you.

As the documentation highlights, there is a related option called mainFields which affects which version of a package esbuild resolves. There is a complicated system for defining exports in package.json which allows a module to contain multiple versions of itself depending on how it’s being used. It can have one entrypoint if it’s require‘d, a different one if imported, or another if used in a browser.

The upshot is that you may need to tell your bundler explicitly to prefer the ESM (“module“) version of a package instead of the fallback CommonJS version (“main“). With esbuild the option looks something like:

esbuild --main-fields=module,main --bundle script.ts 

Setting this will ensure the ESM version is preferred, which may result in improved tree-shaking.

Minification

Tree-shaking and minification are related but distinct optimizations for reducing the size of your bundle. Tree-shaking eliminates dead code, whereas minification rewrites the result to be smaller, for example replacing a function identifier e.g. “frobnicateMajorBazball” with say “a1“.

Usually enabling minification is a simple option in your bundler. This bundle is 2.1MB minified, but 4.5MB without minification:

❯ pnpm exec esbuild --format=esm --target=es2022 --bundle --platform=node --main-fields=module,main  backend/src/api/graphql/candidate/list.ts --outfile=tmp.js

  tmp.js  4.5mb ⚠️

⚡ Done in 239ms


❯ pnpm exec esbuild --minify --format=esm --target=es2022 --bundle --platform=node --main-fields=module,main  backend/src/api/graphql/candidate/list.ts --outfile=tmp-minified.js

  tmp-minified.js  2.1mb ⚠️

⚡ Done in 235ms

Side effects

Sometimes you may want to import a module not because it has a symbol your code makes use of but because you want some side-effect to happen as a result of importing it. This may be an import that extends jest matchers, or initializes a library like google analytics, or some initialization that is performed when a file is imported.

Your bundler doesn’t always know what’s safe to remove. If you have:

import './lib/initializeMangoids'

In your source, what should your bundler do with it? Should it keep it or remove it in tree-shaking?

If you’re using Webpack (or terser) it will look for a sideEffects property in a module’s package.json to check if it’s safe to assume that simply importing a file does not do anything magical:

{
  "name": "your-project",
  "sideEffects": false
}

Code can also be annotated with /*#__PURE__ */ to inform the minifier that this code has no side effects and can be tree-shaken if not referred to by included code.

var Button$1 = /*#__PURE__*/ withAppProvider()(Button);

Read about it in more detail in the Webpack docs.

Externals

Not every package you depend on needs to necessarily be in your bundle. For example in the case of AWS lambda the AWS SDK is included in the runtime. This is a fairly hefty dependency so it can shave some major slices off your bundle if you leave it out. This is done with the external flag:

❯ pnpm exec esbuild --minify --format=esm --target=es2022 --bundle --platform=node --main-fields=module,main  backend/src/api/graphql/candidate/list.ts --outfile=tmp-minified.js

  tmp-minified.js  2.1mb 


❯ pnpm exec --external:aws-sdk --minify --format=esm --target=es2022 --bundle --platform=node --main-fields=module,main  backend/src/api/graphql/candidate/list.ts --outfile=tmp-minified.js

  tmp-minified.js  1.8mb 

One thing worth noting here is that there are different versions of packages depending on your runtime language and version. Node 18 contains the AWS v3 SDK (--external:@aws-sdk/) whereas previous versions contain the v2 SDK (--external:aws-sdk). Such details may be hidden from you if using the NodejsFunction CDK construct or SST Function construct.

On the CDK slack it was recommended to me to always bundle the AWS SDK in your function because you may be developing against a different version than what is available in the runtime. Or you can pin your package.json to use the exact version in the runtime.

Another reason to use externals is if you are using a layer. You can tell your bundler that the dependency is already available in the layer so it’s not needed to bundle it. I use this for prisma and puppeteer.

Performance Impacts

For web pages the performance impacts are instantly noticeable with a smaller bundle size. Your page will load faster both over the network and in terms of script parsing and execution time.

Another way to get an idea of what your node bundle is actually doing at startup is to profile it. I really like the 0x tool which can run a node script and give you a flame graph of where CPU time is spent. This can be an informative visualization and let you dig into what is being called when your script runs:

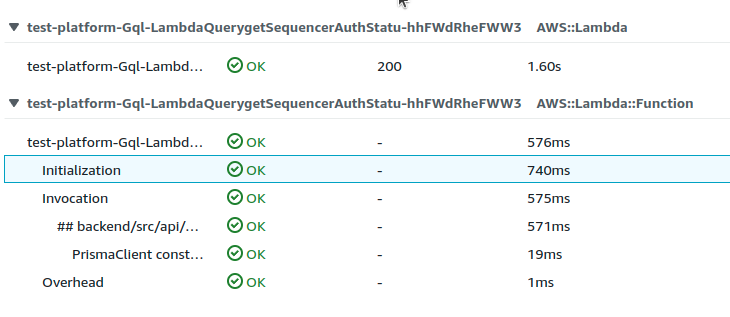
For serverless applications you can inspect the cold start (“initialization”) time for your function on your cloud platform. I use the AWS X-Ray tracing tool. Compare before and after some aggressive bundle size optimizations:

The cold-start time went from 2.74s to 1.60s. Not too bad.

Serverless Bot. Infrastructure with Pulumi

I like to learn something new: new technologies, languages, countries, food, and experiences — all of that is a big part of my life’s joy.

During thinking about my next OKR goal with folks from JetBridge I came up with an idea for how to build something interesting which can help me learn new words and phrases in a more productive way.

The main idea sounds simple: to implement a with a Telegram app bot for learning new words using Anki periodic repetition algorithm. To make it more interesting (and complex 🙃) I decided that it needs to be serverless with AWS lambda and have infrastructure managed by pulumi. This article describes my approach.

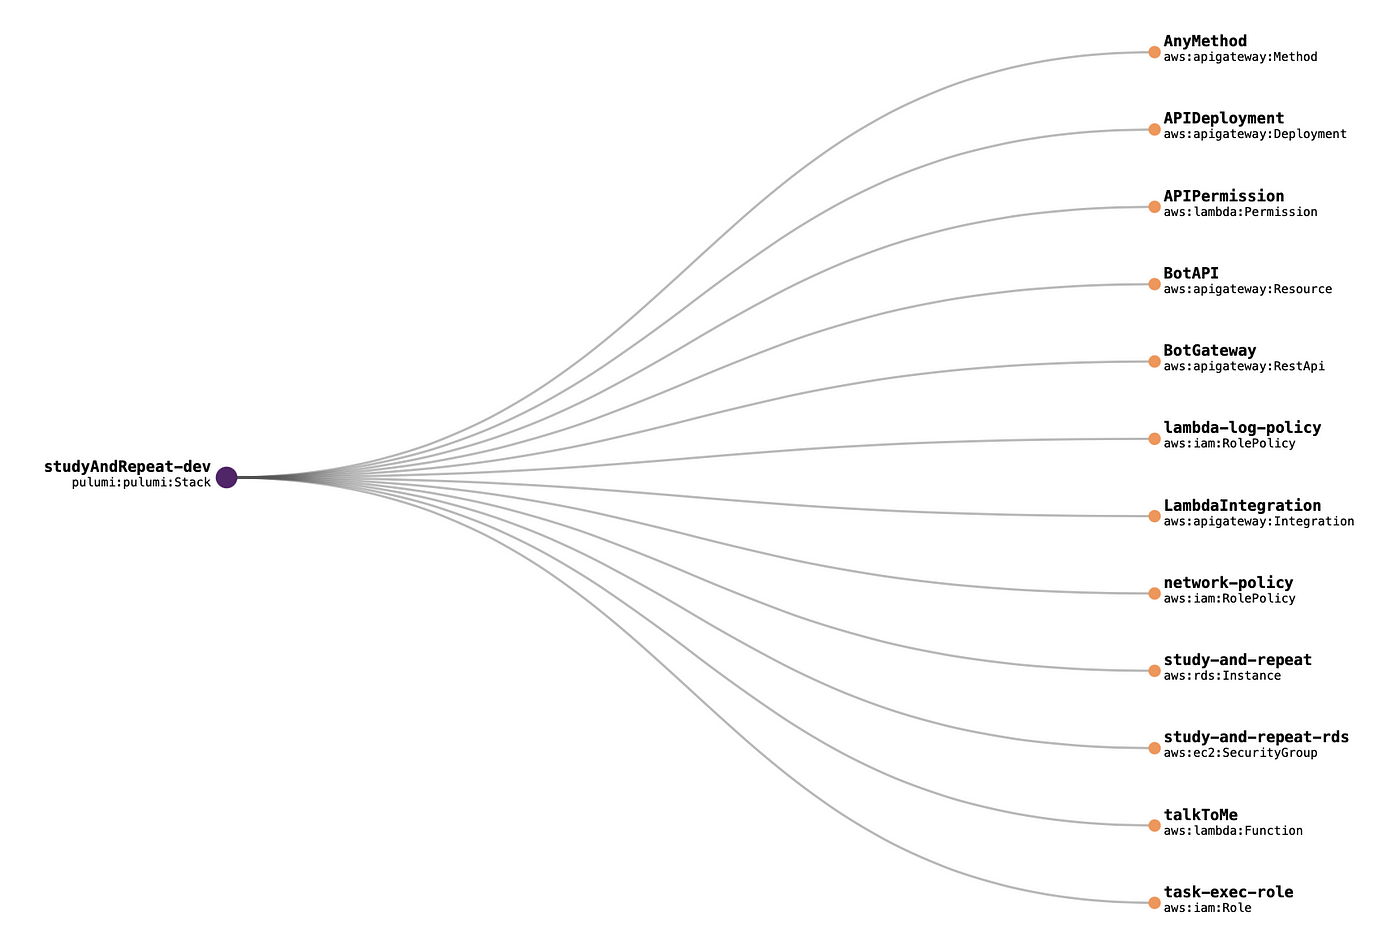
The infrastructure contains:

  • API Gateway to handle incoming requests and pass them forward
  • Lambda to process user commands
  • RDS Postgres database instance for storage
Infrastructure

Pulumi allows managing code infrastructure in a convenient manner using any programming language. It’s great when you can define and configure the infrastructure using the same language as the app. In my case, it is Go.

Another benefit that pulumi provides out of the box is using variables directly from created resources. For example, you create an RDS Instance, and then an endpoint and DB properties are available to be used as lambda env variables. It means you don’t need to hard-code such variables or store them anywhere, pulumi manages them for you. Even in the case when some resource is changed (for example a major RDS upgrade will create a new instance) all related infrastructure will be up to date.

The bigger project would require a much more complex definition and resources stack, but for my purpose, it’s rather small and can be kept in only one file.

Resources created by Pulumi

One more cool feature about pulumi is managing secrets. Usually, you need to configure and use some service for it (AWS Secret store, Vault, etc) but with Pulumi you can use it out of the box with a simple command:

pulumi config set --secret DB_PASSWORD <password>

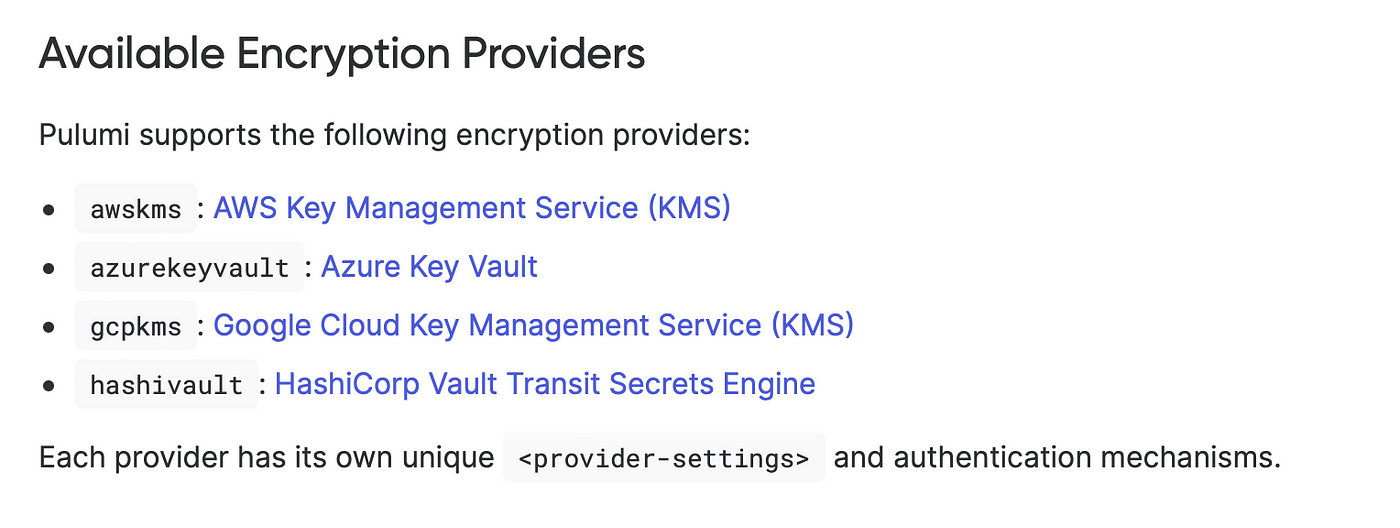
And then use it as an environmental or any other specified property of your app. Additionally, you can configure a key for encryption which is stored in pulumi by default but can easily be changed to a key from AWS KMS or other available provider:

Exported properties allow us to see the most important infra params directly in the CLI or pulumi interface:

ctx.Export("DB Endpoint", pulumi.Sprintf("%s", db.Endpoint))
Exported outputs

To deploy a lambda update, it needs to be built and archived. Then pulumi just sends this archive as a lambda source:

 function, err := lambda.NewFunction(
   ctx,
   "talkToMe",
   &lambda.FunctionArgs{
    Handler: pulumi.String("handler"),
    Role:    role.Arn,
    Runtime: pulumi.String("go1.x"),
    Code:    pulumi.NewFileArchive("./build/handler.zip"),
    Environment: &lambda.FunctionEnvironmentArgs{
     Variables: pulumi.StringMap{
      "TG_TOKEN":    c.RequireSecret("TG_TOKEN"),
      "DB_PASSWORD": c.RequireSecret("DB_PASSWORD"),
      "DB_USER":     db.Username,
      "DB_HOST":     db.Address,
      "DB_NAME":     db.DbName,
     },
    },
   },
   pulumi.DependsOn([]pulumi.Resource{logPolicy, networkPolicy, db}),
  )

To have it as a simple command I use a Makefile:

build::
 GOOS=linux GOARCH=amd64 go build -o ./build/handler ./src/handler.go
 zip -j ./build/handler.zip ./build/handler

Then I can trigger deploy just with make build && pulumi up -y

After that pulumi defines if the archive was changed and sends an update if so. For my simple project, it takes about 20s which is quite fast.

GOOS=linux GOARCH=amd64 go build -o ./build/handler ./src/handler.go
zip -j ./build/handler.zip ./build/handler
updating: handler (deflated 45%)

View Live: https://app.pulumi.com/<pulumi-url>

     Type                    Name                Status            Info
     pulumi:pulumi:Stack     studyAndRepeat-dev
 ~   └─ aws:lambda:Function  talkToMe            updated (12s)     [diff: ~code]


Outputs:
    DB Endpoint   : "<endpoint>.eu-west-1.rds.amazonaws.com:5432"
    Invocation URL: "https://<endpoint>.execute-api.eu-west-1.amazonaws.com/dev/{message}"

Resources:
    ~ 1 updated
    12 unchanged

Duration: 20s

Here you can take a look at the whole infrastructure code.

In conclusion, I can say that pulumi is a great tool to write and keep infrastructure structured, consistent and readable. I used CloudFormation and Terraform previously and pulumi gives me a more user-friendly and pleasant way to have infrastructure as code.

5 tips to make your DevOps team thrive

Written By Vinicius Schettino

DevOps Culture made a real dent on the traditional way organizations used to make software. Heavily inspired by Agile and Lean movements, the DevOps trend makes a move against siloed knowledge, slow and manual deployment pipelines, and strong division between teams such as Development, Testing and Operations. The results announced have been more than eye-catching: Faster deliveries and consequent feedback, happier engineers and better outcomes from the customer/business perspective. 

Background

Aside from the incentives to adopt DevOps practices, companies still struggle to achieve their goals when transforming their internal and customer-facing processes. Turns out that the path is harder than most think. In order to really transform outdated practices into collaborative, agile and automated approaches, the shift cannot be contained only to technical aspects of software development. DevOps Transformation must encompass all organization levels, from developers to executive management. 

Companies often try to achieve that through creating DevOps teams, responsible for the steering and introduction of DevOps practices across the organization. This approach has several pitfalls and threats to efficacy. Often the pushback for maintaining power structures and status quo diminishes the outcomes of that strategy. Instead of really transforming the development process, they often get a limited effect into given phases (such deployment) and automation. When you think of Software Development as a complex system In practice it means that the outcomes are quite limited and the investment might not even pay off. 

In order to avoid that, there are several strategies that can help to avoid said pitfalls and increase the impact of a DevOps team on an organization. In this article we are going to present some tips that can be used to propose, improve and organize DevOps teams in order to make the most out of them. 

1) Make the effort collaborative

The first aspect of DevOps that must be made clear for everyone is that it’s not a thing for only one team to do. The whole idea behind DevOps is about collaboration, avoiding handoffs and complex communication between those working on software. It means it’s impossible to expect one company to “be DevOps” where just one group is trying to put DevOps practices inplace. Those should be widespread, from product management to security and monitoring. Each step towards working software must embrace core concepts of DevOps.

Please note that this is not to say DevOps teams shouldn’t exist. On the contrary, the DevOps world has come a long way, with enough tools, techniques, approaches that we can’t expect everyone to dominate such a variety of skills. The intersection between “Dev” and “Ops” might be big enough to have people dedicated to that. It’s more about what the DevOps team wants to achieve and how they are going to get there. The posture is everything: instead of working alone in the dark and owning everything CI/CD/Ops/Security related, the team must pursue exactly the contrary: working along with product teams, public decisions, pair/mob programming and much more. Might sound simple, but the collaborative approach might be the most important and most ignored aspect of a DevOps Transformation.  In summary, the DevOps team cannot be a silo for DevOps knowledge. Which leads us to the next topic…

2) Do not be the traditional Ops team

Prior to the DevOps era, most organizations would have at least two different teams involved in software production: Development and Operations. While the first would be responsible for product thinking, coding, testing, quality assurance, the second would work on infrastructure, delivery, security, reliability, and monitoring. That way the ideas were transformed into working software through a process resembling an assembly line. Depending on factors such as size, maturity, capillarity, industry sector and even technology, those teams were subdivided into a handful of other, more specialized and shortsighted groups.

Back then, although the frontier between Development and Operations was, naturally, blurred, each team would have quite specific skills and attributions, giving the whole streamed process a frontdesk, bureaucrat tone. 

In that context we had, guess what? A (set of) team(s) dedicated to Operations filled with the same people that today (mostly) form DevOps and similar teams, such as SRE and Engineering Platforms. However, the new proposal has several differences in goals and practices, including the need of working collaboratively in cross functional, small and focused teams. Sadly, far too often they are treated and viewed as the old Operation silo. That way they must “lead by example” the way up into DevOps transformation; not just DevOps tooling and technical aspects, but also through the actions and drive. 

Needless to say, working with assembly-line-like organized teams is very far from an Agile mindset, on which the DevOps principles rely a lot. That said, the DevOps team must be as far as possible from the traditional, waterfall practices of the Operation Teams.

3) Fight the topology that suits your context

There’s no such a thing as perfect architecture! The same could be said for how teams entangled to DevOps should be organized. Every organization is a unique complex system (remember?) and because of that, each solution must be perfectly tailored for the current place it’ll be deployed. That said, however, there are some common patterns that can be found in the wide. Team Topologies identifies the fundamental types of teams and the interactions between them. Following their taxonomy, DevOps focused groups should lean towards the category of Enabling Teams, acting as advocates, evangelists, and overall stimulators of DevOps practices among the stream-aligned teams. Other forms of organization can be of course useful; SRE and Platform Engineering related strategies gravitate towards Platform Teams. What’s the course of action? Just let the software people organize themselves seeking to fulfill the organization/product goals. The resulting team topology will reflect the specific needs of that domain and the support to the initiative will be the strongest possible. That’s a huge success factor since collaboration and will play a big part when the DevOps team starts. 

4) Tools, Templates and Documentation: ways of working together

A key decision when structuring a DevOps team is how they are going to collaborate with others in order to introduce DevOps thinking into software development. Remember DevOps teams should be constantly in touch with other teams presenting new tech, strategies and principles that will be then incorporated (heterogeneously, I would say) throughout the company. The first way one could think of is through traditional ways of collaboration: emails, sync meetings and in person talks appointments.

In spite of those having value, they are far from being really efficient for DevOps collaboration and maybe even for knowledge sharing altogether. There are a few approaches that successful DevOps Teams usually take advantage of:

  • Workshops: Yes, the traditional hands-on course! The idea is old, inspired by classrooms, but the execution changed a lot. Today it can be transformed into a very efficient way of presenting new tools and techniques to a broader public. The emphasis on relevant topics to the public and the use of real world scenarios to train and understand team members are key to the success of workshops.
  • Templates: Sometimes DevOps best practices can be translated into a set of basic tools and configurations to be used on new pieces of documentation and software. In these cases, templates can be a very efficient way of sharing knowledge. It might contain config files for CI/CD platforms, deployment instructions, Dockerfiles, security checks and much more! Just be sure there’s enough flexibility for the use cases you want to cover and enough information so people won’t blindly follow some mysterious, unchangeable standard.
  • Documentation: are you thinking about a boring, gigantic white document with ugly fonts and little to no figures? Think again! Many other forms of storing and sharing knowledge could fall into this category: blog posts, videos, podcasts and even tutorials. The logic is simple: how much do you learn by tutorials and similar content you find online? Why wouldn’t a company create a knowledge source like that? Some content might be too specific and sensitive to be internal, others can also be public and contribute to the increase the awareness of your brand from an employer/reference point of view.  
  • Tools: I think most of the tools related to DevOps topics should be owned by Platform Engineering and SRE teams. It’s another type of collaboration that should be addressed with somewhat different strategies that I intend to write later. 

In all those cases, it’s very important for the DevOps team members to actually understand what their colleagues need. Treat them as your clients and your work as products and ensure what you’re building is really making their lives better. Also, it’s unsurprisingly common to find all those (and others) approaches combined into a greater knowledge sharing strategy.

5) DevOps team scalability

The harsh truth must be said: companies want as much as possible of their software people turning their attention to building value for clients. That pretty much translates as features and working software, no matter how hard it is to keep the big machine working. So we usually cannot afford (and maybe we shouldn’t anyway) to have DevOps people growing at the same pace the rest of the teams grow. That’s ok, we can scale quite efficiently: the ways of collaborating are cheap, easy to maintain and can often be directed to hundreds of professionals at the same time. Onboarding, periodic study groups or tech talks also have a far reach. Another aspect that calls for scabillity is how big is the umbrella on which DevOps things fall. We could add to the Original terms at least a few others 

As teams get more mature on DevOps principles, the support they demand becomes more specialized. That’s when the DevOps team can be transformed into smaller, focused groups containing a certain skillset. This often leads towards Security, Observability, CI/CD and other specialties that will act to teach and show to product teams an in-depth view of the underlying field. As paradoxical as it might sound, DevOps teams wouldn’t be needed in a perfect (hypothetical) DevOps company.

Conclusion

Sure we all can tell the benefits of adopting DevOps principles into software development, but getting there is not easy. Some organizations try to form DevOps teams, expecting they’ll lead the way towards a brighter future. The original idea quite often falls behind, manifesting anti-types that really limit their reach. In this brief article we presented some tips that encompass lots of further reading, seeking the experiment and consolidating several principles that will make your DevOps teams thrive.

Multipart-Encoded and Python Requests

It’s easy to find on the web many examples of how to send multipart-encoded data like images/files using python requests. Even in request’s documentation there’s a section only for that. But I struggled a couple days ago about the Content-type header.

The recommended header for multipart-encoded files/images is multipart/form-data and requests already set it for us automatically, using the parameter “files”. Here’s an example taken from requests documentation:

>>> url = 'https://httpbin.org/post'
>>> files = {'file': open('report.xls', 'rb')}

>>> r = requests.post(url, files=files)
>>> r.text
{
  ...
  "files": {
    "file": "<censored...binary...data>"
  },
  ...
}

As you can see, you don’t even need to set the header. Moving on, we often need custom headers, like x-api-key or something else. So, we’d have:

>>> headers = {'x-auth-api-key': <SOME_TOKEN>, 'Content-type': 'multipart/form-data'}
>>> url = 'https://httpbin.org/post'
>>> files = {'file': open('report.xls', 'rb')}

>>> r = requests.post(url, files=files, headers=headers)
>>> r.text
{
  ...
  "files": {
    "file": "<censored...binary...data>"
  },
  ...
}

Right? Unfortunately, not. Most likely that you will receive an error like below:

ValueError: Invalid boundary in multipart form: b'' 

or

{'detail': 'Multipart form parse error - Invalid boundary in multipart: None'}

Or even from a simple Nodejs server, because it’s not a matter of language or framework. In the case of the NodeJs server, you will get an undefined in request.files because is not set.

So, what’s the catch?

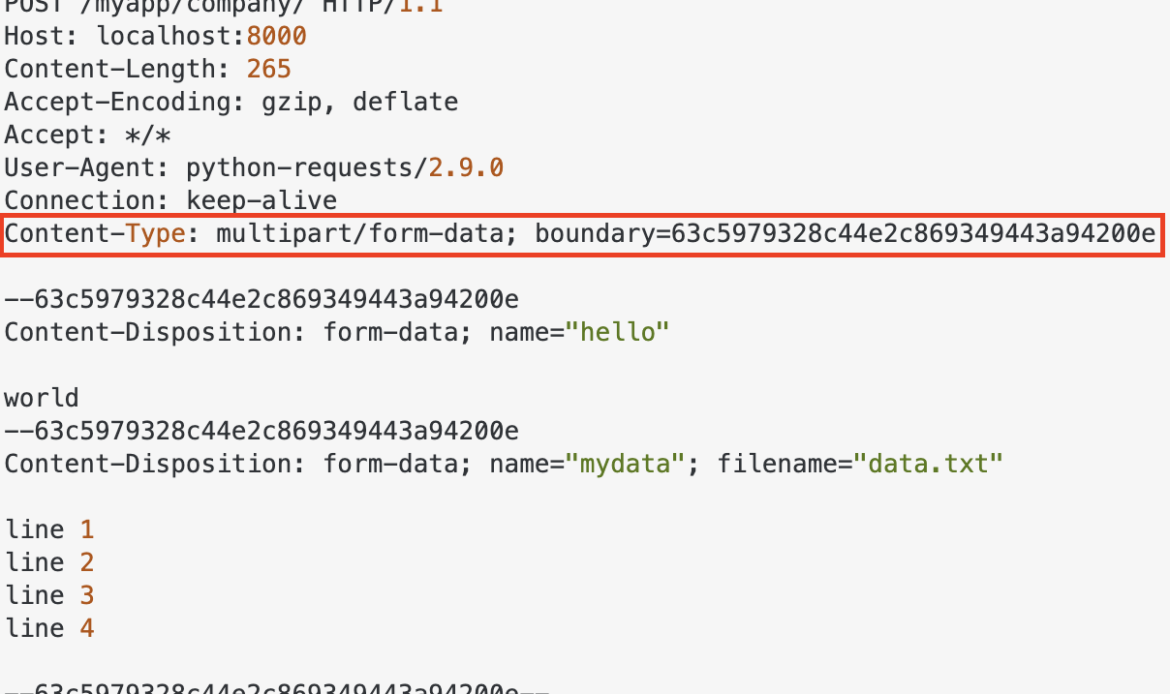
The catch here is even when we need custom headers, we don’t need to set the 'Content-type': 'multipart/form-data', because otherwise requests won’t do its magic for us setting the boundary field.

For multipart entities the boundary directive is required, which consists of 1 to 70 characters from a set of characters known to be very robust through email gateways, and not ending with white space. It is used to encapsulate the boundaries of the multiple parts of the message. Often, the header boundary is prepended with two dashes and the final boundary has two dashes appended at the end. (source)

Here’s an example of a request containing multipart/form-data:

Example of a request containing multipart/form-data

So, there it is. When using requests to POST file and/or images, use the files param and “forget” the Content-type, because the library will handle it for you.

Nice, huh? 😄
Not when I was suffering. 😒

Building a REST API with Django REST Framework

Let’s talk about a very powerful library to build APIs: the Django Rest Framework, or just DRF!

DRF logo

With DRF it is possible to combine Python and Django in a flexible manner to develop web APIs in a very simple and fast way.

Some reasons to use DRF:

  • Serialization of objects from ORM sources (databases) and non-ORM (classes).
  • Extensive documentation and large community.
  • It provides a navigable interface to debug its API.
  • Various authentication strategies, including packages for OAuth1 and OAuth2.
  • Used by large corporations such as: Heroku, EventBrite, Mozilla and Red Hat.

And it uses our dear Django as a base!

That’s why it’s interesting that you already have some knowledge of Django.

Introduction

The best way of learning a new tool is by putting your hand in the code and making a small project.

For this post I decided to join two things I really like: code and investments!

So in this post we will develop an API for consulting a type of investment: Exchange Traded Funds, or just ETFs.

Do not know what it is? So here it goes:

An exchange traded fund (ETF) is a type of security that tracks an index, sector, commodity, or other asset, but which can be purchased or sold on a stock exchange the same as a regular stock. An ETF can be structured to track anything from the price of an individual commodity to a large and diverse collection of securities. ETFs can even be structured to track specific investment strategies. (Retrieved from: Investopedia)

That said, let’s start at the beginning: let’s create the base structure and configure the DRF.

Project Configuration

First, let’s start with the name: let’s call it ETFFinder.

So let’s go to the first steps:

# Create the folder and access it
mkdir etffinder && cd etffinder

# Create virtual environment with latests installed Python version
virtualenv venv --python=/usr/bin/python3.8

# Activate virtual environment
source venv/bin/activate

# Install Django and DRF
pip install django djangorestframework

So far, we:

  • Created the project folder;
  • Created a virtual environment;
  • Activated the virtual environment and install dependencies (Django and DRF)

To start a new project, let’s use Django’s startproject command:

django-admin startproject etffinder .

This will generate the base code needed to start a Django project.

Now, let’s create a new app to separate our API responsibilities.

Let’s call it api.

We use Django’s django-admin startapp command at the root of the project (where the manage.py file is located), like this:

python3 manage.py startapp api

Also, go ahead and create the initial database structure with:

python3 manage.py migrate

Now we have the following structure:

File structure
File structure

Run the local server to verify everything is correct:

python3 manage.py runserver

Access http://localhost:8000 in your browser ans you should see the following screen:

Default webpage
Django’s default webpage

Now add a superuser with the createsuperuser command (a password will be asked):

python manage.py createsuperuser --email admin@etffinder.com --username admin

There’s only one thing left to finish our project’s initial settings: add everything to settings.py.

To do this, open the etffinder/settings.py file and add the api, etffinder and rest_framework apps (required for DRF to work) to the INSTALLED_APPS setting, like this:

INSTALLED_APPS = [
    'django.contrib.admin',
    'django.contrib.auth',
    'django.contrib.contenttypes',
    'django.contrib.sessions',
    'django.contrib.messages',
    'django.contrib.staticfiles',
    'rest_framework',
    'etffinder',
    'api'
]

Well done!

With that we have the initial structure to finally start our project!

Modeling

The process of developing applications using the Django Rest Framework generally follows the following path:

  1. Modeling;
  2. Serializers;
  3. ViewSets;
  4. Routers

Let’s start with Modeling.

Well, as we are going to make a system for searching and listing ETFs, our modeling must reflect fields that make sense.

To help with this task, I chose some parameters from this Large-Cap ETF’s Table, from ETFDB website:

ETFDB table
ETFDB ETF table

Let’s use the following attributes:

  • Symbol: Fund identifier code.
  • Name: ETF name
  • Asset Class: ETF class.
  • Total Assets: Total amount of money managed by the fund.
  • YTD Price Change: Year-to-Date price change.
  • Avg. Daily Volume: Average daily traded volume.

With this in hand, we can create the modeling of the ExchangeTradedFund entity.

For this, we’ll use the great Django’s own ORM (Object-Relational Mapping).

Our modeling can be implemented as follows (api/models.py):

from django.db import models
import uuid


class ExchangeTradedFund(models.Model):
  id = models.UUIDField(
    primary_key=True,
    default=uuid.uuid4,
    null=False,
    blank=True)

  symbol = models.CharField(
    max_length=8,
    null=False,
    blank=False)

  name = models.CharField(
    max_length=50,
    null=False,
    blank=False)

  asset_class = models.CharField(
    max_length=30,
    null=False,
    blank=False)

  total_assets = models.DecimalField(
    null=False,
    blank=False,
    max_digits=14,
    decimal_places=2)

  ytd_price_change = models.DecimalField(
    null=False,
    blank=False,
    max_digits=5,
    decimal_places=2)

  average_daily_volume = models.IntegerField(
    null=False,
    blank=False)

With this, we need to generate the Migrations file to update the database.

We accomplish this with Django’s makemigrations command. Run:

python3 manage.py makemigrations api

Now let’s apply the migration to the Database with the migrate command. Run:

python3 manage.py migrate

With the modeling ready, we can move to Serializer!

Serializer

DRF serializers are essential components of the framework.

They serve to translate complex entities such as querysets and class instances into simple representations that can be used in web traffic such as JSON and XML and we name this process Serialization.

Serializers also serve to do the opposite way: Deserialization. This is done by transforming simple representations (like JSON and XML) into complex representations, instantiating objects, for example.

Let’s create the file where our API’s serializers will be.

Create a file called serializers.py inside the api/ folder.

DRF provides several types of serializers that we can use, such as:

  • BaseSerializer: Base class for building generic Serializers.
  • ModelSerializer: Helps the creation of model-based serializers.
  • HyperlinkedModelSerializer: Similar to ModelSerializer, however returns a link to represent the relationship between entities (ModelSerializer returns, by default, the id of the related entity).

Let’s use the ModelSerializer to build the serializer of the entity ExchangeTradedFund.

For that, we need to declare which model that serializer will operate on and which fields it should be concerned with.

A serializer can be implemented as follows:

from rest_framework import serializers
from api.models import ExchangeTradedFund


class ExchangeTradedFundSerializer(serializers.ModelSerializer):
  class Meta:
    model = ExchangeTradedFund
    fields = [
      'id',
      'symbol',
      'name',
      'asset_class',
      'total_assets',
      'ytd_price_change',
      'average_daily_volume'
    ]  

In this Serializer:

  • model = ExchangeTradedFund defines which model this serializer must serialize.
  • fields chooses the fields to serialize.

Note: It is possible to define that all fields of the model entity should be serialized using fields = ['__all__'], however I prefer to show the fields explicitly.

With this, we conclude another step of our DRF guide!

Let’s go to the third step: creating Views.

ViewSets

A ViewSet defines which REST operations will be available and how your system will respond to API calls.

ViewSets inherit and add logic to Django’s default Views.

Their responsibilities are:

  • Receive Requisition data (JSON or XML format)
  • Validate the data according to the rules defined in the modeling and in the Serializer
  • Deserialize the Request and instantiate objects
  • Process Business related logic (this is where we implement the logic of our systems)
  • Formulate a Response and respond to whoever called the API

I found a very interesting image on Reddit that shows the DRF class inheritance diagram, which helps us better understand the internal structure of the framework:

Django class inheritance diagram
DRF class inheritance diagram

In the image:

  • On the top, we have Django’s default View class.
  • APIView and ViewSet are DRF classes that inherit from View and bring some specific settings to turn them into APIs, like get() method to handle HTTP GET requests and post() to handle HTTP POST requests.
  • Just below, we have GenericAPIView – which is the base class for generic views – and GenericViewSet – which is the base for ViewSets (the right part in purple in the image).
  • In the middle, in blue, we have the Mixins. They are the code blocks responsible for actually implementing the desired actions.
  • Then we have the Views that provide the features of our API, as if they were Lego blocks. They extend from Mixins to build the desired functionality (whether listing, deleting, etc.)

For example: if you want to create an API that only provides listing of a certain Entity you could choose ListAPIView.

Now if you need to build an API that provides only create and list operations, you could use the ListCreateAPIView.

Now if you need to build an “all-in” API (ie: create, delete, update, and list), choose the ModelViewSet (notice that it extends all available Mixins).

To better understand:

  • Mixins looks like the components of Subway sandwiches 🍅🍞🍗🥩
  • Views are similar to Subway: you assemble your sandwich, component by component 🍞
  • ViewSets are like McDonalds: your sandwich is already assembled 🍔

DRF provides several types of Views and Viewsets that can be customized according to the system’s needs.

To make our life easier, let’s use the ModelViewSet!

In DRF, by convention, we implement Views/ViewSets in the views.py file inside the app in question.

This file is already created when using the django-admin startapp api command, so we don’t need to create it.

Now, see how difficult it is to create a ModelViewSet (don’t be amazed by the complexity):

from api.serializers import ExchangeTradedFundSerializer
from rest_framework import viewsets, permissions
from api.models import ExchangeTradedFund


class ExchangeTradedFundViewSet(viewsets.ModelViewSet):
  queryset = ExchangeTradedFund.objects.all()
  serializer_class = ExchangeTradedFundSerializer
  permission_classes = [permissions.IsAuthenticated]

That’s it!

You might be wondering?

Whoa, and where’s the rest?

All the code for handling Requests, serializing and deserializing objects and formulating HTTP Responses is within the classes that we inherited directly and indirectly.

In our class ExchangeTradedFundViewSet we just need to declare the following parameters:

  • queryset: Sets the base queryset to be used by the API. It is used in the action of listing, for example.
  • serializer_class: Configures which Serializer should be used to consume data arriving at the API and produce data that will be sent in response.
  • permission_classes: List containing the permissions needed to access the endpoint exposed by this ViewSet. In this case, it will only allow access to authenticated users.

With that we kill the third step: the ViewSet!

Now let’s go to the URLs configuration!

Routers

Routers help us generate URLs for our application.

As REST has well-defined patterns of structure of URLs, DRF automatically generates them for us, already in the correct pattern.

So, let’s use it!

To do that, first create the urls.py file in api/urls.py.

Now see how simple it is!

from rest_framework.routers import DefaultRouter
from api.views import ExchangeTradedFundViewSet


app_name = 'api'

router = DefaultRouter(trailing_slash=False)
router.register(r'funds', ExchangeTradedFundViewSet)

urlpatterns = router.urls

Let’s understand:

  • app_name is needed to give context to generated URLs. This parameter specifies the namespace of the added URLConfs.
  • DefaultRouter is the Router we chose for automatic URL generation. The trailing_slash parameter specifies that it is not necessary to use slashes / at the end of the URL.
  • The register method takes two parameters: the first is the prefix that will be used in the URL (in our case: http://localhost:8000/funds) and the second is the View that will respond to the URLs with that prefix.
  • Lastly, we have Django’s urlpatterns, which we use to expose this app’s URLs.

Now we need to add our api app-specific URLs to the project.

To do this, open the etffinder/urls.py file and add the following lines:

from django.contrib import admin
from django.urls import path, include

urlpatterns = [
  path('api/v1/', include('api.urls', namespace='api')),
  path('api-auth/', include('rest_framework.urls', namespace='rest_framework')),
  path('admin/', admin.site.urls),
]

Note: As a good practice, always use the prefix api/v1/ to maintain compatibility in case you need to evolve your api to V2 (api/v2/)!

Using just these lines of code, look at the bunch of endpoints that DRF automatically generated for our API:

URLHTTP MethodAction
/api/v1GETAPI’s root path
/api/v1/backgroundsGETListing of all elements
/api/v1/backgroundsPOSTCreation of new element
/api/v1/backgrounds/{lookup}GETRetrieve element by ID
/api/v1/backgrounds/{lookup}PUTElement Update by ID
/api/v1/backgrounds/{lookup}PATCHPartial update by ID (partial update)
/api/v1/backgrounds/{lookup}DELETEElement deletion by ID
Automatically generated routes.

Here, {lookup} is the parameter used by DRF to uniquely identify an element.

Let’s assume that a Fund has id=ef249e21-43cf-47e4-9aac-0ed26af2d0ce.

We can delete it by sending an HTTP DELETE request to the URL:

http://localhost:8000/api/v1/funds/ef249e21-43cf-47e4-9aac-0ed26af2d0ce

Or we can create a new Fund by sending a POST request to the URL http://localhost:8000/api/v1/funds and the field values ​​in the request body, like this:

{
  "symbol": "SPY",
  "name": "SPDR S&P 500 ETF Trust",
  "asset_class": "Equity",
  "total_assets": "372251000000.00",
  "ytd_price_change": "15.14",
  "average_daily_volume": "69599336"
}

This way, our API would return a HTTP 201 Created code, meaning that an object was created and the response would be:

{
  "id": "a4139c66-cf29-41b4-b73e-c7d203587df9",
  "symbol": "SPY",
  "name": "SPDR S&P 500 ETF Trust",
  "asset_class": "Equity",
  "total_assets": "372251000000.00",
  "ytd_price_change": "15.14",
  "average_daily_volume": "69599336"
}

We can test our URL in different ways: through Python code, through a Frontend (Angular, React, Vue.js) or through Postman, for example.

And how can I see this all running?

So let’s go to the next section!

Browsable interface

One of the most impressive features of DRF is its Browsable Interface.

With it, we can test our API and check its values in a very simple and visual way.

To access it, navigate in your browser to: http://localhost:8000/api/v1.

You should see the following:

DRF Browsable Interface
DRF Browsable Interface – API Root

Go there and click on http://127.0.0.1:8000/api/v1/funds!

The following message must have appeared:

{
  "detail": "Authentication credentials were not provided."
}

Remember the permission_classes setting we used to configure our ExchangeTradedFundViewSet?

It defined that only authenticated users (permissions.isAuthenticated) can interact with the API.

Click on the upper right corner, on “Log in” and use the credentials registered in the createsuperuser command, which we executed at the beginning of the post.

Now, look how this is useful! You should be seeing:

DRF Browsable Interface - ETF Form
DRF Browsable Interface – ETF Form

Play a little, add data and explore the interface.

When adding data and updating the page, an HTTP GET API request is triggered, returning the data you just registered:

DRF Browsable Interface - ETF List
DRF Browsable Interface – ETF List

Specific Settings

It is possible to configure various aspects of DRF through some specific settings.

We do this by adding and configuring the REST_FRAMEWORK to the settings.py settings file.

For example, if we want to add pagination to our API, we can simply do this:

REST_FRAMEWORK = {
  'DEFAULT_PAGINATION_CLASS': 'rest_framework.pagination.PageNumberPagination',
  'PAGE_SIZE': 10
}

Now the result of a call, for example, to http://127.0.0.1:8000/api/v1/funds goes from:

[
    {
        "id": "0e149f99-e5a5-4e3a-b89b-8b65ae7c6cf4",
        "symbol": "IVV",
        "name": "iShares Core S&P 500 ETF",
        "asset_class": "Equity",
        "total_assets": "286201000000.00",
        "ytd_price_change": "15.14",
        "average_daily_volume": 4391086
    },
    {
        "id": "21af5504-55bf-4326-951a-af51cd40a2f9",
        "symbol": "VTI",
        "name": "Vanguard Total Stock Market ETF",
        "asset_class": "Equity",
        "total_assets": "251632000000.00",
        "ytd_price_change": "15.20",
        "average_daily_volume": 3760095
    }
]

To:

{
    "count": 2,
    "next": null,
    "previous": null,
    "results": [
        {
            "id": "0e149f99-e5a5-4e3a-b89b-8b65ae7c6cf4",
            "symbol": "IVV",
            "name": "iShares Core S&P 500 ETF",
            "asset_class": "Equity",
            "total_assets": "286201000000.00",
            "ytd_price_change": "15.14",
            "average_daily_volume": 4391086
        },
        {
            "id": "21af5504-55bf-4326-951a-af51cd40a2f9",
            "symbol": "VTI",
            "name": "Vanguard Total Stock Market ETF",
            "asset_class": "Equity",
            "total_assets": "251632000000.00",
            "ytd_price_change": "15.20",
            "average_daily_volume": 3760095
        }
    ]
}

Fields were added to help pagination:

  • count: The amount of returned results;
  • next: The next page;
  • previous: The previous page;
  • results: The current result page.

There are several other very useful settings!

Here are some:

👉 DEFAULT_AUTHENTICATION_CLASSES is used to configure the API authentication method:

REST_FRAMEWORK = {
  ...
  DEFAULT_AUTHENTICATION_CLASSES: [
    'rest_framework.authentication.SessionAuthentication',
    'rest_framework.authentication.BasicAuthentication'
  ]
  ...
}

👉 DEFAULT_PERMISSION_CLASSES is used to set permissions needed to access the API (globally).

REST_FRAMEWORK = {
  ...
  DEFAULT_PERMISSION_CLASSES: ['rest_framework.permissions.AllowAny']
  ...
}

Note: It is also possible to define this configuration per View, using the attribute permissions_classes (which we use in our ExchangeTradedFundViewSet).

👉 DATE_INPUT_FORMATS is used to set date formats accepted by the API:

REST_FRAMEWORK = {
  ...
  'DATE_INPUT_FORMATS': ['%d/%m/%Y', '%Y-%m-%d', '%d-%m-%y', '%d-%m-%Y']
  ...
}

The above configuration will make the API allow the following date formats ’10/25/2006′, ‘2006-10-25′, ’25-10-2006’ for example.

See more settings accessing here the Documentation.