Mastering JavaScript Tree-Shaking

One fantastic feature of JavaScript (compared to say, Python) is that it is possible to bundle your code for packaging; removing everything that is not needed to run your code. We call this “tree-shaking” because the stuff you aren’t using falls out leaving the strongly-attached bits. This reduces the size of your output, whether it’s a NPM module, code to run in a browser, or a NodeJS application.

By way of illustration, suppose we have a script that imports a function from a library. Here it calls apple1() from lib.ts:

If we bundle script.ts using esbuild:

esbuild --bundle script.ts > script-bundle.js

Then we get the resulting output:

The main point here being that only apple1 is included in the bundled script. Since we didn’t use apple2 it gets shaken out like an overripe piece of fruit.

Motivation

There are many reasons this is a valuable feature, the main one is performance. Less code means less time spent parsing JavaScript when your code is executed. It means your web app loads faster, your docker image is smaller, your serverless function cold start time is reduced, your NPM module takes up less disk space.

A robust application architecture can be a serverless architecture where your application is composed of discrete functions. These functions can function like an API if you put an API gateway or GraphQL server that invokes the functions for different routes and queries, or can be triggered by messages in queues or files being uploaded to a bucket or as regularly scheduled events. In this setup each function is self-contained, only containing whatever code is needed for its specific functionality and no unrelated code. This is in contrast to a monolith or microservice where the entire application must be loaded up in order to handle a request. No matter how large your project gets, each function remains about the same size.

I build applications using Serverless Stack, which has a terrific developer experience focused on building serverless applications on AWS with TypeScript and CDK in a local development environment. Under the hood it uses esbuild. Let’s peek under the hood.

Mechanics

Conceptually tree-shaking is pretty straightforward; just throw away whatever code our application doesn’t use. However there are a great number of caveats and tricks needed to debug and finesse your bundling.

Tree-shaking is a feature provided by all modern JavaScript bundlers. These include tools like Webpack, Turbopack, esbuild, and rollup. If you ask them to produce a bundle they will do their best to remove unused code. But how do they know what is unused?

The fine details may vary from bundler to bundler and between targets but I’ll give an overview of salient properties and options to be aware of. I’ll use the example of using esbuild to produce node bundles for AWS Lambda but these concepts apply generally to anyone who wants to reduce their bundle size.

Measuring

Before trying to reduce your bundle size you need to look at what’s being bundled, how much space everything takes up, and why. There are a number of tools at our disposal which help visualize and trace the tree-shaking process.

Bundle Buddy

This is one of the best tools for analyzing bundles visually and it has very rich information. You will need to ask your bundler to produce a meta-analysis of the bundling process and run Bundle Buddy on it (it’s all local browser based). It supports webpack, create-react-app, rollup, rome, parcel, and esbuild. For esbuild you specify the --metafile=meta.json option.

When you upload your metafile to Bundle Buddy you will be presented with a great deal of information. Let’s go through what some of it indicates.

Bundle Buddy in action

Let’s start with the duplicate modules.

This section lets you know that you have multiple versions of the same package in your bundle. This can be due to your dependencies or your project depending on different versions of a package which cannot be resolved to use the same version for some reason.

Here you can see I have versions 3.266.0 and 3.272 of the AWS SDK and two versions of fast-xml-parser. and The best way to hunt down why different versions may be included is to simply ask your package manager. For example you can ask pnpm:

$ pnpm why fast-xml-parser

dependencies:
@aws-sdk/client-cloudformation 3.266.0
├─┬ @aws-sdk/client-sts 3.266.0
│ └── fast-xml-parser 4.0.11
└── fast-xml-parser 4.0.11
@aws-sdk/client-cloudwatch-logs 3.266.0
└─┬ @aws-sdk/client-sts 3.266.0
  └── fast-xml-parser 4.0.11
...
@prisma/migrate 4.12.0
└─┬ mongoose 6.8.1
  └─┬ mongodb 4.12.1
    └─┬ @aws-sdk/credential-providers 3.282.0
      ├─┬ @aws-sdk/client-cognito-identity 3.282.0
      │ └─┬ @aws-sdk/client-sts 3.282.0
      │   └── fast-xml-parser 4.1.2
      ├─┬ @aws-sdk/client-sts 3.282.0
      │ └── fast-xml-parser 4.1.2
      └─┬ @aws-sdk/credential-provider-cognito-identity 3.282.0
        └─┬ @aws-sdk/client-cognito-identity 3.282.0
          └─┬ @aws-sdk/client-sts 3.282.0
            └── fast-xml-parser 4.1.2

So if I want to shrink my bundle I need to figure out how to get it so that both @aws-sdk/client-* and @prisma/migrate can agree on a common version to share so that only one copy of fast-xml-parser needs to end up in my bundle. Since this function shouldn’t even be importing @prisma/migrate (and certainly not mongodb) I can use that as a starting point for tracking down an unneeded import which will discuss shortly. Alternatively you can open a PR for one of the dependencies to use a looser version spec (e.g. ^4.0.0) for fast-xml-parser or @aws-sdk/client-sts.

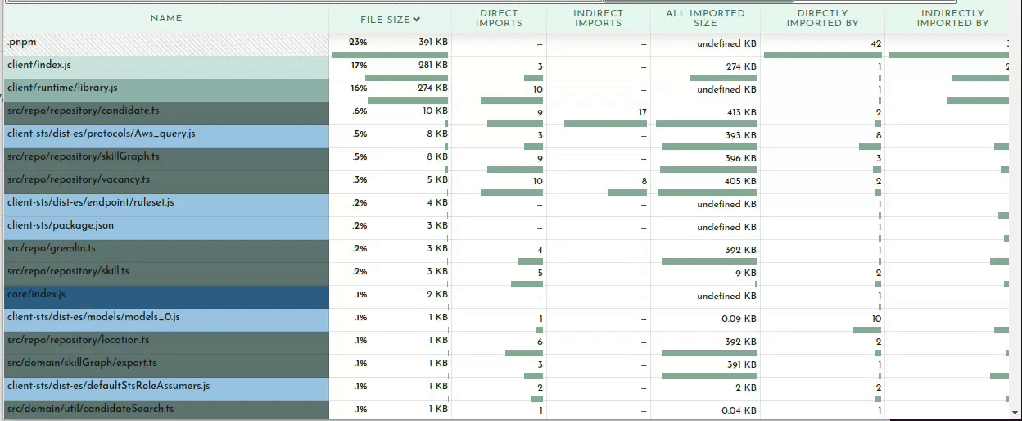
With duplicate modules out of the way, the main meat of the report is the bundled modules. This will usually be broken up into your code and stuff from node_modules:

When viewing in Bundle Buddy you can click on any box to zoom in for a closer look. We can see that of the 1.63MB that comprises our bundle, 39K is for my actual function code:

This is interesting but not where we need to focus our efforts.

Clearly the prisma client and runtime are taking up sizable parcels of real-estate. There’s not much you can do about this besides file a ticket on GitHub (as I did here with much of this same information).

But looking at our node_modules we can see at a glance what is taking up the most space:

This is where you can survey what dependencies are not being tree-shaken out. You may have some intuitions about what belongs here, doesn’t belong here, or seems too large. For example in the case of my bundle the two biggest dependencies are on the left there, @redis-client (166KB) and gremlin 97KB). I do use redis as a caching layer for our Neptune graph database, of which gremlin is a client library that one uses to query the database. Because I know my application and this function I know that this function never needs to talk to the graph database so it doesn’t need gremlin. This is another starting point for me to trace why gremlin is being required. We’ll look at that later on when we get into tracing. Also noteworthy is that even though I only use one redis command, the code for handling all redis commands get bundled, adding a cost of 109KB to my bundle.

Finally the last section in the Bundle Buddy readout is a map of what files import other files. You can click in for what looks like a very interesting and useful graph but it seems to be a bit broken. No matter, we can see this same information presented more clearly by esbuild.

esbuild –analyze

Your bundler can also operate in a verbose mode where it tells you WHY certain modules are being included in your bundle. Once you’ve determined what is taking up the most space in your bundle or identified large modules that don’t belong, it may be obvious to you what the problem is and where and how to fix it. Oftentimes it may not be so clear why something is being included. In my example above of including gremlin, I needed to see what was requiring it.

We can ask our friend esbuild:

esbuild --bundle --analyze --analyze=verbose script.ts --outfile=tmp.js 2>&1 | less

The important bit here being the --analyze=verbose flag. This will print out all traces of all imports so the output gets rather large, hence piping it to less. It’s sorted by size so you can start at the top and see why your biggest imports are being included. A couple down from the top I can see what’s pulling in gremlin:

   ├ node_modules/.pnpm/gremlin@3.6.1/node_modules/gremlin/lib/process/graph-traversal.js ─── 13.1kb ─── 0.7%
   │  └ node_modules/.pnpm/gremlin@3.6.1/node_modules/gremlin/index.js
   │     └ backend/src/repo/gremlin.ts
   │        └ backend/src/repo/repository/skillGraph.ts
   │           └ backend/src/repo/repository/skill.ts
   │              └ backend/src/repo/repository/vacancy.ts
   │                 └ backend/src/repo/repository/candidate.ts
   │                    └ backend/src/api/graphql/candidate/list.ts

This is extremely useful information for tracking down exactly what in your code is telling the bundler to pull in this module. After a quick glance I realized my problem. The file repository/skill.ts contains a SkillRepository class which contains methods for loading a vacancy’s skills which is used by the vacancy repository which is eventually used by my function. Nothing in my function calls the SkillRepository methods which need gremlin, but it does include the SkillRepository class. What I foolishly assumed was that the methods on the class I don’t call will get tree-shaken out. This means that if you import a class, you will be bringing in all possible dependencies any method of that class brings in. Good to know!

@next/bundle-analyzer

This is a colorful but limited tool for showing you what’s being included in your NextJS build. You add it to your next.config.js file and when you do a build it will pop open tabs showing you what’s being bundled in your backend, frontend, and middleware chunks.

The amount of bullshit @apollo/client pulls in is extremely aggravating to me.

Modularize Imports

It was helpful for learning that using top-level Material-UI imports such as import { Button, Dialog } from "@mui/material" will pull in ALL of @mui/material into your bundle. Perhaps this is because NextJS still is stuck on CommonJS, although that is pure speculation on my part.

While you can fix this by assiduously doing import { Button } from "@mui/material/Button" everywhere this is hard to enforce and tedious. There is a NextJS config option to rewrite such imports:

  modularizeImports: {
    "@mui/material": {
      transform: "@mui/material/{{member}}",
    },
    "@mui/icons-material": {
      transform: "@mui/icons-material/{{member}}",
    },
  },

Webpack Analyzer

Has a spiffy graph of imports and works with Webpack.

Tips and Tricks

CommonJS vs. ESM

One factor that can affect bundling is using CommonJS vs. EcmaScript Modules (ESM). If you’re not familiar with the difference, the TypeScript documentation has a nice summary and the NodeJS package docs are quite informative and comprehensive. But basically CommonJS is the “old, busted” way of defining modules in JavaScript and makes use of things like require() and module.exports, whereas ESM is the “cool, somewhat less busted” way to define modules and their contents using import and export keywords.

Tree-shaking with CommonJS is possible but it is more wooley due to the more procedural format of defining exports from a module whereas ESM exports are more declarative. The esbuild tool is specifically built around ESM, in the docs it says:

This way esbuild will only bundle the parts of your packages that you actually use, which can sometimes be a substantial size savings. Note that esbuild’s tree shaking implementation relies on the use of ECMAScript module import and export statements. It does not work with CommonJS modules. Many packages on npm include both formats and esbuild tries to pick the format that works with tree shaking by default. You can customize which format esbuild picks using the main fields and/or conditions options depending on the package.

So if you’re using esbuild, it won’t even bother trying unless you’re using ESM-style imports and exports in your code and your dependencies. If you’re still typing require then you are a bad person and this is a fitting punishment for you.

As the documentation highlights, there is a related option called mainFields which affects which version of a package esbuild resolves. There is a complicated system for defining exports in package.json which allows a module to contain multiple versions of itself depending on how it’s being used. It can have one entrypoint if it’s require‘d, a different one if imported, or another if used in a browser.

The upshot is that you may need to tell your bundler explicitly to prefer the ESM (“module“) version of a package instead of the fallback CommonJS version (“main“). With esbuild the option looks something like:

esbuild --main-fields=module,main --bundle script.ts 

Setting this will ensure the ESM version is preferred, which may result in improved tree-shaking.

Minification

Tree-shaking and minification are related but distinct optimizations for reducing the size of your bundle. Tree-shaking eliminates dead code, whereas minification rewrites the result to be smaller, for example replacing a function identifier e.g. “frobnicateMajorBazball” with say “a1“.

Usually enabling minification is a simple option in your bundler. This bundle is 2.1MB minified, but 4.5MB without minification:

❯ pnpm exec esbuild --format=esm --target=es2022 --bundle --platform=node --main-fields=module,main  backend/src/api/graphql/candidate/list.ts --outfile=tmp.js

  tmp.js  4.5mb ⚠️

⚡ Done in 239ms


❯ pnpm exec esbuild --minify --format=esm --target=es2022 --bundle --platform=node --main-fields=module,main  backend/src/api/graphql/candidate/list.ts --outfile=tmp-minified.js

  tmp-minified.js  2.1mb ⚠️

⚡ Done in 235ms

Side effects

Sometimes you may want to import a module not because it has a symbol your code makes use of but because you want some side-effect to happen as a result of importing it. This may be an import that extends jest matchers, or initializes a library like google analytics, or some initialization that is performed when a file is imported.

Your bundler doesn’t always know what’s safe to remove. If you have:

import './lib/initializeMangoids'

In your source, what should your bundler do with it? Should it keep it or remove it in tree-shaking?

If you’re using Webpack (or terser) it will look for a sideEffects property in a module’s package.json to check if it’s safe to assume that simply importing a file does not do anything magical:

{
  "name": "your-project",
  "sideEffects": false
}

Code can also be annotated with /*#__PURE__ */ to inform the minifier that this code has no side effects and can be tree-shaken if not referred to by included code.

var Button$1 = /*#__PURE__*/ withAppProvider()(Button);

Read about it in more detail in the Webpack docs.

Externals

Not every package you depend on needs to necessarily be in your bundle. For example in the case of AWS lambda the AWS SDK is included in the runtime. This is a fairly hefty dependency so it can shave some major slices off your bundle if you leave it out. This is done with the external flag:

❯ pnpm exec esbuild --minify --format=esm --target=es2022 --bundle --platform=node --main-fields=module,main  backend/src/api/graphql/candidate/list.ts --outfile=tmp-minified.js

  tmp-minified.js  2.1mb 


❯ pnpm exec --external:aws-sdk --minify --format=esm --target=es2022 --bundle --platform=node --main-fields=module,main  backend/src/api/graphql/candidate/list.ts --outfile=tmp-minified.js

  tmp-minified.js  1.8mb 

One thing worth noting here is that there are different versions of packages depending on your runtime language and version. Node 18 contains the AWS v3 SDK (--external:@aws-sdk/) whereas previous versions contain the v2 SDK (--external:aws-sdk). Such details may be hidden from you if using the NodejsFunction CDK construct or SST Function construct.

On the CDK slack it was recommended to me to always bundle the AWS SDK in your function because you may be developing against a different version than what is available in the runtime. Or you can pin your package.json to use the exact version in the runtime.

Another reason to use externals is if you are using a layer. You can tell your bundler that the dependency is already available in the layer so it’s not needed to bundle it. I use this for prisma and puppeteer.

Performance Impacts

For web pages the performance impacts are instantly noticeable with a smaller bundle size. Your page will load faster both over the network and in terms of script parsing and execution time.

Another way to get an idea of what your node bundle is actually doing at startup is to profile it. I really like the 0x tool which can run a node script and give you a flame graph of where CPU time is spent. This can be an informative visualization and let you dig into what is being called when your script runs:

For serverless applications you can inspect the cold start (“initialization”) time for your function on your cloud platform. I use the AWS X-Ray tracing tool. Compare before and after some aggressive bundle size optimizations:

The cold-start time went from 2.74s to 1.60s. Not too bad.

The Web Developer’s Checklist Manifesto

Dmitry Spiridonov 9 min read

Surgeons and military leaders use checklists to ensure consistently high levels of quality in mission-critical work. So why don’t we use them more in software?

We can. And should. Here’s how –

In my job at JetBridge, I work with some of the most experienced software development managers and some of the most demanding enterprise clients around the World. Over the years I’ve developed a checklist for releasing new website builds that will save you time and potential embarrassment. Use this consistently and your coworkers and managers will think you’re a “rock star.”

But before we jump into the checklist I assume that you have done all the development work in terms of the website functionality and its content, you have reviewed all the pages yourself or with the client and your next big step is releasing it to the world.

Checklist:

1. Set up a staging environment

Whether you want to test a new feature on the website, show it to the client, or run performance tests, you should have a staging environment set up. A stage environment is an environment for testing that exactly resembles a production environment.

2. Set up monitoring

Whether your hosting provider drops the ball or you accidentally publish a change that breaks one of your pages or the whole website, setting up an uptime monitoring tool will help you get notified about the issue by Text/Email/Slack message in a timely fashion. Some popular services include: sentry.io, uptimerobot.com, statuscake.com.

3. Compress images

To optimize website load time and improve its SEO, optimize the images used on the website. The primary goal of formatting your images is to find the balance between the lowest file size and acceptable quality. You can use tools like imageoptim.com for the optimization of your images.

4. Run the Google Lighthouse test and address reported issues

Lighthouse from Google is a tool that audits load times, accessibility and search engine optimization of web pages. It includes the ability to test progressive web applications for compliance with standards and best practices. Make sure to run the Lighthouse on a deployed environment (dev/stage) and not only locally.

Run the Google Lighthouse test

5. Set up a 404 page

What happens if the user goes to a non-existing page accidentally or because of a broken link? Will the user see this unfriendly message?

Set up a 404 page

Take some time to design a nice 404 page that will allow the user to go the main page of the website:

6. Set up a favicon

Favicon helps your website appear more professional and credible and can be found among all the other tabs more easily.

To add a favicon you can create a .png image and then use one of the following snippets between the <head> tags of your static HTML documents:

<link rel="icon" type="image/png" href="/favicon.png" />

7. Set up Meta Titles, Meta Description and Social Preview Links

Titles help search engines to serve the right results to the user. Moreover, they display the page title to the users in search results so that they can determine whether the page is something they are looking for. As with the favicon, page titles help the user navigate through the open tabs.

Meta description displays the description of your page in search results and while sharing your page on social media.

To add meta tags, describe metadata within HTML document:

<head>
  <title>HTML Elements Reference</title>
  <meta name="description" content="Free Web tutorials">
</head>

Setting up Social Preview links:

Facebook uses <meta> tags leveraging the Open Graph protocol, a classification system for web pages that extends beyond those <meta> tags already defined in HTML5. A complete list of <meta> tags available can be found at the Open Graph Web site. There are so many from which to choose that it can be somewhat intimidating, but only four are actually required:

<meta property="og:title" content="European Travel Destinations">

<meta property="og:description" content="Offering tour packages for individuals or groups.">

<meta property="og:image" content="<http://euro-travel-example.com/thumbnail.jpg>">

<meta property="og:url" content="<http://euro-travel-example.com/index.htm>"

Twitter has its own <meta> tags that are similar to the Open Graph protocol, but uses the “twitter” prefix instead of “og”. As with Facebook, only a few are required:

<meta name="twitter:title" content="European Travel Destinations ">

<meta name="twitter:description" content=" Offering tour packages for individuals or groups.">

<meta name="twitter:image" content=" <http://euro-travel-example.com/thumbnail.jpg>">

<meta name="twitter:card" content="summary_large_image">

8. Create a robots.txt file

robots.txt contains instructions for search engine crawlers regarding the pages that are allowed to be crawled. It’s useful if you want to exclude certain pages from crawling. The presence of the robots.txt file positively influences your SEO. You should put your robots.txt at the root of the website host to which it applies. More about robots.txt: https://moz.com/learn/seo/robotstxt

9. Set up XML sitemaps/HTML sitemap

A sitemap is a file where you provide information about the pages, videos, and other files on your site, and the relationships between them. Search engines like Google read this file to more intelligently crawl your site. A sitemap tells Google which pages and files you think are important in your site, and also provides valuable information about these files: for example, for pages, when the page was last updated, how often the page is changed, and any alternate language versions of a page.

Guide on building and submitting a sitemap: https://support.google.com/webmasters/answer/183668?hl=en

10. Configure active environment variables for the production build

Make sure that you have configured the environment variables (payment service provider publishable keys, backend endpoint URL, etc.) for your build. Remember to never store any secret keys on GitHub due to security reasons. You can use a library like dotenv package to configure you environment variables.

11. Test the website in different browsers, ensuring responsive design on varied devices

Use a staging environment that you’ve set up to do testing on different devices. Make sure that all the functionality of your website is working, make sure you don’t have broken links. Keep in mind that your pages may behave differently on mobile as the interaction on mobile devices is done using touches (not clicks).

You can use a test from Google to test if a particular page is mobile-friendly: https://search.google.com/test/mobile-friendly

I strongly recommend you to use real mobile devices to test the website interactivity instead of just using browsers’ developer tools.

12. Set-up a domain/transfer a domain to your hosting provider/set the nameservers to point to your hosting provider

If your domain registrar is different from your hosting provider – you will have to perform a domain transfer. Migrating a domain to AWS Route53:

https://docs.aws.amazon.com/Route53/latest/DeveloperGuide/domain-transfer-to-route-53.html

Alternatively, instead of transferring the domain, you can make your hosting provider the DNS service for a domain that’s in use. Instructions on Making Route 53 the DNS service for a domain that’s in use for AWS:

https://docs.aws.amazon.com/Route53/latest/DeveloperGuide/migrate-dns-domain-in-use.html

13. Set up a CDN (Content Delivery Network)

A CDN is a really fast way to deliver static content from your website or mobile application to people with regional caching. A CDN is made up of a network of servers (“points of presence” or POPs) in locations all over the world.

Setting up CDN using

Cloudflare: https://support.cloudflare.com/hc/en-us/articles/201720164-Creating-a-Cloudflare-account-and-adding-a-website

AWS Cloudfront (S3): https://aws.amazon.com/cloudfront/getting-started/S3/

14. Set Up an SSL certificate

An SSL certificate encrypts the data that goes from a user’s computer to the target website and back. Every time a user enters information into your site, SSL makes sure it can securely travel from their browser to your web server.

Installing SSL on Cloudfront: https://aws.amazon.com/premiumsupport/knowledge-center/install-ssl-cloudfront/

Getting an SSL certificate on Letsencrypt: https://letsencrypt.org/getting-started/

15. Configure payment processing

If your website accepts payments, you should have a Payment Service Provider configured on your website. Make sure to set up publishable keys for your PSP before deploying the website to production.

16. Link to the terms of service and privacy policy on your website

There are several reasons for having a privacy policy, including that it is a legal requirement – you can be fined if you don’t have one. In addition, having a privacy policy also helps with SEO.

While a Terms and Conditions agreement is recommended to have for your website, it’s not required by law to have this agreement. This agreement sets the rules that users must agree to in order to use your website. Some reasons for having terms of use: prevent abuses, own your Content, terminate accounts, limit liability, set the governing law. If your company or your client doesn’t have a dedicated lawyer to prepare these documents, you can look for Privacy Policy and Terms and Conditions generators on the Internet (make sure to review and edit them to suit your service).

You may want to extend this list with other items specific to the industry you work in or business processes of your company. Happy shipping 🚢!

8 Simple Ways to Improve Your Client Communication

Anna Medvedeva 6 min read

Talking with clients involves many variables like business, money, strategy, and of course the project itself. But no matter how good your code quality or analysis, the client will always remember how well you communicated.

Communication itself is an intricate jigsaw puzzle incorporating psychology and “soft skills” that can tease out what the client really wants – without the client knowing what they really want. Only through this type of “proactive communication” can you achieve the optimal results for you and your clients.

At JetBridge (and hopefully your work environment as well) we’re encouraged to speak up and challenge our clients if we disagree with the best manner of executing the project’s goal. This requires diplomacy and the courage to vocalize your opinions and ideas. Or as our CEO John often says, “Stand up for yourself. Speak up. Speak out.”

So I wanted to share what I now understand as some simple tricks and tips that help international software developers look and sound more professional.

1. Where to talk: Make sure it’s easy for the client to communicate.

 Do: Send a letter where you ask which way/platform is most suitable for the client to use in order to connect with you. If you are suggesting any platform the client doesn’t have any experience with, make a small tutorial/call/text that explains how to use it and its benefits.

 Don’t

  • Be silent and wait for the client to suggest something.
  • Send an invitation to any platform without making sure the client knows how to use it.
  • Be afraid to make better suggestions that may improve communication with the client.

Tips:

  • Always be available, reply to your emails within one day, answer any calls/messages from the client, even on weekends. Just a simple reply where you schedule a call on workdays will do.

2. Understand your audience:

Do: Make sure you talk the way your client understands. Talk with data, prepare analogies, and try to adapt what you are trying to say into something the client will understand. 

Don’t

  • Overload the client with too many technical terms if they’re non-technical.
  • Deep dive into a very isolated and narrow technical part, not thinking what is most important for the client to hear.

Tips: 

  • If the client doesn’t have any prior technical background, use common words to explain technical jargon. (e.g. use ‘system’ instead of ‘back-end’, ‘website’/‘app’ instead of ‘front-end’, etc.)
  • If the information you’re trying to explain is still too hard to translate, try to help the client understand the underlying technical information in broad strokes (at a “10,000 foot level”).

3. Prepare for the meeting:

Do: Prepare a small list of talking points and issues before the meeting. If there will be several other attendees, research, and prepare who they are and what role they play in the client’s company.

Don’t:

  • Be late.
  • Be unprepared and puzzled with the topics discussed.
  • Wait for the client to discuss all the points needed.
  • Have a clear agenda for the call.

Tips: 

  • Know if the meeting will require a video. Prepare any needed programs/apps beforehand so you can instantly access it if the call requires sharing your screen.
  • Check and test beforehand whether your audio, video works properly.
  • If you don’t know the answer you can say you will check in with the rest of the team and follow up.
  • Have a “green screen” virtual background using tools like Zoom or be in a room where there is little background noise and what’s behind you isn’t dirty laundry. 

4. Discuss everything, don’t assume. 

Do: Double-check what the client asked to do before you start because you may have different views of the subject. It helps to eliminate any misunderstandings and wasted time/money.

Don’t

  • Stay silent and be afraid to ask sometimes even obvious questions. 

Tips: 

  • Answer all questions. It may sound too simple, but double-check that all the client’s questions have answers and you missed no important points. Read and check every email or message that was sent.
  • Don’t be afraid to suggest something better for the client. Starting from part of a feature, UI design, or a way to do something. 

5. Rough estimations: Make assurances, but no promises.

 Do: Make sure the client knows that the estimate is very rough and may change. If you’re not comfortable and hesitant to answer, tell that to the client and explain your reasoning. You also can ask for more time to answer. Don’t be afraid to “push back” on the client if it’s her or his fault that the project is being delayed!

 Don’t:

  • Be afraid to say it may take more time than expected.
  • Promise an exact date and time when it will be delivered; it will be misleading if you don’t meet your deadlines and may lower the quality of delivery.

 Tips: 

  • If you need to do more research or you’re waiting to meet some requirements, you can tell the client how long it will take.

6. Status update: Be proactive and reasonably overcommunicate

 Do: Make sure the client knows the status of the projects at least once a week. Inform about extra added features, testing status, and any upcoming changes. The client should be comfortable with the amount of information they get.

 Don’t:

  • Stay silent and make the client call/write you asking about the status repeatedly.
  • Bombard the client with information overload. 

Tips:

  • It all depends on the project of course, but generally do not update the client more than 2-3 times a week. 

7. Delivering (parts/features): find the best way to show and explain the additional feature that you recently delivered.

 Do: Send a small screen recording showing how the feature can be used and where to find it. Or make an appropriate explanation by text or using screenshots. The key point is to make a simple but useful guide for the client to see the feature and the progress. Eliminate any guessing part from the client-side.

 Don’t:

  • Hide it, or think the client will instantly see the difference with the recent update. 

 Tips:

  • Understand your audience and double-check that the explanation is easy to understand for the person with no tech background.

8. Feedback: get feedback from the client as soon as possible. It will reduce the time between feature delivery and overall development.

 Do: Ask the client to review the added feature as soon as it’s delivered. Comment on how they can test it and where to find it. It should be easy for the client to see and understand what they should test. Demand that the client also help in the user testing!

Don’t:

  • Deliver features silently and make it pile up.
  • Make empty promises to “punt” the hard discussions until next week.

Tips: 

  • Encourage more questions and discuss any parts you’re not sure about.
  • Save and document everything the client said, it will help to track your progress, plan any features that you discussed, and not forget anything.
  • Make sure you address the feedback, and the client didn’t repeat any negative feedback repeatedly.
  • Clients shouldn’t be searching for the updates by themselves. Make sure they know what to expect.

Perfecting both listening and speaking skills, fully understanding the intricacies of customer business, brand communication strategies, and its target audience will ultimately lead to success. I might say that every project, as well as a customer, is truly unique but the framework listed with 8 simple steps can perform miracles – not just for your client but for your career.

How To Write Effective Tickets and PRs

Roman Kyslyy 2 min read

Although it might be tempting to quickly file a ticket that will scope multiple work segments and give it a short description (that is clear to you and maybe a few teammates), later such tasks may affect negatively on the entire team’s productivity.


Divide Et Impera

Here’s a blogpost from guys who do project management tools for living, on why it’s important to properly size the task and break it into smaller chunks.

A summarized list of reasons:

  • You can’t remember everything. So while working on big pieces of work sometimes it’s easy to lose focus and accidentally skip something important.
  • Smaller tasks are way easier to estimate and describe clearly.
  • Smaller tasks produces less code that is easier to review effectively. Also frequent feedbacks help us to keep ourselves on a right track and improve implementation in the fly.
  • Completing a task feels good. The more often your work is delivered, the more often your brain releases dopamine.

Imagine working on some food delivery service and creating a task like “Implement ‘become a deliverer’ flow on front-end”. It might be worth breaking it down into pieces like:

  • “Create base UI components”
  • “Extend front-end services with ‘become deliverer’ flow API calls with unit tests”
  • “Implement ‘Personal Info’ step layout with Cypress tests”
  • “Implement ‘Transport’ step …”

It is also a good practice to create SPIKE tickets if you feel uncertain of possible implementation ways. Investigation results are good to be discussed with team members afterwards.


Reasonable Ticket Structure

Here’s a list of things that speed up developer’s understanding of the problem ×100 times:

  • Acceptance criteria – an answer to a question “What should we have/know/be able to do when work on this task is done?”.
  • Clear steps to reproduce the issue if it’s a bug-fix ticket (imagine yourself reproducing it at app’s initial state).
  • Screenshots/GIFs/video attachments of known front-end bugs.
  • If you have any guesses where the bug might be fixed, post this info in ticket description.
  • Links to designs really come in handy for layout implementation tasks.
  • Links to open/merged PRs, that would help quickly find code of changes you made.
  • What the motivation is. Explain the problem that you want to solve and when appropriate, present your idea for a solution to the problem but leave room for discussion or alternate approaches.

How About Pull Requests?

Main purpose of a PR is not just to merge your changes into master, but to give other people a good understanding of your work’s context and reasons behind your changes. Perception of all that stuff is way easier when reviewing a short PR that scopes some single logical concept (or at least not too many of them).

Short PRs are good because they:

  • Speed up code review process and consequently the product development.
  • Reduce bugs introduction into codebase.
  • Don’t block other developers and reduce chances of conflicts between branches.

When reading through your finished work try asking yourself “Will other people easily understand what and why is happening here? Will they not lose focus and understand all the connections between changes made?”.

If not, there’s absolutely nothing wrong with breaking your PR into bunch of smaller ones that would be easier to digest.

A couple of great ways to make PRs enjoyable to read through:

  • Add a link to the ticket where changes are requested.
  • Give it a sufficient description of what changes were made to achieve requested result.
  • Add screenshots, GIFs or videos of layout implementation results.
  • Provide steps for local testing, if appropriate.
  • Add comments to your code that you expect to be unclear for others for some reason (although of course we aim to write self-descriptive code needing no explanations).


Try thinking of tickets and PRs that you create as a product that you desire to sell. The more you commit to the effort of creating it – the more grateful and happy will be people working on it and reviewing it.

Cheers!