Web3 is: read/write/execute with artificial scarcity and cryptographic identity. Should you care? Yes.
What?
Let’s break it down.
Back when I started my career, “web2.0” was the hot new thing.

The “2.0” part of it was supposed to capture a few things: blogs, rounded corners on buttons and input fields, sharing of media online, 4th st in SOMA. But what really distinguished it from “1.0” was user-generated content. In the “1.0” days if you wanted to publish content on the web you basically had to upload an HTML file, maybe with some CSS or JS if you were a hotshot webmaster, to a server connected to the internet. It was not a user-friendly process and certainly not accessible to mere mortals.
The user-generated content idea was that websites could allow users to type stuff in and then save it for anyone to see. This was mostly first used for making blogs like LiveJournal and Moveable Type possible, later MySpace and Facebook and Twitter and wordpress.com where I’m still doing basically the same thing as back then. I don’t have to edit a file by hand and upload it to a server. You can even leave comments on my article! This concept seems so mundane to us now but it changed the web into an interactive medium where any human with an internet connection and cheap computer can publish content to anyone else on the planet. A serious game-changer, for better or for worse.
If you asked most people who had any idea about any of this stuff what would be built with web 2.0 they would probably have said “blogs I guess?” Few imagined the billions of users of YouTube, or grandparents sharing genocidal memes on Facebook, or TikTok dances. The concept of letting normies post stuff on the internet was too new to foresee the applications that would be built with it or the frightful perils it invited, not unlike opening a portal to hell.
Web3
The term “web3” is designed to refer to a similar paradigm shift underway.
Before getting into it I want to address the cryptocurrency hype. Cryptocurrency draws in a lot of people, many of dubious character qualities, that are lured by stories of getting rich without doing any work. This entire ecosystem is a distraction, although some of the speculation is based on organizations and products which may or may not have actual value and monetizable utility at some point in the present or future. This article is not about cryptocurrency, but about the underlying technologies which can power a vast array of new technologies and services that were not possible before. Cryptocurrency is just the first application of this new world but will end up being one of the most boring.
What powers the web3 world? What underlies it? With the help of blockchain technology a new set of primitives for building applications is becoming available. I would say the key interrelated elements are: artificial scarcity, cryptographic identity, and global execution and state. I’ll go into detail what I mean here, although to explain these concepts in detail in plain English is not trivial so I’m going to skip over a lot.
Cryptographic identity: your identity in web3-land consists of what is called a “keypair” (see Wikipedia), also known as a wallet. The only thing that gives you access to control your identity (and your wallet) is the fact that you are in physical or virtual possession of the “private key” half of the keypair. If you hold the private key, you can prove to anyone who’s asking that you own the “public key” associated with it, also known as your wallet address. So what?
Your identity is known to the world as your public key, or wallet address. There is an entire universe of possibilities that this opens up because only you, the holder of your private key, can prove that you own that identity. To list just a short number of examples:
- No need to create a new account on every site or app you use.
- No need for relying on Facebook, Google, Apple, etc to prove your identity (unless you want to).
- People can encrypt messages for you that only you can read, without ever communicating with you, and post the message in public. Only the holder of the private key can decrypt such messages.
- Sign any kind of message, for example voting over the internet or signing contracts.
- Strong, verifiable identity. See my e-ID article for one such example provided by Estonia.
- Anonymous, throwaway identities. Create a new identity for every site or interaction if you want.
- Ownership or custody of funds or assets. Can require multiple parties to unlock an identity.
- Link any kind of data to your identity, from drivers licenses to video game loot. Portable across any application. You own all the data rather than it living on some company’s servers.
- Be sure you are always speaking to the same person. Impossible to impersonate anyone else’s identity without stealing their private key. No blue checkmarks needed.

There are boundless other possibilities opened up with cryptographic identity, and some new pitfalls that will result in a lot of unhappiness. The most obvious is the ease with which someone can lose their private key. It is crucial that you back yours up. Like write the recovery phrase on a piece of paper and put it in a safe deposit box. Brace yourself for a flood of despairing clickbait articles about people losing their life savings when their computer crashes. Just as we have banks to relieve us of the need to stash money under our mattresses, trusted (and scammer) establishments with customer support phone numbers and backups will pop up to service the general populace and hold on to their private keys.
Artificial scarcity: this one should be the most familiar by now. With blockchain technology came various ways of limiting the creation and quantity of digital assets. There will only ever be 21 million bitcoins in existence. If your private key proves you own a wallet with some bitcoin attached you can turn it into a nice house or lambo. NFTs (read this great deep dive explaining WTF a NFT is) make it possible to limit ownership of differentiated unique assets. Again we’re just getting started with the practical applications of this technology and it’s impossible to predict what this will enable. Say you want to give away tickets to an event but only have room for 100 people. You can do that digitally now and let people trade the rights. Or resell digital movies or video games you’ve purchased. Or the rights to artwork. Elites will use it for all kinds of money laundering and help bolster its popularity.
Perhaps you require members of your community to hold a certain number of tokens to be a member of the group, as with Friends With Benefits to name one notable example. If there are a limited number of $FWB tokens in existence, it means these tokens have value. They can be transferred or resold from people who aren’t getting a lot out of their membership to those who more strongly desire membership. As the group grows in prestige and has better parties the value of the tokens increases. As the members are holders of tokens it’s in their shared interest to increase the value the group provides its members. A virtuous cycle can be created. Governance questions can be decided based on the amount of tokens one has, since people with more tokens have a greater stake in the project. Or not, if you want to run things in a more equitable fashion you can do that too. Competition between different organizational structures is a Good Thing.
This concept is crucial to understand and so amazingly powerful. When it finally clicked for me is when I got super excited about web3. New forms of organization and governance are being made possible with this technology.
The combination of artificial scarcity, smart contracts, and verifiable identity is a super recipe for new ways of organizing and coordinating people around the world. Nobody knows the perfect system for each type of organization yet but there will be countless experiments done in the years to come. No technology has more potential power than that which coordinates the actions of people towards a common goal. Just look at nation states or joint stock companies and how they’ve transformed the world, both in ways good and bad.
The tools and procedures are still in their infancy, though I strongly recommend this terrific writeup of different existing tools for managing these Decentralized Autonomous Organizations (DAOs). Technology doesn’t solve all the problems of managing an organization of course, there are still necessary human layers and elements and interactions. However some of the procedures that have until now rested on an reliable and impartial legal system (something most people in the world don’t have access to) for the management and ownership of corporations can now be partially handled not only with smart contracts (e.g. for voting, enacting proposals, gating access) but investment, membership, and participation can be spread to theoretically anyone in the world with a smartphone instead of being limited to the boundaries of a single country and (let’s be real) a small number of elites who own these things and can make use of the legal system.
Any group of like-minded people on the planet can associate, perhaps raise investment, and operate and govern themselves as they see fit. Maybe for business ventures, co-ops, nonprofits, criminal syndicates, micro-nations, art studios, or all sorts of new organizations that we haven’t seen before. I can’t predict what form any of this will take but we have already seen the emergence of DAOs with billions of dollars of value inside them and we’re at the very, very early stages. This is what I’m most juiced about.
Check out the DAO Dashboard. This is already happening and it’s for real.

And to give one more salient example: a series of fractional ownership investments can be easily distributed throughout the DAO ecosystem. A successful non-profit that sponsors open source development work, Gitcoin, can choose to invest some of its GTC token in a new DAO it wants to help get off the ground, Developer DAO. The investment proposal, open for everyone to see and members to vote on, would swap 5% of the newly created Developer DAO tokens (CODE being the leading symbol proposal right now) for 50,000 GTC tokens, worth $680,000 at the time of writing. Developer DAO plans to use this and other funds raised to sponsor new web3 projects acting as an incubator that helps engineers build their web3 skills up for free. Developer DAO can invest its own CODE tokens in new projects and grants, taking a similar fraction of token ownership in new projects spun off by swapping CODE tokens. In this way each organization can invest a piece of itself in new projects, each denominated in their own currency which also doubles as a slice of ownership. It’s like companies investing shares of their own stock into new ventures without having to liquidate (liquidity can be provided via Uniswap liquidity pools). In this case we’re talking about an organic constellation of non-profit and for-profit ventures all distributing risk, investment capital, and governance amongst themselves with minimal friction that anyone in the world can participate in.
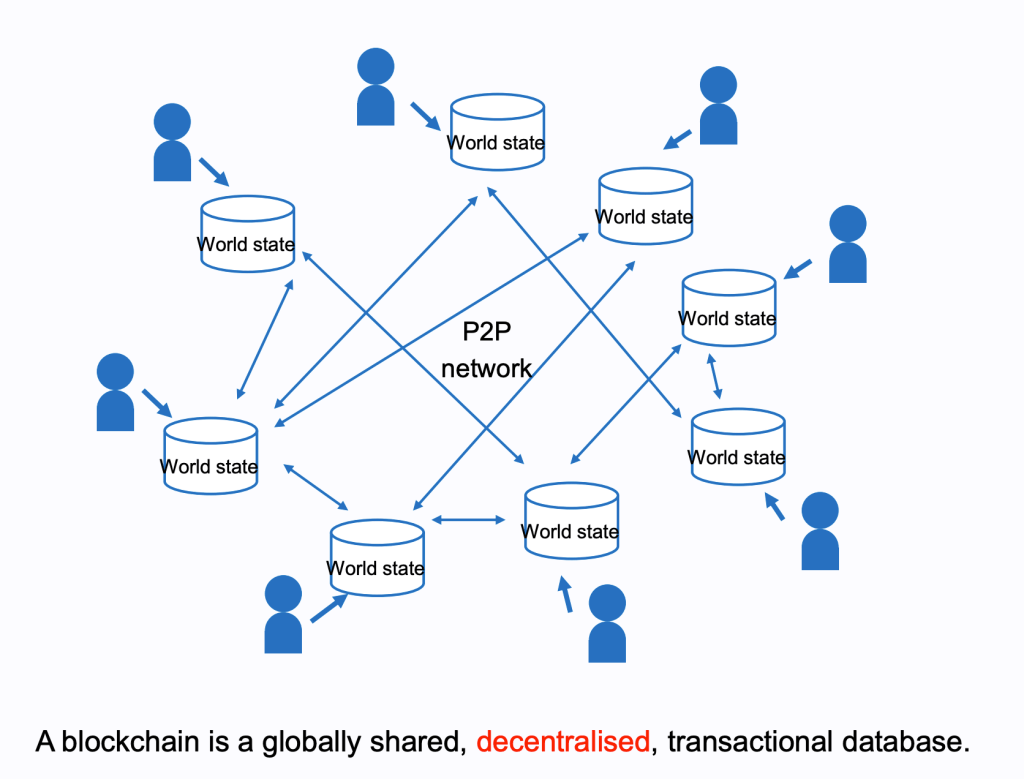
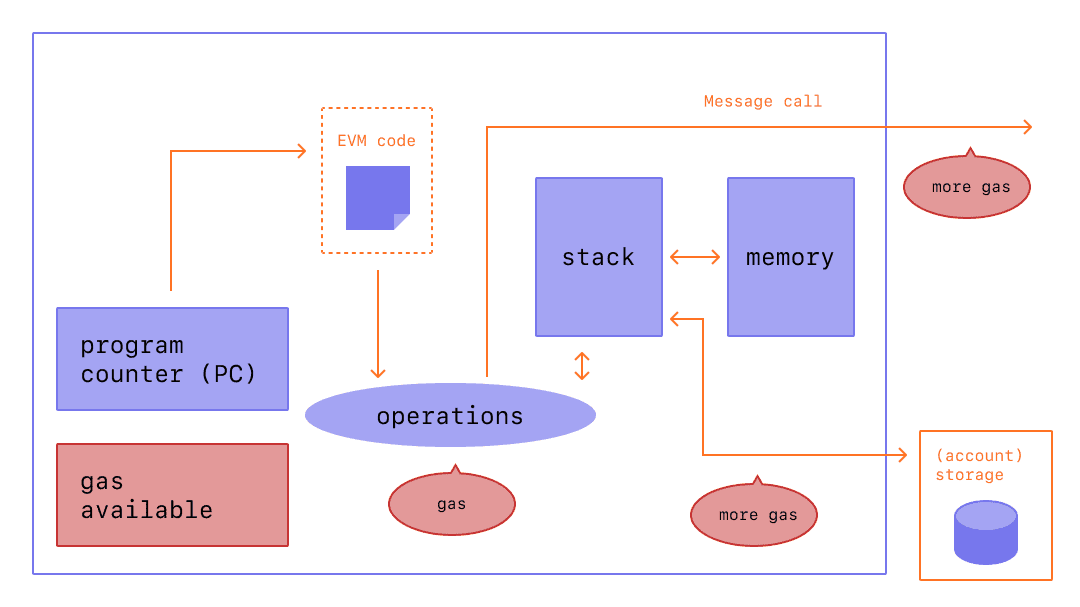
Global execution and state: there are now worldwide virtual machines, imaginary computers which can be operated by anyone and the details of their entire history, operations, and usage is public. These computers can be programmed with any sort of logic and the programs can be uploaded and executed by anyone, for a fee. Such programs today are usually referred to as smart contracts although that is really just one possible usage of this tool. What will people build with this technology? It’s impossible to predict at this early age, like imagining what smartphones will look like when the PC revolution is getting started.

These virtual machines are distributed across the planet and are extremely resilient and decentralized. No one person or company “owns” Ethereum (to use the most famous example) although there is a DAO that coordinates the standards for the virtual machine and related protocols. When a new proposal is adopted by the organization, the various software writers update their respective implementations of the Ethereum network to make changes and upgrades. It’s a voluntary process but one that works surprisingly well, and is not unlike the set of proposals and standards for the internet that have been managed for decades by the Internet Engineering Task Force (IETF).
Also worth mentioning are zero-knowledge proofs which can enable privacy, things like anonymizing transactions and messaging. Of course these will for sure be used to nefarious ends, but they also open up possibilities for fighting tyranny and free exchange of information. Regardless of my opinion or anyone else’s, the cat’s out of the bag and these will be technologies that societies will need to contend with.

Why should I care?
I didn’t care until recently, a month ago maybe. When I decided to take a peek to see what was going on in the web3 space, I found a whole new world. There are so many engineers out there who have realized the potential in this area, not to mention many of the smartest investors and technologists. The excitement is palpable and the amount of energy in the community is invigorating. I joined the Developer DAO, a new community of people who simply want to work on cool stuff together and help others learn how to program with this new technology. Purely focused on teaching and sharing knowledge. People from all over the world just magically appear and help each other build projects, not asking for anything in return. If you want to learn more about the web3 world you could do a lot worse than following @Developer_DAO on twitter.
As with all paradigm shifts, some older engineers will scoff and dismiss the new hotness as a stupid fad. There were those who pooh-poohed personal computers which could never match the power and specialized hardware of mainframes, those who mocked graphical interfaces as being for the weak, a grumpy engineer my mother knew who said the internet is “just a fad”, and people like Oracle’s CEO Larry Ellison saying the cloud is just someone else’s computer. Or me, saying the iPhone looks like a stupid idea.
The early phase of web3 is cryptocurrencies and blockchains (“layer 1”) solutions. Not something that non-technical people or really anyone can take full advantage of because there are few interfaces to interact with it. In the phase we’re in right now developer tools and additional layers of abstraction (“layer 2”) are starting to become standardized and accessible, and it’s just now starting to become possible to build web3 applications with user interfaces. Very soon we’ll start to see new types of applications appearing, to enable new kinds of communities, organizations, identity, and lots more nobody has dreamed up yet. There will be innumerable scams, a crash like after the first web bubble, annoying memesters and cryptochads. My advice is to ignore the sideshows and distractions and focus on the technology, tooling, and communities that weren’t possible until now and see what creative and world-changing things people build with web3.
For more information I recommend:
- Ethereum.org overview of DAOs (text)
- The decentralized future (podcast)
- Chris Dixon and Naval Ravikant on The Wonders of Web3 (podcast – Tim Ferriss)
- @Developer_DAO on twitter (tweets)