About Me: I’ve created 3 software companies: Five9 (IPO), DoctorBase (cash sale) and JetBridge (current co), much of it using offshore software developers. I’ve made a lot of expensive mistakes you should avoid.
TLDR: Adopt something like our Developer Handbook and give it to every developer before the interview. A majority of offshore developers after reading it decline to interview with us, which is nice because it saves my HR team lots of time by automatically weeding out the bottom 75% (marketplaces and outsourcing companies recruit the bottom 50%).
Most customers who go to marketplaces or outsourcers for competent software developers do not get what they are advertised, often leading to expensive failure for non-technical founders and professional risk for enterprise managers. Here’s how the schemes work (and how to solve for them) –
“Hire ex-Googlers on our marketplace!”
Why would a software engineer who makes $250k+ for FAANG companies (and can WFH) lurk on marketplaces to work on an idiot’s idea with no stability or benefits at a fraction of the wages?
They don’t.
This marketing gimmick works because it’s human nature to go online and believe we found a $100 bill for $20, but the international labor market, especially post-Covid, has become extremely efficient. Even average developers get multiple messages from recruiters every week – they no longer need to go to marketplaces. And they’re mostly remote work offers.
So what kind of developers go onto marketplaces looking for work?
The kind that don’t know how to reverse a string (basic stuff) or will pull a bait-and-switch on you (the developer you talk to will not be the one doing the work).
Marketplaces can be very effective for sourcing UIUX designers, graphic design, mechanical turk tasks and more, but increasingly competent software developers are not on them.
“Two weeks free if you’re not satisfied!” is often a marketing gimmick by marketplaces. Two weeks is simply not enough (especially for non-technical founders) to determine if a developer is good.
If you find a developer you like on a marketplace, ask them if they’re willing to take a technical pair programming session with an onshore CTO you trust.
Try it – the response is often amusing.
And if you get an amusing response, walk away with your money still in your bank account.
“We take you from MVP to IPO!”
Almost every software outsourcer I know (except the huge ones) are trying to build their own software apps. Outsourcing can be a grueling business and many SMB outsourcers dream of becoming a SaaS company. If they knew how to build successful MVPs they wouldn’t still be in outsourcing.
Because outsourcing is a labor arbitrage game, outsourcing companies try to pay a 3:1 ratio from fees to wages. Meaning if an outsourcing company charges $75/hour, they’re paying the developers about $25/hour.
So why would a competent developer work for an outsourcer that takes 66% of the revenue created when they’re doing all of the work post-sale?
They don’t.
Enterprise outsourcing companies are places for semi-competent software developers to hide on over-staffed teams (and not give a shit), the exact kind you don’t want. Besides, the large outsourcing companies only take “digital transformation” projects that have $1M+ budgets (just look at the earnings reports of the publicly traded outsourcing companies).
SMB outsourcing companies are a great place for project managers and junior developers to cut their teeth (on your dollar).
This gimmick works because enterprises often have legacy projects that smart, ambitious software developers don’t want to work on (like 20 year old banking applications built on J2EE), and SMB outsourcing companies hire a “Product Manager” that can speak decent english (their developers will mostly not).
Most MVPs do not need a Product/Project Manager, they need a competent Tech Lead (a senior fullstack engineer who has led teams before). Ask any experienced Tech Lead and they will confirm.
If an SMB outsourcing company quotes you for both the developers’ time as well as a Project/Product Manager, walk away. It’s a technique used to hide the fact that they don’t have competent developers.
BTW, most competent developers speak English (since most of the educational content, workshops, conferences, etc are in English). Which also makes sense because good developers are supposed to be good at learning languages.
So what’s the solution(s)?
In my experience, and according to all of our data, anywhere from 3% – 9% of offshore software developers are commercially competent. Since software development is a non-licensed profession that often makes 10x more than most jobs in emerging economies, this makes sense.
Outsource the technical interviews to a highly competent 3rd party.
If you’re a technical manager working in an enterprise, you likely don’t have the time (or risk profile) to conduct 11 – 30 technical interviews for every 1 offer to an offshore developer. And if your company needs to make 2 offers for every 1 accepted offer, obviously double that time-number. There are cost savings to be had going offshore, but the risk profile is much greater.
If you’re a non-technical founder, and if you have the money, first hire a technical co-founder or technical employee onshore (or an elite dev offshore). I get it, believe me, it’s incredibly difficult and expensive, it’s easier to just hire someone on a marketplace and test your MVP idea.
The problem is this – it is highly unlikely your idea is the one with Product Market Fit. According to David Rusenko (sold his startup Weebly for $365M to Square) it will likely take 20-30 iterations of your idea before achieving a product that has any chance of making you money. This requires an in-house technical founder/employee who can then manage an offshore team. Relying solely on an offshore team just won’t work.
In 23 years of being in startups, I’ve never seen a non-technical founder without a technical founder ‘get rich’ by partnering with an outsourcing company. Not once.
And if you can’t find a technical founder, honestly ask yourself – how will you find your first 10 enterprise customers or your first 10,000 consumer users? How will you sell investors or sell your company?
And if you’re an enterprise hiring manager, outsource the professional risk by having a highly competent 3rd party conduct the first round of technical interviews for your offshore dev team.
Based Jensen Huang, CEO of Nvidia, which is one of the largest companies in the world by market cap now, said this February that people should stop learning to code. He was making the point that people will soon be able to instruct computers with natural human language to get what they want out of them. If you’re a younger person or a parent, it’s worth asking now, is there still value in learning to program a computer or get a computer science education?
Jensen Huang, CEO of Nvidia, argues that we should stop saying kids should learn to code.
He argues the rise of AI means we can replace programming languages with human language prompts thus enabling everyone to be a programmer.
I respect Jensen enormously and believe he is worth taking seriously, even if he used to slang 3D-Sexy-Elf boxes to gamers. Also to recognize his bias as the manufacturer of the picks and shovels for the current venture gold rush and his incentives to pump up the future perceived value of his company’s stock, if such a thing is even possible at a P/E of 73.
My perspective is as a software practitioner, having been a professional software “engineer” for two decades now, consulted and built companies on software of my design, and writing code every day, something I do not believe Mr. Huang is doing. Let’s start with a little historical perspective.
Past Promises To Eliminate Programmers
Programming real physical computers in the beginning was a laborious process taking weeks to rewire circuitry with plugboards and switches in the early ENIAC and UNIVAC days.
As stored-program machines became more sophisticated and flexible, they could be fed programs in various computer-friendly formats, often via punched cards. These programs were very specific to the architecture of the computer system they were controlling and required specialized knowledge about the computer to make it do what you wanted.
As the utility of computers grew and businesses and government began seeing a need to automate operations, in the 1950’s the U.S. Department of Defense along with industry and academia set up a committee to design a COmmon Business-Oriented Language (COBOL) as a temporary “short-range” solution “good for a year or two” to make the design of business automation software accessible to non-computer-specialists, across a range of industries and fields to promote standards and reusability. The idea was:
Representatives enthusiastically described a language that could work in a wide variety of environments, from banking and insurance to utilities and inventory control. They agreed unanimously that more people should be able to program and that the new language should not be restricted by the limitations of contemporary technology. A majority agreed that the language should make maximal use of English, be capable of change, be machine-independent and be easy to use, even at the expense of power.
The general idea was that now that computers could be instructed in the English language instead of talking to them at their beep-boop level, and programming could be made widely accessible. High-level business requirements could be spelled out in precise business-y language rather than fussing about with operands and memory locations and instruction pointers.
In one sense this certainly was a huge leap forward and did achieve this aim, although to what degree depends on your idea of “widely accessible.” COBOL for business and FORTRAN for science and many many other languages did make programming comparably widely available in contrast to before, although the explosion of personal computers and even more simplified languages like BASIC helped speed things along immensely.
Statistically, the number of people engaged in programming and related computer science fields grew substantially during this period from the 1960s to the year 2000. In the early 1980s, there were approximately 500,000 professional computer programmers in the United States. By the end of the 20th century, this number had grown to approximately 2.3 million programmers due to the tech boom and the widespread adoption of personal computers. The percentage of households owning a computer in the United States increased from 8% in 1984 to 51% in 2000, according to the U.S. Census Bureau. This increase in computer ownership correlates with a greater exposure to programming for the general population.
Every advancement in programming has made the operation of computers more abstract and accessible, which in my opinion is a good thing. It allows programmers to focus on problems closer to providing some value to someone rather than doing undifferentiated mucking about with technical bits and bobs.
As software continues to become more deeply integrated into every aspect of human life, from medicine to agriculture, to entertainment, the military, art, education, transportation, manufacturing, and everything else besides, there has been a need for people to create this software. How many specialists will be needed in the future though?
The U.S. Bureau of Labor Statistics projects the demand for computer programmer jobs in the U.S. to decline 11% from 2022-2032, although notes that 6,700 jobs on average will be created each year due to the need to replace other programmers who may retire (incidentally, COBOL programmers frequently) or exit the market.
So how will AI change this?
Current AI Tooling For Software Development
I’ve been using AI assistants for my daily work, including GitHub’s Copilot for two and a half years, and ChatGPT for the better part of a year. I happily pay for them because they make my life easier and serve valuable functions in helping me to perform some tasks more rapidly. Here’s some of the benefits I get from them:
Finishing what I was going to write anyway.
It’s often the case that I know what code needs to be added to perform some small feature I’m building. Sometimes function by function or line by line, what I’m going to write is mostly obvious based on the surrounding code. There is frequently a natural progression of events, since I’m giving the computer instructions to perform some relatively common task that has been done thousands of times before me by other programmers. Perhaps it’s updating a database record to mark an email as being sent, or updating a customer’s billing status based on the payment of an invoice, or disabling a button while an operation is proceeding. Most of what I’m doing is not groundbreaking never-before-seen stuff, so the next steps in what I’m doing can be anticipated. Giving descriptive names to my files, functions, and variables, and adding descriptive comments is already a great practice for anyone writing maintainable code but also really helps to push Copilot in the right direction. The greatest value here is simply saving me time. Like when you’re writing a reply to an email in Gmail, and it knows how you were going to finish your sentence, so you just tell it to autocomplete what you were going to write anyway, like adding “a great weekend!” to “Have” as a sign-off. Lazy programmers are the most productive programmers and this is a great aid in this pursuit.
Saving me a trip to the documentation.
Most of modern programming is really just gluing other libraries and services together. All of these components you must interface with have their own semantics and vocabulary. If you want to accomplish a task, whether it’s resizing an image or sending a notification to Slack, you typically need to do a quick google search then dig through the documentation of whatever you’re using, which is also often in a multitude of formats and page structures and of highly varying quality. Another time saver is having your AI assistant already aware of how to interface with this particular library or service you’re using, saving you a trip to the documentation.
Writing tests and verifying logic.
It should be mentioned that writing code is actually not all that hard. The real challenge in building software comes in making sure the code you wrote actually does what you expected it to do and doesn’t have bugs. One way we solve this is by writing automated tests that verify the behavior of our code. It doesn’t solve all of our problems but it does add a useful safety net and helps later when you need to modify the code without breaking it. Copilot is useful for automating some of the tedium of this process.
Also sometimes if I have some piece of code with a number of conditions and not very straightforward logic, I will just paste it into ChatGPT and ask me if the logic looks correct. Sometimes it points out potential issues I hadn’t considered or suggests how to rewrite the code to be simpler or more readable.
Finding the appropriate algorithm or formula.
This is less common but sometimes I have some need to perform an operation on data and I don’t know the appropriate algorithm. Suppose I want to get a rough distance between two points on the globe, and I’m more interested in speed rather than accuracy. I don’t know the appropriate formula off the top of my head but I can at least get one suggested to me and it’s ready to convert between the data structures I have available and my desired output format. AIs are great at this.
Problems With “AI” Tooling For Building Software
While the term artificial intelligence is all the buzz right now, there is no intelligence to speak of in any of these commercial tools. They are large language models, which are good at predicting what comes next in a sequence of words, code, etc. I could probably ask one to finish this article for me and maybe it would do a decent job, but I’m not going to.
Fancy autocomplete is powerful and helps with completing something you at least have some idea of how to begin. This sort of tool has fundamental limitations though especially when it comes to software. For one thing, these tools are trained with a finite context window size, meaning they have very small limits in terms of how much information they can work with at any time, can’t really do recursion, and can’t “understand” (using the term very loosely) larger structures of a project.
There are nifty demos of new software being created by AI, which is not such a terribly difficult task. I’ve started hundreds of software projects, there’s no challenge in that. I admit it is very neat to see a napkin drawing of a simple web app turned into code, and this may very well one day in the medium term allow non-technical people to build simple, limited, applications. However, modifying an existing project is a problem that gets drastically harder as the project grows and evolves. Precisely because of the limited context window, an AI agent can’t understand the larger structures that develop in your program. A software program ends up with its own internal representations of data, nomenclatures, interfaces, in essence its own domain-specific programming language for solving its functional requirements. The complexity explodes as each project turns into its own deviation from whatever the LLM has been previously trained on.
Speaking of training, another glaring issue is that computer programmers (I mean, computers that program) only know about what they’ve seen before. Much of that training input is out of date for one thing. Often when I do use a LLM to help me use an API, it will give me commands for an older version of that API which are no longer correct or relevant. New technologies it has particular trouble with, for example giving me all kinds of nonsense about the AWS CDK. But worse than that, anything created after about 2022 or 2023 which be very hard for LLMs to train on because of the “closed loop” problem. This occurs when LLMs begin to learn from their own outputs, a scenario that becomes increasingly likely as they are used to generate more content, including code and documentation. The risk here is twofold: first, there’s the potential for perpetuating inaccuracies. An LLM might generate an incorrect or suboptimal piece of code or explanation, and if this output is ingested back into the training set, the error becomes part of the learning material, potentially leading to a feedback loop of misinformation. Second, this closed loop can lead to a stagnation of knowledge, where the model becomes increasingly confident in its outputs, regardless of their accuracy, because it keeps “seeing” similar examples that it itself generated. This self-reinforcement makes it particularly challenging for LLMs to learn about new libraries, languages, or technologies introduced after their last training cut-off. As a result, the utility of LLMs in programming could be significantly hampered by their inability to stay current with the latest developments, compounded by the risk of circulating and reinforcing their own misconceptions.
If we get rid of most of the programmer specialists as Mr. Huang foresees, then more code generated in the future will be the product of computery-type programmers. They learn by example, but will not always produce the best solution to a given problem, or maybe a great solution but for a slightly different problem. Sure, this can be said about human-style programmers as well, but we’re capable of abstract reasoning and symbolic manipulation in a way that LLMs will never be capable of, meaning we can interrogate the fundamental assumptions being made about how things are done, rather than parroting variations on what’s been seen before and assuming our training data is probably correct because that’s how it was done in the past. Their responses are generated based on patterns in the data they’ve been trained on, not from a process of logical deduction or understanding of a computational problem in the way a human or even a conventional program does. This means that while a LLM can produce code that looks correct, it may not actually function as intended when put into practice, because the model doesn’t truly “understand” the code it’s writing, it’s essentially making educated guesses based on the data it’s seen. While LLMs can replicate patterns and follow templates, they fall short when it comes to genuine innovation or creative problem-solving. The essence of programming often involves thinking outside the box, something that’s inherently difficult for a model that operates by mimicking existing boxes. Even more, programming at its core often involves understanding and manipulating complex systems in ways that are fundamentally abstract and symbolic. This level of abstraction and symbolic manipulation is something that LLMs, as they currently stand, are fundamentally incapable of achieving in a meaningful way.
If these programmer agents do become capable of reasoning and symbolicmanipulation, and if they can reason about large amounts of data, then we will be truly living in a different world. People with money and brains are actively working on these projects and there are financial and reputational incentives now motivating this work in a major way, so I absolutely expect advancements one day. How far that day is off, I dare not speculate on.
The Users Of Computer-Aided Programming Tools
One of the coolest features and biggest footguns about programming is that you can give a computer instructions that it will follow perfectly and without fail exactly as you specify them. I think it’s amazingly neat to have a robot that will do whatever you ask it, never get tired, never need oiling, can be shared and tinkered with, worked on in maximum comfort from anywhere. That’s partly what I love about programming, I enjoy bossing a machine around and imposing my will on it, and it almost never complains. But the problem anyone learns almost immediately when they start writing code is that computers will do exactly what you tell them to do without any idea of what you want them to do. When people communicate with each other there is a huge background of shared context, not to mention gestures, facial expressions, tones, and other verbal and non-verbal channels to help get the message across more accurately. ChatGPT does not seem to get the hint even when I get so frustrated I start swearing at it. Colleagues that work together on a shared task in the context of a larger organization have a shared understanding of purpose, risks, culture, legal environment, etc. that they are operating inside of. Even with all of this, human programmers still err constantly in translating things like business requirements into computer programs. A LLM with none of this out-of-band information will have a much harder time and make many more assumptions than a colleague performing the same task. The LLM may however be better suited for narrowly-defined, well-scoped tasks which are not doing anything new. I hope and believe LLMs will reduce drudgery, boilerplate, and wheel reinventing. But I wouldn’t count on them excelling at building anything new, partly because of how non-specialists will try to communicate with them.
In most professions a sort of jargon develops. Practitioners learn the special meanings of words in their fields, for example in medicine or law or baseball. In the world of software we love applying 10-dollar words like “polymorphism” or “atomicity” to justify our inflated paychecks, but there is another benefit to this jargon, which is it can help us describe common concepts and ideas more precisely. If you say to a coder to “add up all the stuff we sold yesterday”, you may or may not get the answer to the question you think you’re asking. If you say “sum the invoice totals for all transactions from 2024-04-01 at 00:00 UTC up to 2024-04-02 00:00 UTC for accounts in the USA” you are a lot more likely to get the answer you want and be more confident that you got a reliable number. Less precise instructions leave huge mists of ambiguity which programming computers will happily fill in with assumptions. This is where much of the value of specialists comes in, namely the facility in some dialect which enables a greater precision of expression and intent than the verbiage someone in the Sales or HR department will reliably deploy. In plenty of situations, say if you’re building a social media network for parakeets, maybe it’s okay. But when real money is on the line, or health and safety, or decisions with liability ramifications are introduced, I predict companies will still want to keep one or two specialists around to make sure they aren’t now playing a game of telephone with a coworker talking to a LLM on the other end and who knows what logic emerging out of the other end.
Introducing AI agents into your software development flow may create more problems than it solves, at least with what is likely to be around in the near term. On the terrific JS Party podcast they recently took a look at “Devin”, a brand new tool which claims the ability to go off by itself and complete tickets like a software engineer in your team might do. It received heaps of breathless press. But until these agents are actually reliable, other engineers still will have to debug the work done by the agent, which could end up wasting more time than is saved.
But the number they published, I think, was 13.86% of issues unresolved. So that’s about one in seven. So you pointed out a list of issues, and it can independently go and solve one in seven. And first off, to me, I’m like “That is not an independent software developer.” And furthermore, I find myself asking “If its success rate is one in seven, how do you know which one?” Are the other six those “It just got stuck”? Or has it submitted something broken? Because if it sets up something broken, that doesn’t actually solve the issue, not only do you have it only actually solving one in seven, but you’ve added load, because you have to go and debug and figure out which things are broken. So I think the marketing stance there is little over the top relative to what’s being delivered.
The software YouTuber Internet of Bugs went on to accuse the creators of Devin of misleading the public about its capabilities in a detailed takedown.
And in practice, a lot of code a LLM gives me is just wrong. A couple weeks ago I think I ended up trying to write a script for around four hours with ChatGPT when probably should have just looked up the relevant documentation myself. It kept going in circles and giving me code that just didn’t do what it said it did, even with me feeding it back output and error messages.
What’s The Future?
While there are many reasons for skepticism about AI-assisted programming, I am guardedly optimistic. I do get value out of the tools I use today which I believe will improve rapidly. I know there are very smart people out there working on them, assisted by computers making the tools even smarter, perhaps not unlike how computers started to be used to design better processors in a powerful feedback loop. I have limited expectations for LLMs but they are certainly not the only tool in the AI toolbox and there are vast amounts of money flowing into research and development, some of which will undoubtedly produce results. Computers will be able to drop some of the arbitrary strictness that made programming so tedious in the past and present (perhaps a smarter IDE will not bother you ever again about forgetting a ; or about an obviously mistyped variable name). I have high hopes for better static analysis tools or automated code reviews. Long-term I do believe how most people interact with computers will fundamentally change. AI agents will be trusted with more and more real-world tasks in the way that more and more vital societal functions have been allowed to be conducted over the internet. But someone will still have to create those agents and the systems they interact with and it won’t be only AI agents talking to themselves. At least I sure hope not.
So I’m not too concerned for my job security just yet. Software continues to eat the world and I’m not convinced the current state of the art can do the job of programmers without specialist intermediaries. As in the past, new development tools and paradigms will make programmers more productive and able to spend more time focusing on the problems that need solving rather than on mundane tasks. Maybe we will be able to let computers automate their automation of our lives but it will be on the less-mission-critical margins for quite some time.
One fantastic feature of JavaScript (compared to say, Python) is that it is possible to bundle your code for packaging; removing everything that is not needed to run your code. We call this “tree-shaking” because the stuff you aren’t using falls out leaving the strongly-attached bits. This reduces the size of your output, whether it’s a NPM module, code to run in a browser, or a NodeJS application.
By way of illustration, suppose we have a script that imports a function from a library. Here it calls apple1() from lib.ts:
The main point here being that only apple1 is included in the bundled script. Since we didn’t use apple2 it gets shaken out like an overripe piece of fruit.
Motivation
There are many reasons this is a valuable feature, the main one is performance. Less code means less time spent parsing JavaScript when your code is executed. It means your web app loads faster, your docker image is smaller, your serverless function cold start time is reduced, your NPM module takes up less disk space.
A robust application architecture can be a serverless architecture where your application is composed of discrete functions. These functions can function like an API if you put an API gateway or GraphQL server that invokes the functions for different routes and queries, or can be triggered by messages in queues or files being uploaded to a bucket or as regularly scheduled events. In this setup each function is self-contained, only containing whatever code is needed for its specific functionality and no unrelated code. This is in contrast to a monolith or microservice where the entire application must be loaded up in order to handle a request. No matter how large your project gets, each function remains about the same size.
I build applications using Serverless Stack, which has a terrific developer experience focused on building serverless applications on AWS with TypeScript and CDK in a local development environment. Under the hood it uses esbuild. Let’s peek under the hood.
Mechanics
Conceptually tree-shaking is pretty straightforward; just throw away whatever code our application doesn’t use. However there are a great number of caveats and tricks needed to debug and finesse your bundling.
Tree-shaking is a feature provided by all modern JavaScript bundlers. These include tools like Webpack, Turbopack, esbuild, and rollup. If you ask them to produce a bundle they will do their best to remove unused code. But how do they know what is unused?
The fine details may vary from bundler to bundler and between targets but I’ll give an overview of salient properties and options to be aware of. I’ll use the example of using esbuild to produce node bundles for AWS Lambda but these concepts apply generally to anyone who wants to reduce their bundle size.
Measuring
Before trying to reduce your bundle size you need to look at what’s being bundled, how much space everything takes up, and why. There are a number of tools at our disposal which help visualize and trace the tree-shaking process.
Bundle Buddy
This is one of the best tools for analyzing bundles visually and it has very rich information. You will need to ask your bundler to produce a meta-analysis of the bundling process and run Bundle Buddy on it (it’s all local browser based). It supports webpack, create-react-app, rollup, rome, parcel, and esbuild. For esbuild you specify the --metafile=meta.json option.
When you upload your metafile to Bundle Buddy you will be presented with a great deal of information. Let’s go through what some of it indicates.
Bundle Buddy in action
Let’s start with the duplicate modules.
This section lets you know that you have multiple versions of the same package in your bundle. This can be due to your dependencies or your project depending on different versions of a package which cannot be resolved to use the same version for some reason.
Here you can see I have versions 3.266.0 and 3.272 of the AWS SDK and two versions of fast-xml-parser. and The best way to hunt down why different versions may be included is to simply ask your package manager. For example you can ask pnpm:
So if I want to shrink my bundle I need to figure out how to get it so that both @aws-sdk/client-* and @prisma/migrate can agree on a common version to share so that only one copy of fast-xml-parser needs to end up in my bundle. Since this function shouldn’t even be importing @prisma/migrate (and certainly not mongodb) I can use that as a starting point for tracking down an unneeded import which will discuss shortly. Alternatively you can open a PR for one of the dependencies to use a looser version spec (e.g. ^4.0.0) for fast-xml-parser or @aws-sdk/client-sts.
With duplicate modules out of the way, the main meat of the report is the bundled modules. This will usually be broken up into your code and stuff from node_modules:
When viewing in Bundle Buddy you can click on any box to zoom in for a closer look. We can see that of the 1.63MB that comprises our bundle, 39K is for my actual function code:
This is interesting but not where we need to focus our efforts.
Clearly the prisma client and runtime are taking up sizable parcels of real-estate. There’s not much you can do about this besides file a ticket on GitHub (as I did here with much of this same information).
But looking at our node_modules we can see at a glance what is taking up the most space:
This is where you can survey what dependencies are not being tree-shaken out. You may have some intuitions about what belongs here, doesn’t belong here, or seems too large. For example in the case of my bundle the two biggest dependencies are on the left there, @redis-client (166KB) and gremlin 97KB). I do use redis as a caching layer for our Neptune graph database, of which gremlin is a client library that one uses to query the database. Because I know my application and this function I know that this function never needs to talk to the graph database so it doesn’t need gremlin. This is another starting point for me to trace why gremlin is being required. We’ll look at that later on when we get into tracing. Also noteworthy is that even though I only use one redis command, the code for handling all redis commands get bundled, adding a cost of 109KB to my bundle.
Finally the last section in the Bundle Buddy readout is a map of what files import other files. You can click in for what looks like a very interesting and useful graph but it seems to be a bit broken. No matter, we can see this same information presented more clearly by esbuild.
esbuild –analyze
Your bundler can also operate in a verbose mode where it tells you WHY certain modules are being included in your bundle. Once you’ve determined what is taking up the most space in your bundle or identified large modules that don’t belong, it may be obvious to you what the problem is and where and how to fix it. Oftentimes it may not be so clear why something is being included. In my example above of including gremlin, I needed to see what was requiring it.
We can ask our friend esbuild:
esbuild --bundle --analyze --analyze=verbose script.ts --outfile=tmp.js 2>&1 | less
The important bit here being the --analyze=verbose flag. This will print out all traces of all imports so the output gets rather large, hence piping it to less. It’s sorted by size so you can start at the top and see why your biggest imports are being included. A couple down from the top I can see what’s pulling in gremlin:
This is extremely useful information for tracking down exactly what in your code is telling the bundler to pull in this module. After a quick glance I realized my problem. The file repository/skill.ts contains a SkillRepository class which contains methods for loading a vacancy’s skills which is used by the vacancy repository which is eventually used by my function. Nothing in my function calls the SkillRepository methods which need gremlin, but it does include the SkillRepository class. What I foolishly assumed was that the methods on the class I don’t call will get tree-shaken out. This means that if you import a class, you will be bringing in all possible dependencies any method of that class brings in. Good to know!
This is a colorful but limited tool for showing you what’s being included in your NextJS build. You add it to your next.config.js file and when you do a build it will pop open tabs showing you what’s being bundled in your backend, frontend, and middleware chunks.
The amount of bullshit @apollo/client pulls in is extremely aggravating to me.
Modularize Imports
It was helpful for learning that using top-level Material-UI imports such as import { Button, Dialog } from "@mui/material" will pull in ALL of @mui/material into your bundle. Perhaps this is because NextJS still is stuck on CommonJS, although that is pure speculation on my part.
While you can fix this by assiduously doing import { Button } from "@mui/material/Button" everywhere this is hard to enforce and tedious. There is a NextJS config option to rewrite such imports:
Has a spiffy graph of imports and works with Webpack.
Tips and Tricks
CommonJS vs. ESM
One factor that can affect bundling is using CommonJS vs. EcmaScript Modules (ESM). If you’re not familiar with the difference, the TypeScript documentation has a nice summary and the NodeJS package docs are quite informative and comprehensive. But basically CommonJS is the “old, busted” way of defining modules in JavaScript and makes use of things like require() and module.exports, whereas ESM is the “cool, somewhat less busted” way to define modules and their contents using import and export keywords.
Tree-shaking with CommonJS is possible but it is more wooley due to the more procedural format of defining exports from a module whereas ESM exports are more declarative. The esbuild tool is specifically built around ESM, in the docs it says:
This way esbuild will only bundle the parts of your packages that you actually use, which can sometimes be a substantial size savings. Note that esbuild’s tree shaking implementation relies on the use of ECMAScript module import and export statements. It does not work with CommonJS modules. Many packages on npm include both formats and esbuild tries to pick the format that works with tree shaking by default. You can customize which format esbuild picks using the main fields and/or conditions options depending on the package.
So if you’re using esbuild, it won’t even bother trying unless you’re using ESM-style imports and exports in your code and your dependencies. If you’re still typing require then you are a bad person and this is a fitting punishment for you.
As the documentation highlights, there is a related option called mainFields which affects which version of a package esbuild resolves. There is a complicated system for defining exports in package.json which allows a module to contain multiple versions of itself depending on how it’s being used. It can have one entrypoint if it’s require‘d, a different one if imported, or another if used in a browser.
The upshot is that you may need to tell your bundler explicitly to prefer the ESM (“module“) version of a package instead of the fallback CommonJS version (“main“). With esbuild the option looks something like:
Setting this will ensure the ESM version is preferred, which may result in improved tree-shaking.
Minification
Tree-shaking and minification are related but distinct optimizations for reducing the size of your bundle. Tree-shaking eliminates dead code, whereas minification rewrites the result to be smaller, for example replacing a function identifier e.g. “frobnicateMajorBazball” with say “a1“.
Usually enabling minification is a simple option in your bundler. This bundle is 2.1MB minified, but 4.5MB without minification:
Sometimes you may want to import a module not because it has a symbol your code makes use of but because you want some side-effect to happen as a result of importing it. This may be an import that extends jest matchers, or initializes a library like google analytics, or some initialization that is performed when a file is imported.
Your bundler doesn’t always know what’s safe to remove. If you have:
import './lib/initializeMangoids'
In your source, what should your bundler do with it? Should it keep it or remove it in tree-shaking?
If you’re using Webpack (or terser) it will look for a sideEffects property in a module’s package.json to check if it’s safe to assume that simply importing a file does not do anything magical:
{
  "name": "your-project",
  "sideEffects": false
}
Code can also be annotated with /*#__PURE__ */ to inform the minifier that this code has no side effects and can be tree-shaken if not referred to by included code.
var Button$1 = /*#__PURE__*/ withAppProvider()(Button);
Not every package you depend on needs to necessarily be in your bundle. For example in the case of AWS lambda the AWS SDK is included in the runtime. This is a fairly hefty dependency so it can shave some major slices off your bundle if you leave it out. This is done with the external flag:
One thing worth noting here is that there are different versions of packages depending on your runtime language and version. Node 18 contains the AWS v3 SDK (--external:@aws-sdk/) whereas previous versions contain the v2 SDK (--external:aws-sdk). Such details may be hidden from you if using the NodejsFunction CDK construct or SST Function construct.
On the CDK slack it was recommended to me to always bundle the AWS SDK in your function because you may be developing against a different version than what is available in the runtime. Or you can pin your package.json to use the exact version in the runtime.
Another reason to use externals is if you are using a layer. You can tell your bundler that the dependency is already available in the layer so it’s not needed to bundle it. I use this for prisma and puppeteer.
Performance Impacts
For web pages the performance impacts are instantly noticeable with a smaller bundle size. Your page will load faster both over the network and in terms of script parsing and execution time.
Another way to get an idea of what your node bundle is actually doing at startup is to profile it. I really like the 0x tool which can run a node script and give you a flame graph of where CPU time is spent. This can be an informative visualization and let you dig into what is being called when your script runs:
For serverless applications you can inspect the cold start (“initialization”) time for your function on your cloud platform. I use the AWS X-Ray tracing tool. Compare before and after some aggressive bundle size optimizations:
The cold-start time went from 2.74s to 1.60s. Not too bad.
I like to learn something new: new technologies, languages, countries, food, and experiences — all of that is a big part of my life’s joy.
During thinking about my next OKR goal with folks from JetBridge I came up with an idea for how to build something interesting which can help me learn new words and phrases in a more productive way.
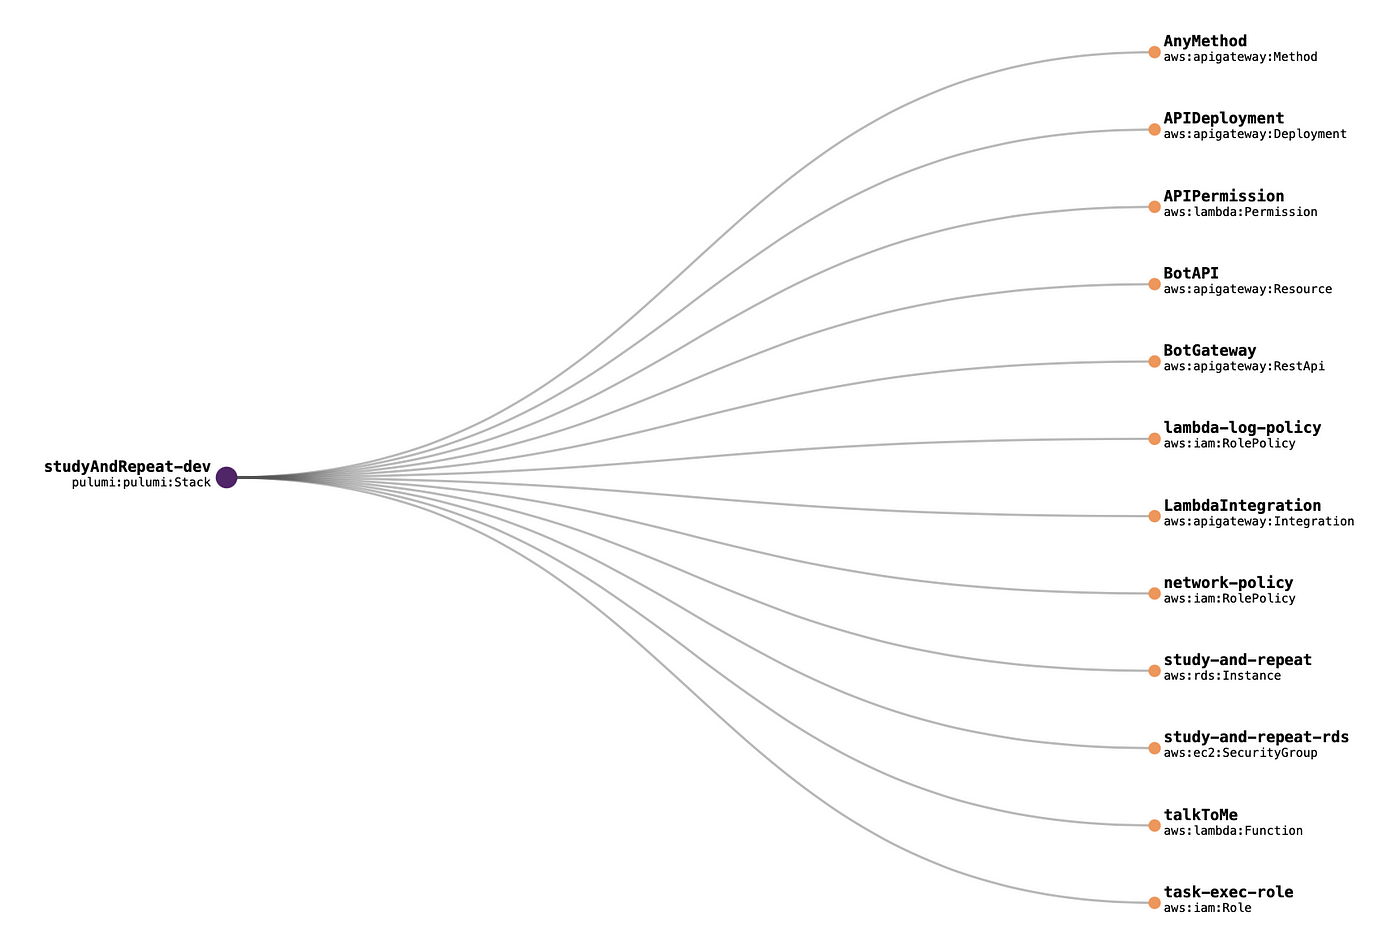
The main idea sounds simple: to implement a with a Telegram app bot for learning new words using Anki periodic repetition algorithm. To make it more interesting (and complex 🙃) I decided that it needs to be serverless with AWS lambda and have infrastructure managed by pulumi. This article describes my approach.
The infrastructure contains:
API Gateway to handle incoming requests and pass them forward
Lambda to process user commands
RDS Postgres database instance for storage
Infrastructure
Pulumi allows managing code infrastructure in a convenient manner using any programming language. It’s great when you can define and configure the infrastructure using the same language as the app. In my case, it is Go.
Another benefit that pulumi provides out of the box is using variables directly from created resources. For example, you create an RDS Instance, and then an endpoint and DB properties are available to be used as lambda env variables. It means you don’t need to hard-code such variables or store them anywhere, pulumi manages them for you. Even in the case when some resource is changed (for example a major RDS upgrade will create a new instance) all related infrastructure will be up to date.
The bigger project would require a much more complex definition and resources stack, but for my purpose, it’s rather small and can be kept in only one file.
Resources created by Pulumi
One more cool feature about pulumi is managing secrets. Usually, you need to configure and use some service for it (AWS Secret store, Vault, etc) but with Pulumi you can use it out of the box with a simple command:
pulumi config set --secret DB_PASSWORD <password>
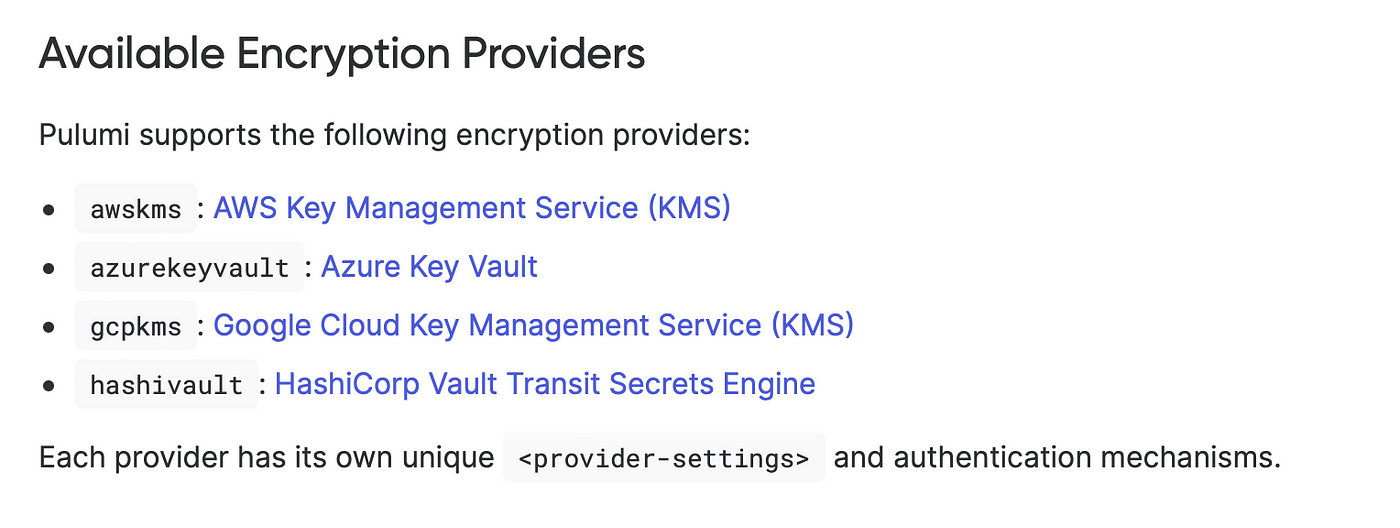
And then use it as an environmental or any other specified property of your app. Additionally, you can configure a key for encryption which is stored in pulumi by default but can easily be changed to a key from AWS KMS or other available provider:
Exported properties allow us to see the most important infra params directly in the CLI or pulumi interface:
build::
 GOOS=linux GOARCH=amd64 go build -o ./build/handler ./src/handler.go
 zip -j ./build/handler.zip ./build/handler
Then I can trigger deploy just with make build && pulumi up -y
After that pulumi defines if the archive was changed and sends an update if so. For my simple project, it takes about 20s which is quite fast.
GOOS=linux GOARCH=amd64 go build -o ./build/handler ./src/handler.go
zip -j ./build/handler.zip ./build/handler
updating: handler (deflated 45%)

View Live: https://app.pulumi.com/<pulumi-url>

     Type                    Name                Status            Info
     pulumi:pulumi:Stack     studyAndRepeat-dev
 ~   └─ aws:lambda:Function  talkToMe            updated (12s)     [diff: ~code]


Outputs:
    DB Endpoint   : "<endpoint>.eu-west-1.rds.amazonaws.com:5432"
    Invocation URL: "https://<endpoint>.execute-api.eu-west-1.amazonaws.com/dev/{message}"

Resources:
    ~ 1 updated
    12 unchanged

Duration: 20s
Here you can take a look at the whole infrastructure code.
In conclusion, I can say that pulumi is a great tool to write and keep infrastructure structured, consistent and readable. I used CloudFormation and Terraform previously and pulumi gives me a more user-friendly and pleasant way to have infrastructure as code.
DevOps Culture made a real dent on the traditional way organizations used to make software. Heavily inspired by Agile and Lean movements, the DevOps trend makes a move against siloed knowledge, slow and manual deployment pipelines, and strong division between teams such as Development, Testing and Operations. The results announced have been more than eye-catching: Faster deliveries and consequent feedback, happier engineers and better outcomes from the customer/business perspective.
Background
Aside from the incentives to adopt DevOps practices, companies still struggle to achieve their goals when transforming their internal and customer-facing processes. Turns out that the path is harder than most think. In order to really transform outdated practices into collaborative, agile and automated approaches, the shift cannot be contained only to technical aspects of software development. DevOps Transformation must encompass all organization levels, from developers to executive management.
Companies often try to achieve that through creating DevOps teams, responsible for the steering and introduction of DevOps practices across the organization. This approach has several pitfalls and threats to efficacy. Often the pushback for maintaining power structures and status quo diminishes the outcomes of that strategy. Instead of really transforming the development process, they often get a limited effect into given phases (such deployment) and automation. When you think of Software Development as a complex system In practice it means that the outcomes are quite limited and the investment might not even pay off.
In order to avoid that, there are several strategies that can help to avoid said pitfalls and increase the impact of a DevOps team on an organization. In this article we are going to present some tips that can be used to propose, improve and organize DevOps teams in order to make the most out of them.
1) Make the effort collaborative
The first aspect of DevOps that must be made clear for everyone is that it’s not a thing for only one team to do. The whole idea behind DevOps is about collaboration, avoiding handoffs and complex communication between those working on software. It means it’s impossible to expect one company to “be DevOps” where just one group is trying to put DevOps practices inplace. Those should be widespread, from product management to security and monitoring. Each step towards working software must embrace core concepts of DevOps.
Please note that this is not to say DevOps teams shouldn’t exist. On the contrary, the DevOps world has come a long way, with enough tools, techniques, approaches that we can’t expect everyone to dominate such a variety of skills. The intersection between “Dev” and “Ops” might be big enough to have people dedicated to that. It’s more about what the DevOps team wants to achieve and how they are going to get there. The posture is everything: instead of working alone in the dark and owning everything CI/CD/Ops/Security related, the team must pursue exactly the contrary: working along with product teams, public decisions, pair/mob programming and much more. Might sound simple, but the collaborative approach might be the most important and most ignored aspect of a DevOps Transformation. In summary, the DevOps team cannot be a silo for DevOps knowledge. Which leads us to the next topic…
2) Do not be the traditional Ops team
Prior to the DevOps era, most organizations would have at least two different teams involved in software production: Development and Operations. While the first would be responsible for product thinking, coding, testing, quality assurance, the second would work on infrastructure, delivery, security, reliability, and monitoring. That way the ideas were transformed into working software through a process resembling an assembly line. Depending on factors such as size, maturity, capillarity, industry sector and even technology, those teams were subdivided into a handful of other, more specialized and shortsighted groups.
Back then, although the frontier between Development and Operations was, naturally, blurred, each team would have quite specific skills and attributions, giving the whole streamed process a frontdesk, bureaucrat tone.
In that context we had, guess what? A (set of) team(s) dedicated to Operations filled with the same people that today (mostly) form DevOps and similar teams, such as SRE and Engineering Platforms. However, the new proposal has several differences in goals and practices, including the need of working collaboratively in cross functional, small and focused teams. Sadly, far too often they are treated and viewed as the old Operation silo. That way they must “lead by example” the way up into DevOps transformation; not just DevOps tooling and technical aspects, but also through the actions and drive.
Needless to say, working with assembly-line-like organized teams is very far from an Agile mindset, on which the DevOps principles rely a lot. That said, the DevOps team must be as far as possible from the traditional, waterfall practices of the Operation Teams.
3) Fight the topology that suits your context
There’s no such a thing as perfect architecture! The same could be said for how teams entangled to DevOps should be organized. Every organization is a unique complex system (remember?) and because of that, each solution must be perfectly tailored for the current place it’ll be deployed. That said, however, there are some common patterns that can be found in the wide. Team Topologies identifies the fundamental types of teams and the interactions between them. Following their taxonomy, DevOps focused groups should lean towards the category of Enabling Teams, acting as advocates, evangelists, and overall stimulators of DevOps practices among the stream-aligned teams. Other forms of organization can be of course useful; SRE and Platform Engineering related strategies gravitate towards Platform Teams. What’s the course of action? Just let the software people organize themselves seeking to fulfill the organization/product goals. The resulting team topology will reflect the specific needs of that domain and the support to the initiative will be the strongest possible. That’s a huge success factor since collaboration and will play a big part when the DevOps team starts.
4) Tools, Templates and Documentation: ways of working together
A key decision when structuring a DevOps team is how they are going to collaborate with others in order to introduce DevOps thinking into software development. Remember DevOps teams should be constantly in touch with other teams presenting new tech, strategies and principles that will be then incorporated (heterogeneously, I would say) throughout the company. The first way one could think of is through traditional ways of collaboration: emails, sync meetings and in person talks appointments.
In spite of those having value, they are far from being really efficient for DevOps collaboration and maybe even for knowledge sharing altogether. There are a few approaches that successful DevOps Teams usually take advantage of:
Workshops: Yes, the traditional hands-on course! The idea is old, inspired by classrooms, but the execution changed a lot. Today it can be transformed into a very efficient way of presenting new tools and techniques to a broader public. The emphasis on relevant topics to the public and the use of real world scenarios to train and understand team members are key to the success of workshops.
Templates: Sometimes DevOps best practices can be translated into a set of basic tools and configurations to be used on new pieces of documentation and software. In these cases, templates can be a very efficient way of sharing knowledge. It might contain config files for CI/CD platforms, deployment instructions, Dockerfiles, security checks and much more! Just be sure there’s enough flexibility for the use cases you want to cover and enough information so people won’t blindly follow some mysterious, unchangeable standard.
Documentation: are you thinking about a boring, gigantic white document with ugly fonts and little to no figures? Think again! Many other forms of storing and sharing knowledge could fall into this category: blog posts, videos, podcasts and even tutorials. The logic is simple: how much do you learn by tutorials and similar content you find online? Why wouldn’t a company create a knowledge source like that? Some content might be too specific and sensitive to be internal, others can also be public and contribute to the increase the awareness of your brand from an employer/reference point of view.
Tools: I think most of the tools related to DevOps topics should be owned by Platform Engineering and SRE teams. It’s another type of collaboration that should be addressed with somewhat different strategies that I intend to write later.
In all those cases, it’s very important for the DevOps team members to actually understand what their colleagues need. Treat them as your clients and your work as products and ensure what you’re building is really making their lives better. Also, it’s unsurprisingly common to find all those (and others) approaches combined into a greater knowledge sharing strategy.
5) DevOps team scalability
The harsh truth must be said: companies want as much as possible of their software people turning their attention to building value for clients. That pretty much translates as features and working software, no matter how hard it is to keep the big machine working. So we usually cannot afford (and maybe we shouldn’t anyway) to have DevOps people growing at the same pace the rest of the teams grow. That’s ok, we can scale quite efficiently: the ways of collaborating are cheap, easy to maintain and can often be directed to hundreds of professionals at the same time. Onboarding, periodic study groups or tech talks also have a far reach. Another aspect that calls for scabillity is how big is the umbrella on which DevOps things fall. We could add to the Original terms at least a few others
As teams get more mature on DevOps principles, the support they demand becomes more specialized. That’s when the DevOps team can be transformed into smaller, focused groups containing a certain skillset. This often leads towards Security, Observability, CI/CD and other specialties that will act to teach and show to product teams an in-depth view of the underlying field. As paradoxical as it might sound, DevOps teams wouldn’t be needed in a perfect (hypothetical) DevOps company.
Conclusion
Sure we all can tell the benefits of adopting DevOps principles into software development, but getting there is not easy. Some organizations try to form DevOps teams, expecting they’ll lead the way towards a brighter future. The original idea quite often falls behind, manifesting anti-types that really limit their reach. In this brief article we presented some tips that encompass lots of further reading, seeking the experiment and consolidating several principles that will make your DevOps teams thrive.
Web3 is: read/write/execute with artificial scarcity and cryptographic identity. Should you care? Yes.
What?
Let’s break it down.
Back when I started my career, “web2.0” was the hot new thing.
What?
The “2.0” part of it was supposed to capture a few things: blogs, rounded corners on buttons and input fields, sharing of media online, 4th st in SOMA. But what really distinguished it from “1.0” was user-generated content. In the “1.0” days if you wanted to publish content on the web you basically had to upload an HTML file, maybe with some CSS or JS if you were a hotshot webmaster, to a server connected to the internet. It was not a user-friendly process and certainly not accessible to mere mortals.
— Mischa Spiegelmock @mvs@vhspace.social (@spiegelmock) October 22, 2019
The user-generated content idea was that websites could allow users to type stuff in and then save it for anyone to see. This was mostly first used for making blogs like LiveJournal and Moveable Type possible, later MySpace and Facebook and Twitter and wordpress.com where I’m still doing basically the same thing as back then. I don’t have to edit a file by hand and upload it to a server. You can even leave comments on my article! This concept seems so mundane to us now but it changed the web into an interactive medium where any human with an internet connection and cheap computer can publish content to anyone else on the planet. A serious game-changer, for better or for worse.
If you asked most people who had any idea about any of this stuff what would be built with web 2.0 they would probably have said “blogs I guess?” Few imagined the billions of users of YouTube, or grandparents sharing genocidal memes on Facebook, or TikTok dances. The concept of letting normies post stuff on the internet was too new to foresee the applications that would be built with it or the frightful perils it invited, not unlike opening a portal to hell.
Web3
The term “web3” is designed to refer to a similar paradigm shift underway.
Before getting into it I want to address the cryptocurrency hype. Cryptocurrency draws in a lot of people, many of dubious character qualities, that are lured by stories of getting rich without doing any work. This entire ecosystem is a distraction, although some of the speculation is based on organizations and products which may or may not have actual value and monetizable utility at some point in the present or future. This article is not about cryptocurrency, but about the underlying technologies which can power a vast array of new technologies and services that were not possible before. Cryptocurrency is just the first application of this new world but will end up being one of the most boring.
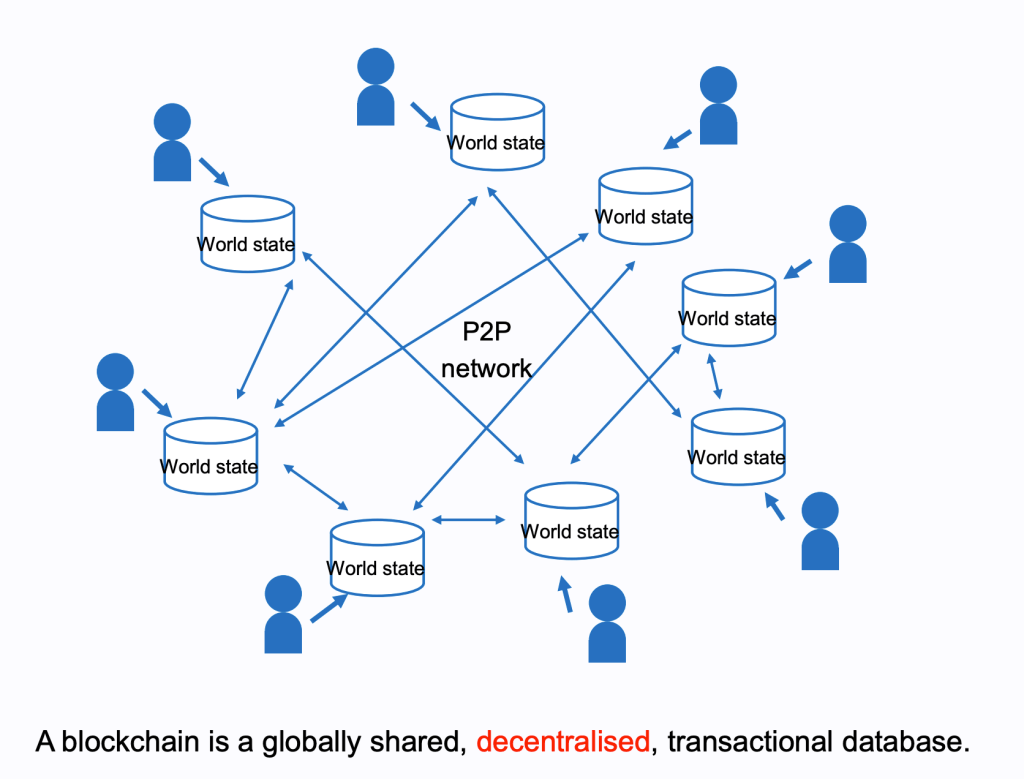
What powers the web3 world? What underlies it? With the help of blockchain technology a new set of primitives for building applications is becoming available. I would say the key interrelated elements are: artificial scarcity, cryptographic identity, and global execution and state. I’ll go into detail what I mean here, although to explain these concepts in detail in plain English is not trivial so I’m going to skip over a lot.
Cryptographic identity: your identity in web3-land consists of what is called a “keypair” (see Wikipedia), also known as a wallet. The only thing that gives you access to control your identity (and your wallet) is the fact that you are in physical or virtual possession of the “private key” half of the keypair. If you hold the private key, you can prove to anyone who’s asking that you own the “public key” associated with it, also known as your wallet address. So what?
Your identity is known to the world as your public key, or wallet address. There is an entire universe of possibilities that this opens up because only you, the holder of your private key, can prove that you own that identity. To list just a short number of examples:
No need to create a new account on every site or app you use.
No need for relying on Facebook, Google, Apple, etc to prove your identity (unless you want to).
People can encrypt messages for you that only you can read, without ever communicating with you, and post the message in public. Only the holder of the private key can decrypt such messages.
Sign any kind of message, for example voting over the internet or signing contracts.
Strong, verifiable identity. See my e-ID article for one such example provided by Estonia.
Anonymous, throwaway identities. Create a new identity for every site or interaction if you want.
Link any kind of data to your identity, from drivers licenses to video game loot. Portable across any application. You own all the data rather than it living on some company’s servers.
Be sure you are always speaking to the same person. Impossible to impersonate anyone else’s identity without stealing their private key. No blue checkmarks needed.
Illustration from Wikipedia.
There are boundless other possibilities opened up with cryptographic identity, and some new pitfalls that will result in a lot of unhappiness. The most obvious is the ease with which someone can lose their private key. It is crucial that you back yours up. Like write the recovery phrase on a piece of paper and put it in a safe deposit box. Brace yourself for a flood of despairing clickbait articles about people losing their life savings when their computer crashes. Just as we have banks to relieve us of the need to stash money under our mattresses, trusted (and scammer) establishments with customer support phone numbers and backups will pop up to service the general populace and hold on to their private keys.
Artificial scarcity: this one should be the most familiar by now. With blockchain technology came various ways of limiting the creation and quantity of digital assets. There will only ever be 21 million bitcoins in existence. If your private key proves you own a wallet with some bitcoin attached you can turn it into a nice house or lambo. NFTs (read this great deep dive explaining WTF a NFT is) make it possible to limit ownership of differentiated unique assets. Again we’re just getting started with the practical applications of this technology and it’s impossible to predict what this will enable. Say you want to give away tickets to an event but only have room for 100 people. You can do that digitally now and let people trade the rights. Or resell digital movies or video games you’ve purchased. Or the rights to artwork. Elites will use it for all kinds of money laundering and help bolster its popularity.
Perhaps you require members of your community to hold a certain number of tokens to be a member of the group, as with Friends With Benefits to name one notable example. If there are a limited number of $FWB tokens in existence, it means these tokens have value. They can be transferred or resold from people who aren’t getting a lot out of their membership to those who more strongly desire membership. As the group grows in prestige and has better parties the value of the tokens increases. As the members are holders of tokens it’s in their shared interest to increase the value the group provides its members. A virtuous cycle can be created. Governance questions can be decided based on the amount of tokens one has, since people with more tokens have a greater stake in the project. Or not, if you want to run things in a more equitable fashion you can do that too. Competition between different organizational structures is a Good Thing.
This concept is crucial to understand and so amazingly powerful. When it finally clicked for me is when I got super excited about web3. New forms of organization and governance are being made possible with this technology.
The combination of artificial scarcity, smart contracts, and verifiable identity is a super recipe for new ways of organizing and coordinating people around the world. Nobody knows the perfect system for each type of organization yet but there will be countless experiments done in the years to come. No technology has more potential power than that which coordinates the actions of people towards a common goal. Just look at nation states or joint stock companies and how they’ve transformed the world, both in ways good and bad.
The tools and procedures are still in their infancy, though I strongly recommend this terrific writeup of different existing tools for managing these Decentralized Autonomous Organizations (DAOs). Technology doesn’t solve all the problems of managing an organization of course, there are still necessary human layers and elements and interactions. However some of the procedures that have until now rested on an reliable and impartial legal system (something most people in the world don’t have access to) for the management and ownership of corporations can now be partially handled not only with smart contracts (e.g. for voting, enacting proposals, gating access) but investment, membership, and participation can be spread to theoretically anyone in the world with a smartphone instead of being limited to the boundaries of a single country and (let’s be real) a small number of elites who own these things and can make use of the legal system.
Any group of like-minded people on the planet can associate, perhaps raise investment, and operate and govern themselves as they see fit. Maybe for business ventures, co-ops, nonprofits, criminal syndicates, micro-nations, art studios, or all sorts of new organizations that we haven’t seen before. I can’t predict what form any of this will take but we have already seen the emergence of DAOs with billions of dollars of value inside them and we’re at the very, very early stages. This is what I’m most juiced about.
Check out the DAO Dashboard. This is already happening and it’s for real.
And to give one more salient example: a series of fractional ownership investments can be easily distributed throughout the DAO ecosystem. A successful non-profit that sponsors open source development work, Gitcoin, can choose to invest some of its GTC token in a new DAO it wants to help get off the ground, Developer DAO. The investment proposal, open for everyone to see and members to vote on, would swap 5% of the newly created Developer DAO tokens (CODE being the leading symbol proposal right now) for 50,000 GTC tokens, worth $680,000 at the time of writing. Developer DAO plans to use this and other funds raised to sponsor new web3 projects acting as an incubator that helps engineers build their web3 skills up for free. Developer DAO can invest its own CODE tokens in new projects and grants, taking a similar fraction of token ownership in new projects spun off by swapping CODE tokens. In this way each organization can invest a piece of itself in new projects, each denominated in their own currency which also doubles as a slice of ownership. It’s like companies investing shares of their own stock into new ventures without having to liquidate (liquidity can be provided via Uniswap liquidity pools). In this case we’re talking about an organic constellation of non-profit and for-profit ventures all distributing risk, investment capital, and governance amongst themselves with minimal friction that anyone in the world can participate in.
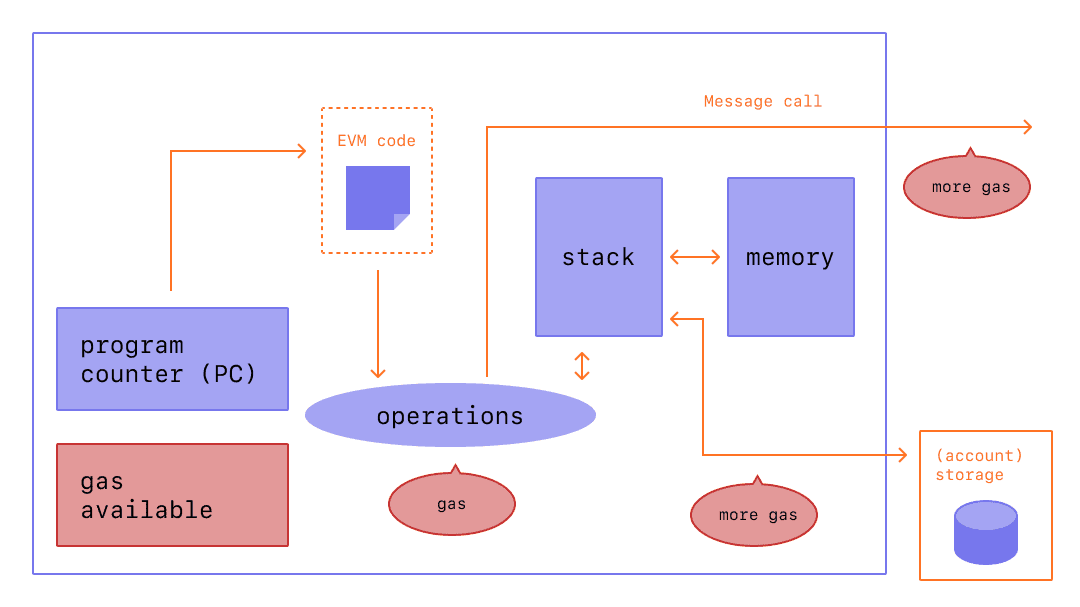
Global execution and state: there are now worldwide virtual machines, imaginary computers which can be operated by anyone and the details of their entire history, operations, and usage is public. These computers can be programmed with any sort of logic and the programs can be uploaded and executed by anyone, for a fee. Such programs today are usually referred to as smart contracts although that is really just one possible usage of this tool. What will people build with this technology? It’s impossible to predict at this early age, like imagining what smartphones will look like when the PC revolution is getting started.
These virtual machines are distributed across the planet and are extremely resilient and decentralized. No one person or company “owns” Ethereum (to use the most famous example) although there is a DAO that coordinates the standards for the virtual machine and related protocols. When a new proposal is adopted by the organization, the various software writers update their respective implementations of the Ethereum network to make changes and upgrades. It’s a voluntary process but one that works surprisingly well, and is not unlike the set of proposals and standards for the internet that have been managed for decades by the Internet Engineering Task Force (IETF).
Also worth mentioning are zero-knowledge proofs which can enable privacy, things like anonymizing transactions and messaging. Of course these will for sure be used to nefarious ends, but they also open up possibilities for fighting tyranny and free exchange of information. Regardless of my opinion or anyone else’s, the cat’s out of the bag and these will be technologies that societies will need to contend with.
Why should I care?
I didn’t care until recently, a month ago maybe. When I decided to take a peek to see what was going on in the web3 space, I found a whole new world. There are so many engineers out there who have realized the potential in this area, not to mention many of the smartest investors and technologists. The excitement is palpable and the amount of energy in the community is invigorating. I joined the Developer DAO, a new community of people who simply want to work on cool stuff together and help others learn how to program with this new technology. Purely focused on teaching and sharing knowledge. People from all over the world just magically appear and help each other build projects, not asking for anything in return. If you want to learn more about the web3 world you could do a lot worse than following @Developer_DAO on twitter.
As with all paradigm shifts, some older engineers will scoff and dismiss the new hotness as a stupid fad. There were those who pooh-poohed personal computers which could never match the power and specialized hardware of mainframes, those who mocked graphical interfaces as being for the weak, a grumpy engineer my mother knew who said the internet is “just a fad”, and people like Oracle’s CEO Larry Ellison saying the cloud is just someone else’s computer. Or me, saying the iPhone looks like a stupid idea.
The early phase of web3 is cryptocurrencies and blockchains (“layer 1”) solutions. Not something that non-technical people or really anyone can take full advantage of because there are few interfaces to interact with it. In the phase we’re in right now developer tools and additional layers of abstraction (“layer 2”) are starting to become standardized and accessible, and it’s just now starting to become possible to build web3 applications with user interfaces. Very soon we’ll start to see new types of applications appearing, to enable new kinds of communities, organizations, identity, and lots more nobody has dreamed up yet. There will be innumerable scams, a crash like after the first web bubble, annoying memesters and cryptochads. My advice is to ignore the sideshows and distractions and focus on the technology, tooling, and communities that weren’t possible until now and see what creative and world-changing things people build with web3.