Communication is a fundamental skill for engineers. No one builds anything on their own. Whether participating in an open-source project or being employed to crank out code, you need to work with others. The value of effective communication skills cannot be overstated.
Even Linus Torvalds, a curmudgeon who will never lack work and whose word is law in the Linux community, has acknowledged the need to be more measured in his criticisms and more generous with empathy.
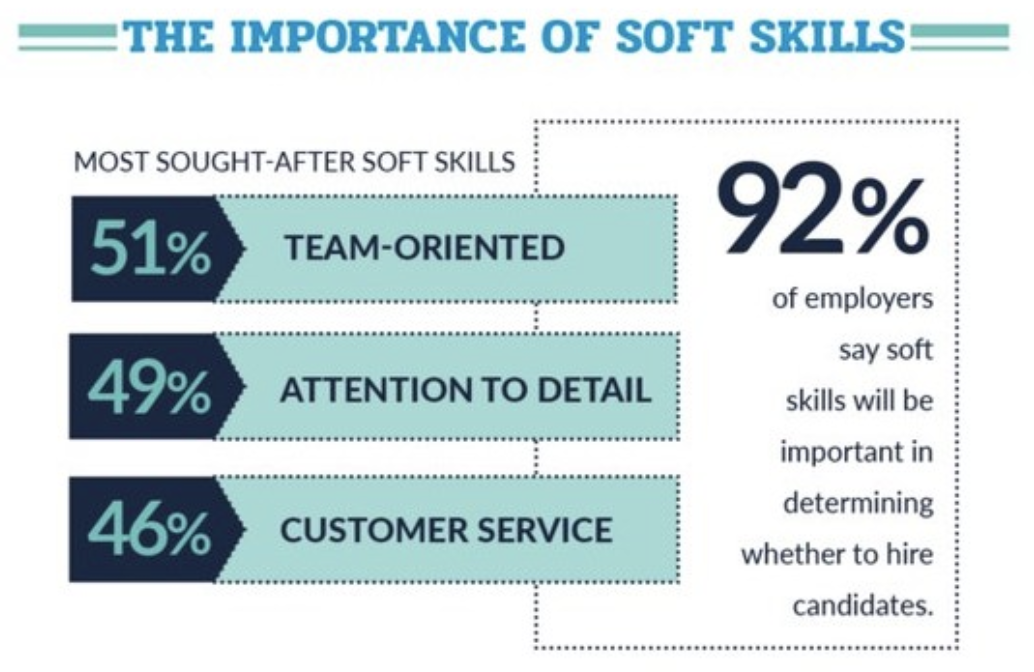
Soft skills, in the parlance of our times, are in vogue. Employers and potential collaborators will judge you based on your ability to lucidly communicate your thoughts in an agreeable and succinct fashion.
CareerBuilder also found in this survey that eighty percent of hirers said that soft skills would be equally or more important than hard skills.
There are many great guides and books written about how to communicate effectively with other human beings. A lot centers around having empathy. Having an understanding of where someone is coming from, considering the information that they have that you don’t or vice-versa, and being respectful are basic tenets. I offer a few suggestions here:
Use interrogatives instead of declarations
Even when you are pretty sure of a fact you want to communicate to someone else, it is often better phrased as a question rather than a statement of fact.
“Why did you write it this way?” is infinitely preferable to “this code is wrong.”
If discussing a solution or implementation with someone, ask them what they think first, regardless if you already have a plan in your head. They may suggest what you are already thinking, may have thought about things you haven’t, and may bring up other good ideas. Especially for junior people; it helps them engage their critical thinking skills instead of learning to rely on you to provide the answer. It gives people more ownership and desire to defend their idea because it’s theirs.
Don’t argue forever over things
This is one I am especially guilty of, and it has to do with knowing when to concede a technical argument. Very often there are no clear right answers for how to proceed with a feature or fix, and a healthy discussion of the tradeoffs can be illuminating and help arrive at a reasonable solution.
However since many tradeoff estimations involve a lot of guesswork and feelings and intuition, the “best” answer may never be agreed on. At some point you have to agree and move forward, and different people may have ideas of when that time has passed. I know I’ve driven at least one person crazy by continuing past the point they considered to be entering the domain of diminishing returns.
Often the proper solution isn’t clear. Agreeing on a proposal, prototyping, and gathering more data is more fruitful than making people exasperated or arguing for hours. Once you sit down to actually try it, it may quickly resolve the debate.
Try to not talk too much shit on other people’s code
“Oho!” said the pot to the kettle; “You are dirty and ugly and black! Sure no one would think you were metal, Except when you’re given a crack.”
“Not so! not so!” kettle said to the pot; “‘Tis your own dirty image you see; For I am so clean – without blemish or blot – That your blackness is mirrored in me.”
If there’s one thing engineers love to do it’s complain about languages, libraries, tools, operating systems, service providers, interfaces, APIs, containerization systems, people on mailing lists, etc… When your tools don’t work right it can cause you hours of frustration and confusion, which nobody enjoys.
A moment’s contemplation will recollect the vast amount of sub-standard, buggy, hacked together balls of mud that the experienced engineer has thrown together in the past. If you write perfect defect-free code then you should continue with your expressions of distaste for the inferior engineers out there making fools of themselves. If on the other hand, you realize you have made plenty of blunders of your own, consider going easy on the target of your ire.
I’ve seen many online communities devolve into an ever-smaller group of grumpy guys, mostly chatting about how much everyone else is stupid and sucks. These communities sap your soul. Inject some positivity into your world when you can.
Communicate proactively
People aren’t mind readers and they generally are focused on their own work and problems. If you have information that may be useful to others, don’t wait for them to come to you and ask for it. If someone hasn’t asked you for an update or provided you with what you need, reach out rather than suffering in silence.
Over-communicating in a team is almost always better than under-communicating. By letting people know what you’re doing you can help others prioritize, not duplicate work, know whom to ask questions, inform you if they’re making changes that could affect your work, and reduce the need for people to make assumptions.
Don’t assume
Assumptions are frequently foolish and rarely right. Often a brief message can save you time, making sure you don’t start off down a fruitless path. And by asking, you are communicating information about what you are working on and the fact that the knowledge you seek is not as widely shared or accessible as the owner of it may assume.
Comment and document what you’re doing and why
Nothing makes working with code others have written go smoothly like having comments liberally sprinkled throughout the source code. Whether it’s a new hire or yourself in two years when you’ve forgotten why you need to check that condition in that insane query, a brief summary of your logic and thinking at the time can help impart understanding and reduce the need for assumptions.
The goal is clarity and unambiguous communication of ideas. People aren’t mind readers and need a lot of information, some of which only you possess.
Thanks for reading!
Published using the Emacs-to-wordpress tool Org2Blog.
What kind of language should Facebook forbid? What kind of regulations should the U.S. government promogulate regarding whom Twitter can ban?
☞ Who cares?? ☜ Not me.
A depressing amount of energy and ink is wasted on these questions which shouldn’t even be issues in the first place. We don’t have to base our public discourse on platforms that corporations or even governments control.
Python and related tooling continues to progress and evolve. I’d like to share some of the tools and practices we’re using at JetBridge to develop python web applications.
This is by no means an exhaustive account or a definite list of all best practices, and I hope readers will share what’s working well for them so I can learn and incorporate that knowledge. I don’t know about everything out there but I can at least present a survey of what we’ve been using on multiple projects with success.
Python
Let’s start with… python. As of January 1st, 2020 python 2 support was officially discontinued. If you are still maintaining any python 2 code you are using the language equivalent of Windows XP. Not only is python 2 no longer receiving security updates but now all python module authors will feel comfortable dropping any support for python 2 in any future versions of their modules, which means your dependencies are unlikely to receive security updates as well. Using python 2 is now a legitimate security risk.
Python 3.8 is out. What’s new in it?
The “walrus operator” := allows you to initialize a variable as part of any expression and save a line or two of code. The battle in PEP 572 over getting this operator included in the language was so unpleasant that it caused Guido van Rossum to ragequit his Benevolent Dictator For Life of Python role.
__pycache__ directories are now managed out-of-tree so they stop polluting your deployments and source control.
New additions to python’s type system – TypedDict lets you define the shape of a dictionary type, Literal lets you easily construct literal value constraints such as for enumerated value options, and at long last we have built-in support for structural subtyping, also known as Protocols.
F-string debug syntax – now instead of writing:
print(f"blorp={blorp}")
You can write:
print(f"{blorp=}")
Which is terrific news for those of us who will continue using print statements to debug until the day we die.
Keeping your code neat and formatted can really help with readability and enforcing a consistent style. The tooling can also help catch potential bugs or mistakes. Here’s what we’re using:
Flake8 – Classic Linting Tool
Run as a pre-commit hook or in your CI flow. We suggest installing and enabling the plugins:
Mypy performs the useful function of type-checking, to the extent one can in python. It does on some occasions catch useful errors for you and is improving as time goes on. Still, the usefulness of python’s bolted-on type system afterthought is limited compared to say, any other typed language.
If you are adding it to an existing project with many dependencies you may need to add ignore_missing_imports = True to your mypy.ini configuration file until you can resolve all of the warnings you’re going to get.
Bento – Static Analysis
Bento is a very new tool that attempts to be sort of a meta-linter, combining a number of different checker tools into one, most notably Bandit, a “Security oriented static analyser for python code.” It’s designed to integrate into git hooks and CI workflows relatively easily. It’s still quite new and not super mature yet but this is definitely a tool to keep your eye on. The analysis engines are open source and provided for free, though the company behind it is working to offer paid features for larger teams.
Black – Formatting
Black is a brutal and fantastic code formatter, much like prettier for python. It can be run as a pre-commit hook to make sure your code is formatted correctly, or you can have your editor run it automatically on save (my preference). It is technically possible to modify the formatting rules but there is no reason you should ever do that. Just enable it, always run it on every changed file, and never worry about 97% of code formatting issues ever again.
Workflow Integration
People are of differing opinions on whether you should add these tools into your editor, git hooks, or CI pipeline. Personally I have all of these tools hooked into my editor (mostly spacemacs but giving PyCharm a try) and love having my code formatted upon saving and seeing type errors inline in my code. This is definitely the best way to develop but it doesn’t enforce any standards in your team. Maybe you can always expect the people working on your project to have their editors configured correctly but this is mostly unrealistic for most teams.
You can add it as a pre-commit (or pre-push) git hook, which ensures everything is run before it goes to CI. The downside is this can add extra setup steps for the project or greatly increased execution time for common git commands.
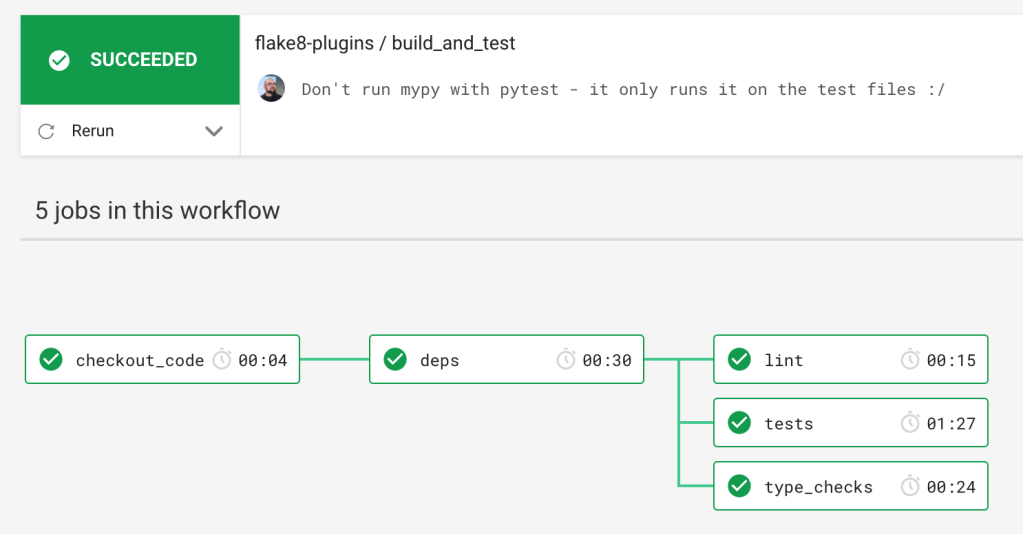
Another option is to run all of your checks in CI and let developers be responsible for committing code that is correct or suffer failed tests. I have CircleCI configured to install dependencies and then run the checks as separate jobs in parallel.
And these options are not mutually exclusive. You can totally do all three together.
Testing
Switching away from unittest.TestCase and lots of custom helper functions to create objects in favor of pytest fixtures and factoryboy made testing vastly more pleasant, especially when writing tests that talk to the database.
Our setup for writing tests that interact with Flask and SQLAlchemy is to set up fixtures with factoryboy which helps you declaratively write fixture factories for all your database models and pytest-factoryboy which lets you register your factories as pytest fixtures. The plugin pytest-postgresql allows easy creation of a PostgreSQL database for running tests and pytest-flask-sqlalchemy patches in a mocked database session (or sessionmaker or engine if you need them) during tests that ensures each test runs in a subtransaction. Subtransactions (aka SAVEPOINT) allow you to run each test isolated in its own transaction and all changes are rolled back at the end of the test. This allows each test to be invisible to any other test or transaction and also to have all database changes cleaned up automatically. This is the most efficient way to run database tests with a high degree of reproducibility to how your application will be running for real.
There are a lot of pieces here but they fit together beautifully in the end. Your test setup may look something like this:
myapp/db/fixture.py – where we like to define database factories. These can be used for populating development environments and tests with sample DB rows.
from faker import Factory as FakerFactory
import factory
from jetkit.db import Session  # see https://github.com/jetbridge/jetkit-flask/blob/e3fc3448933ffbfb573cc1dfc873364cd17d4aca/jetkit/db/__init__.py#L10

faker: FakerFactory = FakerFactory.create()

class SQLAFactory(factory.alchemy.SQLAlchemyModelFactory):
    """Use a scoped session when creating factory models."""

    class Meta:
        abstract = True
        # by providing access to our current sqlalchemy session the factory can automatically
        # add newly-created objects to the session (i.e. insert into the DB)
        sqlalchemy_session = Session


class UserFactoryFactory(SQLAFactory):
    """Base class for user factories with common fields."""
    class Meta:
        abstract = True

    dob = factory.LazyAttribute(lambda x: faker.simple_profile()["birthdate"])
    name = factory.LazyAttribute(lambda x: faker.name())
    password = 'my-default-pw!'
    avatar_url = factory.LazyAttribute(
        lambda x: f"https://placem.at/people?w=200&txt=0&random={random.randint(1, 100000)}"
    )


class NormalUserFactory(UserFactoryFactory):
    """Create a user with type=Normal."""
    class Meta:
        model = NormalUser

    email = factory.Sequence(lambda n: f"normaluser.{n}@example.com")
This sets us up with a factory that can produce NormalUser objects. In our setup we use SQLAlchemy polymorphism to distinguish between different user types with different model classes and the UserFactoryFactory (how very enterprise) gives us a base class to quickly define factories for each type of user model.
myapp/test/conftest.py – place to add fixtures made available to your tests. Documentation on these fixtures is provided here.
from myapp.db.fixtures import NormalUserFactory
from pytest_factoryboy import register

register(NormalUserFactory)
This register helper function takes our factory and creates two pytest fixtures out of it. One fixture will be called normal_user which will always return a user object in our DB session, created on demand once per test. The other fixture will be normal_user_factory which will accept arguments to override the factory defaults.
Next we set up fixtures for database, app, and our DB session:
@pytest.fixture(scope="session")
def database(request):
    """Create a Postgres database for the tests, and drop it when the tests are done."""
    with DatabaseJanitor(DB_USER, DB_HOST, DB_PORT, DB_NAME, DB_VERSION):
        yield
This provides a new database for the entire test session – it’s only created once and dropped when everything is finished.
@pytest.fixture(scope="session")
def app(database):
    """Create a Flask app context for tests."""
    # here we pass in config overrides to our create_app
    app = create_app(config=dict(SQLALCHEMY_DATABASE_URI=DB_CONN, TESTING=True))

    with app.app_context():
        yield app
The above code provides us with a Flask app and context for the duration of the entire test session. You can push a new context for each test if you like (remove the scope fixture argument) but I’ve never needed to do this.
@pytest.fixture(scope="session")
def _db(app):
    """Provide the transactional fixtures with access to the database via a Flask-SQLAlchemy database connection."""
    from myapp.db import db
    db.create_all()
    return db
This is the magic hook to provide our database session to pytest-flask-sqlalchemy. We need to provide the package of our SQLAlchemy instance to our pytest configuration in tox.ini:
Now we can define a fixture for a HTTP client to talk to our app:
@pytest.fixture
def client(app, normal_user):
    # get flask test client
    client = app.test_client()

    access_token = create_access_token(identity=normal_user)

    # set environ http header to authenticate user
    client.environ_base["HTTP_AUTHORIZATION"] = f"Bearer {access_token}"

    return client
This fixture has a dependency on two other fixtures; app and normal_user. We defined the app fixture just above, and the normal_user fixture is automatically added for us by the pytest_factoryboyregister helper.
So now that we have a client fixture and a normal_user fixture, we can write very straightforward tests for API calls. Suppose we want to test a user API:
The simplicity and compactness of this test is striking. We don’t have any test cases, we define our dependencies in the function arguments, we use straightforward assert statements to check our responses. The test runs in an isolated subtransaction, dependency injection is performed to load the complete dependencies for this particular test, and it couldn’t possibly be any cleaner.
If you’re curious why we’re doing a simple assert here and not something like self.assertEqual() the answer is that pytest overrides the built in assert function with a more test-friendly and powerful version. You will still receive output exactly as you would expect from any test framework if the assertion fails. See the pytest documentation for more details.
Virtual Environments ﹠ Dependencies
The most modern tool for managing dependencies and virtual environments is Pipenv. It’s a bit more npm-style than venv or virtualenvwrapper, with a lockfile, split dev dependencies, and environment management via command line instead of sourcing anything in your shell. It saves the virtual environment files away out of tree.
The downsides for Pipenv are that it is frankly super slow and there hasn’t been an official release in over a year despite very active development. I hope that a faster new release will come out sometime soon.
One more feature that may be of interest to some is the ability to define multiple sources in a Pipfile. If you have certain dependencies that need to be pulled from an internal package index server for example, you can define that source for only those dependencies instead of having to globally change your pypi mirror.
Web Framework
Some of the popular modern web frameworks are Django, Flask, and Falcon.
Django
Django is a pretty heavy solution but has the benefit of everything being set up for you. It’s not a tool I reach for because I normally only try to create lightweight API servers, with little to no server-side rendering of HTML, and I don’t find Django as suited to a serverless architecture as something more lightweight.
Flask
Flask has been our go-to tool for years. It gives you a basic core into which you can plug in components and features as needed. The setup involved in creating the perfect enterprise-ready Flask app from scratch is considerable and takes some experience to get right on your own. The flexibility and ability to craft an application perfectly suited to your needs is invaluable for serious projects, and the simplicity and whipupitude makes it perfect for dead-simple services too.
I’ve written at length about writing serverless web applications with Flask:
If Flask is too heavy for you, there’s the Falcon microframework. If you’re writing a web service for a system with 64k of RAM and it’s not talking to any database or external services and the CPU overhead of handling HTTP requests and responses is the main bottleneck, Falcon may be a good choice. Their documentation really emphasizes how fast it is. I don’t think your web framework is usually the primary concern when it comes to speed but doubtless there are situations where this is needed.
Digression: Request Globals
<Digression>
There is one funky aspect of how Flask provides access to the current “app” context and the current request context that bothers or confuses some people. There exists an instance of your web application that contains configuration, routes, error handlers, and extensions that comprise your app. When your app is started up a new “app context” is pushed onto the app context stack to keep track of what app is currently active:
from myapp import app
with app.app_context():
    do_stuff_with_my_app()
In any code running inside of this context, you can access the current application.
from flask import current_app
def do_stuff_with_my_app():
    print(current_app.config['SOME_KEY'])
What’s important here is that current_app is a context variable proxy, which you can treat like a global variable but actually belongs to a context stack and is thread safe. Typically you only need to deal directly with pushing an app context if you’re writing scripts or wrappers that utilize your Flask app instance.
A similar approach is used for the current request context. When your Flask app is running (inside an app context) and a new request comes in, a new request context is pushed onto the request context stack to keep track of the request and request-local variables.
So whereas in many web frameworks like node’s Express you get passed in request and response objects as part of your handler:
import json
import falcon
class Resource(object):
    def on_post(self, req, resp):
        body = json.load(req.stream)
        print(body)
        resp.body = body
        resp.status = falcon.HTTP_200
In Flask one might write:
from flask import request
@app.route("/", methods=["POST"])
def app_index():
    body = request.get_json()
    print(body)
    return body
Again, request looks somewhat like a global variable but in reality it is a proxy object to a thread-local object on a context stack. The request is pushed automatically for you by Flask when the request comes in, so you mostly don’t have to know or care about manipulating this stack, unless you are writing some of the more exotic kinds of test cases.
This global-seeming access to context may feel dirty to some, likely conditioned by a healthy aversion to global variables or “god-objects” because of thread safety issues, poor code organization, and the inability to grapple with multiple instances of such objects simultaneously in the same program. These are valid concerns that the LocalProxy objects and context stacks effectively mitigate, while still providing a simple and convenient method to access the instances as needed from anywhere in your codebase, with the only caveat that you are responsible for pushing an app context if you are doing something outside the normal request flow.
I confess that the appeal of this approach was not obvious to me until I tried building a Flask app that talked to a database without using the Flask-SQLAlchemy extension. This extension integrates SQLAlchemy (an ORM) sessions with the Flask contexts so you can always easily access a database session that is local to the current request and transaction, or linked to your app context if not inside a request.
The real value of these context variables comes when you try to modularize your code and database routines. One problem that this solves is when you have a database transaction started inside a request, and then you call into some other code which may call other code which performs queries that should be inside the same transaction, as in a typical atomic operation that a RESTful endpoint might do. Somewhere you must retain a database handle to this operation, and expecting it to be passed through every function that might conceivably call another function that might perform a query is not feasible or clean. Being able to simply import a database session object that is automatically scoped to the finest level of application work you are performing (i.e. to the current request, or not) and assume it belongs to the current database transaction is a truly simple and elegant solution.
This approach has been recognized as a useful tool and in fact in python 3.7 gained first-class support in the form of contextvars from PEP 567. Opinions certainly may differ on the purity and magical-ness of this mechanism but I consider the simplicity and accessibility it affords to be the stronger argument. And given that it is now enshrined in python core means it is unlikely to go away anytime soon.
</Digression>
Putting Into Practice
If some of these ideas sound just splendid to you and you want to try them out, by all means give them a spin. If you’re looking to incrementally adopt new tools and features to your codebase implementing each of these suggestions independently should be manageable. However if you’re starting a new project or want to maximally embrace JetBridge style, it’s a daunting task to configure and wire up all of these practices into a well-organized and clean template. Honestly, setting up the database tests and Flask extensions is tedious. I’m lazy and don’t feel like doing it for new projects. That’s why we’ve created an open-source app starter kit and utility library for rapidly building modern, enterprise-ready python web applications with all of these practices and many more baked in and ready to go. Sort of a Create-React-App (we have one of those too) for our very opinionated python web service setup where we can put these recommendations into practice and save ourselves time setting up each new service.
sls-flask
Our starter kit is called sls-flask. It generates a Flask app skeleton with pytest fixtures, RESTful APIs and serialization, database factories, linting, authentication and more in a serverless-first package. It utilizes our handy JetKit-Flask python library that provides common database utilities (soft delete, upsert, UUIDs), S3 asset support, starting points for authentication and user access and other bits of functionality we’ve found useful in many projects.
WebSockets, the standard for doing real-time bidirectional communication typically between a browser and a server, is a fair attempt to create a standard to supplant the previously employed hacky solutions and continues to evolve in terms of implementation.
The basic idea has primarily been to establish some sort of channel in which a server can “push” events to a client, rather than the client “polling” every so often to see if there is new information. This was until fairly recently a relatively obscure concept, but now any smartphone owner is extremely well-acquainted with push notifications. This real-time channel has been used for not just notifications but also services like VOIP and gaming.
In the days before the WebSocket standard various semi-clever attempts to implement push notifications were devised. The first was using <iframe>s to load an HTML document using chunked encoding, where the server would write a script tag with some new data in the form of JavaScript commands when the data became available. When the browser encountered a closing script tag it would execute the JS immediately even though the document was still streaming.
The next scheme was using XML HTTP Request (aka XHR [aka AJAX]) to do something similar but without needing an <iframe>. This was known as “long-polling”, or “comet.” This was still mostly a unidirectional channel and suffered from timeouts and reconnection issues with potential race conditions.
Now with WebSockets we have a much improved system and wide browser support. But what about the backend? What happens when a browser or other client connects to a WebSocket server?
Previously we’ve developed and hosted WebSocket servers written in Perl, Go, and Python, using PostgreSQL asynchronous events as the message passing system. Deploying WebSocket servers is not as straightforward as HTTP servers because of the long-lived connections and having to perform TCP load balancing. Depending on your hosting setup you may have to deal with internal timeouts or getting events from your message bus to the right backend via some subscription mechanism.
Architecture
Since I love not running servers I’ve been excited about the chance to use serverless WebSockets via AWS API Gateway. In this new scheme you define Lambda functions that react to events such as authentication, connect, disconnect, and user-defined events that can be read from JSON message bodies.
Infrastructure-wise the setup is extremely basic. All of the real work to handle authorization and events and done in code, which we will look at shortly. Let’s use a concrete example of a typical WebSocket use case – sending notifications from the server to the client to inform it of some data change in order for the client to update some information in real time or notify the user.
For my application I created an authorizer function that validates a JWT encoded in the WebSocket URL query parameters (there is no good way in a browser to set headers when opening a WebSocket connection). This function denies or grants access to proceed and saves the authenticated user ID in the principalId response field, which is passed along to subsequent event handlers.
Once the authorization check is successful the special $connect route is called if there is a handler defined. In this handler we have the user ID in the invocation event passed along from the authorizer response and we have a connectionId. We save this user ID and connection ID pair in our database so that we can know who is connected and have the ability to send them a notification later on using their connectionId.
The API Gateway makes a best-effort attempt to detect disconnections and invokes the special $disconnect route whereupon our handler removes the connection record from the database.
Putting all of these pieces together with actual working code required me gathering a fair bit of information from different sources and working out the proper request fields and response formats but it all worked out wonderfully in the end. I’d like to share the working code examples for the handlers and some sample client code as well.
The Code
To define your handlers and when they get invoked you need to configure API Gateway to register your authorizer handler and the assorted route handlers. Using the Serverless toolkit this is straightforward and nicely documented. My configuration looks something like:
def authorizer(event, context):
    method_arn = event.get("methodArn")
    def deny(msg):
        return {"message": msg,
                "policyDocument": gen_policy(method_arn=method_arn, allow=False)
        }

    # get access token from query string
    query_params = event.get("queryStringParameters")
    if not query_params:
        return deny("missing queryStringParameters")
    if "token" not in query_params:
        return deny("missing token in query string")
    token = query_params["token"]
    if not token:
        return deny("empty token")

    # decode and verify JWT token
    decoded = None
    try:
        decoded = decode_token(token)
    except ExpiredSignatureError:
        return deny("Expired token")

    identity = decoded.get("identity")
    if not identity:
        raise Exception("invalid JWT; missing identity")

    # allow access
    policy = gen_policy(method_arn=method_arn, allow=True)
    context = {}  # can add more auth context info here if desired
    res = {
        "principalId": identity,
        "policyDocument": policy,
        "context": context
    }
    return res

def gen_policy(method_arn: str, allow: bool):
    effect = "Allow" if allow else "Deny"
    return {
        "Version": "2012-10-17",
        "Statement": [{
            "Action": "execute-api:Invoke",
            "Effect": effect,
            "Resource": method_arn
        }],
    }
This looks for a JWT in the query string and attempts to parse and validate it. If successful then an IAM policy is returned along with the decoded identity ID. The details of the event and policy can be found in the Lambda REQUEST WebSocket authorizer documentation.
If the client is granted Invoke access to the execute-api service then API Gateway will call our $connect route next:
def connect(event, context):
    ctx = event.get("requestContext", {})
    # get user and connection id
    conn_id = ctx.get("connectionId")
    auth = ctx.get("authorizer", {})
    user_id = auth.get("principalId")

    if not user_id:
        return make_response(401, "Not authorized")

    if not conn_id:
        raise Exception("missing connectionId")

    # save the connection id/user id pair in DB
    WebsocketClient.save_connection(
        user_id=user_id,
        connection_id=conn_id,
        domain_name=ctx["domainName"],
        stage=ctx["stage"],
    )
    db.session.commit()

    return make_response(200, "ok")

def make_response(status_code, body):
    if not isinstance(body, str):
        body = json.dumps(body)
    return {"statusCode": status_code, "body": body}
The purpose of this route is to store the user ID and connection ID in the database along with the connection’s domain and stage. We will use this to send our notification to the client.
def send_ws(user_id, message):
    """Push a notification to the user if they have an active websocket connection."""
    connections = WebsocketClient \
        .query \
        .filter_by(user_id=user_id) \
        .all()

    for conn in connections:
        conn.send(message)
And conn.send():
import boto3
import json
from notifier.db import db, Model
from botocore.exceptions import ClientError

class WebsocketClient(Model):

    ...

    def send(self, message):
        """Send a message to an active connection.

        :param message: can be anything that is JSON-serializable."""
        # get APIGW management client
        apigw_mgmt_client = boto3.client(
            "apigatewaymanagementapi",
            endpoint_url=f"https://{self.domain_name}/{self.stage}",
        )
        try:
            # send message
            apigw_mgmt_client.post_to_connection(
                Data=json.dumps(message).encode("utf-8"),
                ConnectionId=self.connection_id,
            )
        except ClientError as err:
            # gracefully handle case where client is no longer connected
            code = int(err.response["Error"]["Code"])
            if code == 410:
                # client gone, cleanup
                db.session.delete(self)
                db.session.commit()
                return
            raise
This is the where the real action happens. When we want to send a message from the server to the client we do it with the PostToConnection call. We need to provide the API Gateway domain and stage for it to construct the URL needed for the API call. Boto is simply doing HTTP requests to interact with the WebSocket connection as documented here. And you can use an HTTP client directly if you like to get connection info, send a message, and close the connection.
For completeness let’s look at handling the $disconnect route:
def disconnect(event, context):
    # get connection ID
    ctx = event.get("requestContext", {})
    conn_id = ctx.get("connectionId")
    if not conn_id:
        raise Exception("no connection id found")

    # delete the connection record from our DB
    WebsocketClient.delete_connection(connection_id=conn_id)
    db.session.commit()
    return make_response(200, "ok")
Client ➞ Server Messages
But wait, there’s more!
Our application is now ready to send notifications to our client, but if we want to be able to receive messages from the client we can support this case as well. We can define custom routes that are matched based on a route key as documented here and here. In practice this means that if API Gateway receives a JSON message it looks for the route name by default in a field called "action" and decides which Lambda to call based on that value. You can also create a $default route to catch any unhandled message if you prefer to do things that way as well.
Client Code
I implemented a basic WebSocket client in TypeScript using the standard WebSocket API. The only special thing it does is append your access token (managed with axios-jwt) to the WebSocket connection URL.
import { refreshTokenIfNeeded } from 'axios-jwt'

export const WEBSOCKET_EVENT = 'onwebsocketmessage'

export class WSEvent extends Event {
  message: object

  constructor(msg: object) {
    super(WEBSOCKET_EVENT)
    this.message = msg
  }
}

export type WSEventHandler = (ev: WSEvent) => void

export default class WSClient extends EventTarget {
  ws: WebSocket | undefined
  public isConnected: boolean = false
  reconnectTime: number = 1 // time in seconds before reconnect

  // connect
  public open = async () => {
    if (this.ws) {
      if (this.ws.readyState === WebSocket.CONNECTING || this.ws.readyState === WebSocket.OPEN)
        // already open/opening
        return

      this.ws.close() // do reconnect
    }

    // config from create-react-app+dotenv
    if (!process.env.REACT_APP_WS_URL) throw new Error('REACT_APP_WS_URL missing')
    const host = new URL(process.env.REACT_APP_WS_URL)

    // make sure auth token is fresh
    // requestRefresh defined elsewhere - see axios-jwt documentation
    const accessToken = await refreshTokenIfNeeded(requestRefresh)

    // add auth token to URL
    if (accessToken) host.searchParams.set('token', accessToken)

    // create new websocket client
    if (!this.ws) {
      this.ws = new WebSocket(String(host))
      this.ws.onopen = this.handleOpen
      this.ws.onclose = this.handleClose
      this.ws.onmessage = this.handleMessage
    }
  }

  // disconnect
  public close = () => {
    if (this.ws) this.ws.close()
  }

  public reconnect() {
    if (this.ws) this.ws.close()
    this.open()
  }

  // CALLBACKS

  protected handleOpen = (ev: Event) => {
    this.isConnected = true
    this.reconnectTime = 1 // reset reconnect timer

    const ws = this.ws
    if (!ws) return
  }

  protected handleClose = (ev: Event) => {
    this.isConnected = false

    // do reconnect
    setTimeout(() => {
      this.reconnectTime *= 2 // exponential backoff

      this.open()
    }, this.reconnectTime * 1000)

    // reconnect?
    this.open()
  }

  protected handleMessage = (ev: MessageEvent) => {
    // handle message received on WS
    const data = ev.data
    if (!data) return

    // try to parse as JSON
    const msg = JSON.parse(data)

    // create new websocket event and dispatch it to listeners
    const msgEvt = new WSEvent(msg)
    this.dispatchEvent(msgEvt)
  }
}
And as a bonus here’s a React hook that lets you register an event handler for WebSocket messages:
import * as React from 'react'
import WSClient, { WEBSOCKET_EVENT, WSEvent } from './api'

// singleton
let client: WSClient

interface IUseWebSocketClientArgs {
  onEvent?: (evt: WSEvent) => void
}

const useWebSocketClient = ({ onEvent }: IUseWebSocketClientArgs) => {
  React.useEffect(() => {
    if (!client) client = new WSClient()

    // listen for events
    if (onEvent) client.addEventListener(WEBSOCKET_EVENT, onEvent as EventListener)

    // ensure client is connected
    client.open()

    // cleanup handler
    return () => {
      if (onEvent) client.removeEventListener(WEBSOCKET_EVENT, onEvent as EventListener)
    }
  })
  return { client }
}

export default useWebSocketClient
Conclusion
Like many other serverless technologies this approach is certainly not practical for every use case but it is quite reasonable for a lot of common cases. While API Gateway WebSockets kind of support binary data payloads the serverless approach is probably best suited to your application if you’re passing occasional JSON messages around and dealing with relatively low throughput and volume.
At JetBridge we enjoy developing software applications with our clients that we can take pride in while expanding our areas of knowledge and expertise at the same time. Because we are frequently starting on new projects we have standardized on a harmonious and expressive set of tools and libraries and frameworks to help us rapidly lift off new applications and deliver as much value as we can with minimal repetition.
Our setup isn’t perfect or the end-all stack for every project, but it’s something we’ve evolved over years and it works quite well for us. We continue to learn about new tools and techniques and evolve our workflow so consider this more of a snapshot in time. If you aren’t reading this in August of 2019 then we have probably modified at least some parts of the stack.
Methodology
Our theory of software development is: don’t overcomplicate things.
Pragmatism and business value are the overriding concerns, not the latest and coolest and hippest frameworks or tech. We love playing with new cool stuff as much as any geek but we don’t believe in using something new just for the sake of being new or feeling unhip. Maturity and support should factor into deciding on a library or framework to base your application on, as should maintainability, community, available documentation and support, and of course what actual value it brings for us and our clients.
There is a tendency a lot of engineers have to make software more complex than it needs to be. To use non-standard tools when widely available and known tools exist that might already do the job. To try to shoehorn some neat piece of tech someone read about on Hacker News into something it isn’t really suited for. To depend on extra external services when there are already existing services that can be extended to perform the desired task. Using something too low-level when more abstraction would really simplify things, or using something too fancy and complicated when a simple system-level tool or language would accomplish things more expediently.
Simplicity is a strategy that when used wisely can greatly increase your code readability and maintainability, as well as result in easy to manage operational environments.
Frontend
By the time I am writing this all frameworks and libraries we use have likely been superseded by cool new hip JS jams and you will sneer at our unfashionable choices. Nevertheless, this is what is working well for us today:
React: Vue may have more stars on GitHub but React is still the industry standard and is used and supported actively by Facebook among others. Writing apps with React hooks really feels like we are getting closer and closer to functional programming, adding a new level of composibility and code reuse that was clumsily achieved with HOCs before.
Material-UI for React is a toolkit that has almost every sort of widget and utility you might need, powerful theming and styling options, integrates CSS-in-JS very smoothly and looks solid out of the box. It is essentially an implementation of the UI paradigms promulgated by Google so working within its constraints and visual language gives you a reasonable starting point.
Create-React-App/react-scripts: This really does everything you need and configures your new React app with sane defaults. You never need to monkey around with Webpack or HMR again. We have extended CRA/r-s to spit out new frontend projects with extra ESlint and prettier options and Storybook.
Storybook: We prefer to build a component library of small and larger components implemented in isolation using mock data, rather than always coding and testing the layout and design inside the complete app. This allows UI devs to work without being blocked on completion of backend endpoints, helps to enforce the concept of reusable and self-contained components, and lets us preview the various interface states easily.
TypeScript: Everyone uses TypeScript now because it’s good and you should too. It does take some getting used to and learning how to use it properly with React and Redux requires some small amount of learning, but it’s entirely worth it. Remember: you should never need to use any. And when you think you need to use any – you probably just need to add a type argument (generic).
ESLint: ESlint works great with TypeScript now! Don’t forget to set extends: ['plugin:@typescript-eslint/recommended', 'plugin:react/recommended', 'react-app']
Prettier: Set up your editor to run Prettier on your code when you hit save. Not only does it enforce a consistent style, but it also means you can be way way lazier about formatting your code. Less typing but better formatting.
Redux: Redux is nice… I guess. You do need some central place to store your user authentication info and stuff like that, and redux-persist is super handy. In the spirit of keeping things simple though, really ask yourself if you need redux for what you’re doing. Maybe you do, or maybe you can just use a hook or state instead. Sure maybe you think at first that you want to cache some API response in redux, but if you start adding server-side filtering or search or sorting, then it really is better off just as a simple API request inside your component.
Async/await: Stop using the Promise API! Catch exceptions in your UI components where you can actually present an error to the user rather than in your API layer.
Axios: The HTTP client of choice. We use JWT for authentication and recommend our axios-jwt interceptor module for taking care of token storage, authorization headers, and refresh.
Cypress: A popular tool for writing end-to-end tests. Cypress makes it easy to mock API responses and fully test your application as an automated web browser, either headless or used interactively. Can record videos and screenshots of every state and step of your tests to review what your UI looks like and how it reacts even after automated test runs.
I don’t believe there’s anything crazy or unusual here and that’s sort of the point. Stick with what’s standard unless you have a good reason not to.
Backend
Our backend services are always designed around the 12-factor app principles and always built to be cloud-native and when appropriate, serverless.
Most projects involve setting up your typical REST API, talking to other services, and performing CRUD on a PostgreSQL DB. Our go-to stack is:
Python 3.7. Python is clean, readable, has an impressively massive repository of community modules on PyPI, active core development, and a pretty good balance of high-level dynamic features without getting too obtuse or distracting.
Type annotations and type linting with mypy. Python does have type annotations, but they are very limited, not well integrated, and not usually very useful for catching mistakes. I hope the situation improves because many errors have to be discovered at runtime in Python when compared with languages like TypeScript or Go. This is the biggest drawback to Python in my opinion, but we do our best with mypy.
Flask, a lightweight web application framework. Flask is very nicely suited to building REST APIs, providing just enough structure to your application for handling WSGI, configuration, database connections, reusable API handlers, tracing/debugging (with AWS X-Ray), logging, exception handling, authentication, and flexible URL routing. We don’t lean on Flask for much besides providing the glue to hold everything together in a coherent application without imposing too much overhead or boilerplate.
SQLAlchemy for declarative ORM. Has nice features for handling Postgres dialect features such as UPSERT and JSONB. Ability to compose mixins for model and query classes is very powerful and something we are using more and more for features like soft deletion. Polymorphic subtypes are one of the most interesting SQLAlchemy features, allowing you to define a type discriminator column and instantiate appropriate model subclasses based on its value.
Flask-REST-API with Marshmallow helps succinctly define REST endpoints and serialization and validation with a minimum of boilerplate, making heavy use of decorators for a declarative feel when appropriate. As a bonus it also generates OpenAPI spec documents and comes with Swagger-UI to automatically provide documentation of every API endpoint and its arguments and response shapes without any extra effort required.
We are currently developing Flask-CRUD to further reduce boilerplate in the common cases for CRUD APIs and mandating strict data model access control checks.
In projects that require it we can use Heroku or just EC2 for hosting but all of our recent projects have been straightforward enough to build as serverless applications. You can read about our setup and the benefits this brings us in more detail in this article.
We have built a starter kit that ties together all of our backend pieces together in a powerful template to bootstrap new serverless Flask projects called sls-flask. If you’re thinking of building a database-backed REST API in Python, give it a try! You get a lot of power and flexibility in a small bundle. There isn’t anything particularly special or exotic included in it, but we believe the foundation it provides adds up to an extremely streamlined and modern development toolkit.
All of our tooling and templates are open source, and we often contribute bug reports and fixes upstream to modules that we make use of. We encourage you to try out our stack or let us know what you’re using if you’re happy with what you’re doing. Share and enjoy!
Other Platforms
🌎 Web
Python isn’t the only possibility for building webapp backends, and we’re also doing some projects in Go, where we can get the benefits of a compiled language and fantastic type safety and compile-time checks. If we can find something simple and powerful like flask-rest-api for Go, we’d certainly like to see how it can improve our setup and when it would be more appropriate. It’s been really excellent for microservices and projects where a lot of higher level patterns aren’t so necessary.
Ruby on Rails is a mature and battle-tested framework with many years of development and improvements behind it and allows for rapid prototyping and can be well-suited to MVP projects.
📱 Mobile
iOS
On iOS our language of choice is naturally Swift; it’s modern, strongly typed, and easy to read even for our Android teammates. The entire iOS platform has an awesome community working on a large array of open source projects in Swift (and Objective-C). We prefer Swift to react-native for apps of any size or complexity.
Android
When writing android apps we also choose tools that are mature, well known and have proven their value in business projects. The Android community is very active and creative, but it is wise to approach new fancy solutions with a dose of reserve. Here’s our stack:
Kotlin: It is an obvious choice either for new apps and for development of existing ones. It’s fully compatible with Java code and can even be (trans)compiled to JavaScript! The language is modern, robust and much less verbose than its predecessor. Another huge improvement over Java is null-safety.
Dagger: A dependency injection framework with a pretty steep learning curve but it does tremendous work in keeping the project well-organized. Even though it requires some initial setup, it proves its value as the project grows. Unlike most DI frameworks, Dagger doesn’t use reflection; it’s all based on compile-time code generation
RxJava: Streams for everyone! Reactive extensions allow us to build responsive, message-driven, reliable code. RxJava does everything in terms of multithreading, synchronization, data manipulation and together with Dagger it helps us keep the app’s components decoupled.
Retrofit: Turns your HTTP API into a Kotlin interface, works great with RxJava.
Android Jetpack, Data Binding: We also make heavy use of Android Jetpack (navigation!) as it plays well with the rest of our stack and solves some fundamental problems. Data binding helps to keep our views always up to date and additionally saves us lots of boilerplate code.
React-Native
React-native (with expo.io): For simple apps, react-native with TypeScript is easy and any React developer can just jump in and start developing a mobile app. We’re familiar with the many limitations of react-native, so as the project grows we either start writing some screens totally natively or we plan to start with the native SDK from the very beginning.